Have you ever felt limited by the default content types in WordPress? You’re not alone! Custom Post Types (CPTs) allow you to expand the horizons of your WordPress site by creating tailored content structures. Whether you’re building a portfolio, a recipe blog, or an online store, CPTs can help you organize your content in a way that makes sense for your users and enhances their experience. Let’s dive into what Custom Post Types are and how they can transform your website!
Understanding the Benefits of Custom Post Types
Custom Post Types bring a wealth of advantages to your WordPress experience. Here are some of the key benefits:
- Organized Content: Custom Post Types help you categorize different content types neatly. Whether it’s testimonials, events, or products, you can keep everything structured.
- SEO Optimization: With custom fields and taxonomies, you can optimize each post type for specific keywords, improving your site’s visibility on search engines.
- Enhanced User Experience: Custom Post Types can provide a more intuitive navigation structure for your audience, making it easier for them to find what they’re looking for.
- Customizable Features: Tailor fields and attributes to suit your content needs, allowing for a unique backend experience that matches your frontend design.
- Flexibility: Want to sell products? Showcase portfolio pieces? You can create CPTs that serve your specific needs without bloating your install with unnecessary themes or plugins.
In summary, Custom Post Types are a fantastic way to enhance your WordPress site. By leveraging CPTs, you can ensure that your content is organized, user-friendly, and optimized for both visitors and search engines. Ready to create your own custom content structure? Let’s go on this journey together!
How to Register Custom Post Types in WordPress
If you’re looking to take your WordPress site to the next level, one of the best ways to do this is by adding custom post types. This enables you to expand the types of content you share beyond just posts and pages. Whether it’s portfolios, testimonials, or products, custom post types can really enrich your site’s content.
Here’s a step-by-step guide on how to register custom post types in WordPress:
- Use the functions.php file: Navigate to your theme’s
functions.phpfile. You can find this in your theme’s directory or through the WordPress admin panel under Appearance > Theme Editor. - Add the Custom Post Type Code: You’ll want to use the
register_post_type()function. Here’s a basic example:
function create_my_custom_post() { register_post_type('portfolio', array( 'labels' => array( 'name' => __('Portfolios'), 'singular_name' => __('Portfolio') ), 'public' => true, 'has_archive' => true, 'rewrite' => array('slug' => 'portfolios'), 'supports' => array('title', 'editor', 'thumbnail'), ) );}add_action('init', 'create_my_custom_post');In this example, we’ve created a custom post type named ‘Portfolio’. You can customize the labels and parameters as per your needs.
After saving the changes, your new custom post type will appear in the WordPress admin menu! This is an exciting moment because now you have a dedicated area to manage your new type of content.
Using a Plugin to Create Custom Post Types
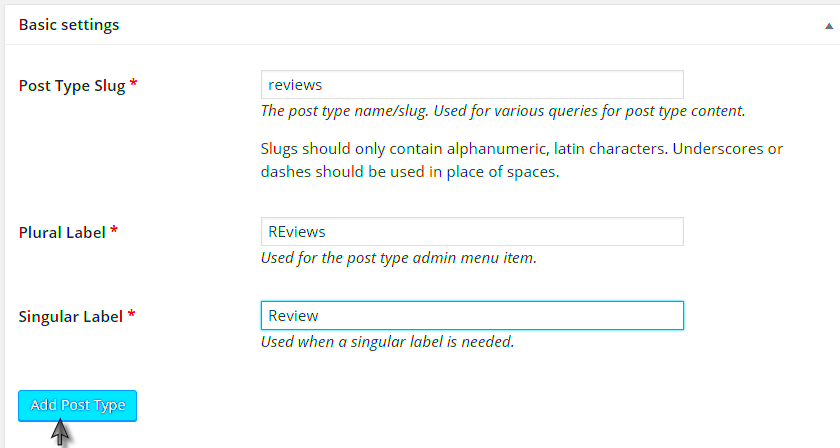
If diving into code sounds intimidating, or simply isn’t your style, don’t fret! There’s an easier way—using a plugin to create custom post types. Several plugins are designed to make this process as smooth as possible, allowing you to focus more on creating content rather than wrestling with code.
Here are some popular plugins you can use:
- Custom Post Type UI: An intuitive interface that allows you to register custom post types and taxonomies easily without any coding.
- Pods: A powerful plugin for managing custom content types and fields, Pods gives you added flexibility and options.
- Advanced Custom Fields (ACF): While primarily focused on custom fields, ACF can work alongside other plugins to enhance your custom post types with tailored fields.
Let’s take a closer look at how to use the Custom Post Type UI plugin:
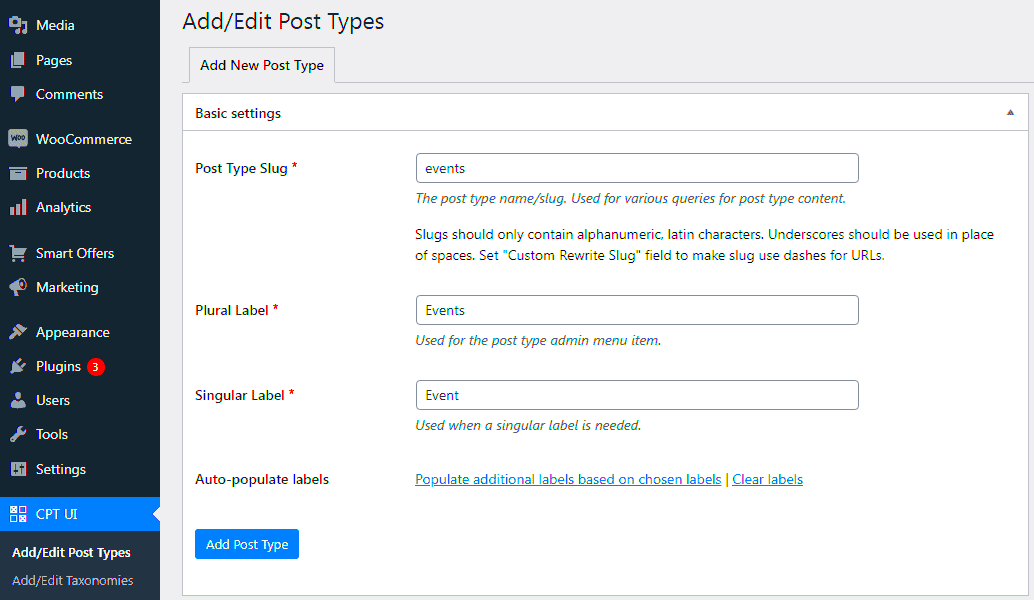
- Install and Activate: Go to the Plugins section in your WordPress dashboard, search for Custom Post Type UI, install, and activate it.
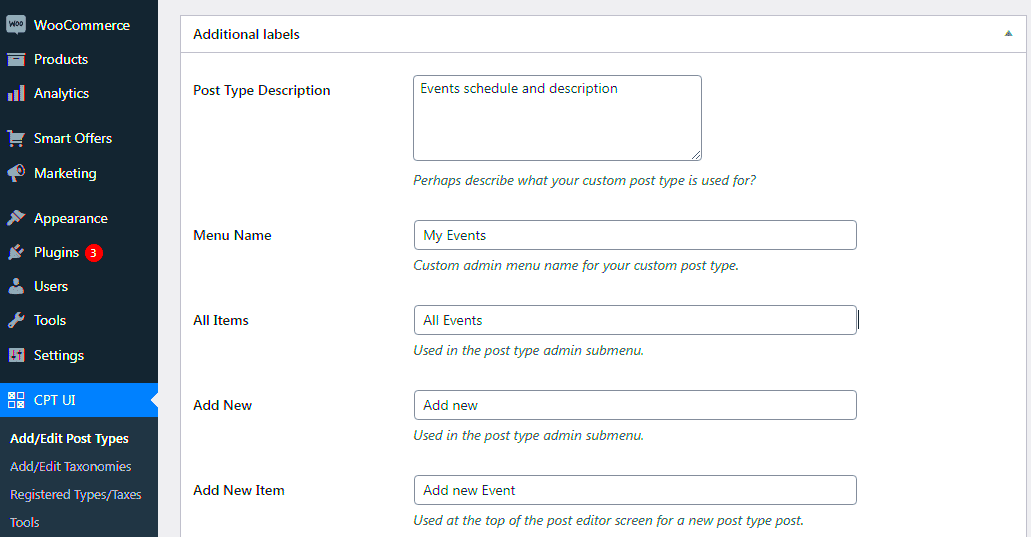
- Create a New Custom Post Type: Navigate to CPT UI section in the admin menu, choose “Add/Edit Post Types,” and fill out the required fields.
- Configure Settings: Customize various settings like labels, menu position, and supports options as per your needs.
- Save and Test: Once you’re done, save your changes, and voila! Your custom post type is now ready for action.
Using a plugin not only saves time but also minimizes the risk of error, making it a great choice for beginners or those who prefer a more visual approach to managing their content.
5. Adding Custom Fields to Your Custom Post Types
Once you’ve created your custom post types in WordPress, you might wonder how to add more specific information to them. This is where custom fields come into play. Custom fields allow you to include additional metadata for your posts, providing more structure to your content and giving users detailed information.
To add custom fields, you can use a plugin like Advanced Custom Fields (ACF). Here’s a quick step-by-step guide:
- Install the ACF Plugin: Go to your WordPress dashboard, click on ‘Plugins,’ then ‘Add New.’ Search for “Advanced Custom Fields,” install, and activate it.
- Create a Field Group: In the ACF menu, click on ‘Field Groups’ and then ‘Add New.’ Here, you can create a group of custom fields for your post type.
- Add Custom Fields: After naming your field group, use the ‘Add Field’ button to create fields. You can define a variety of field types such as text, image, or select options.
- Set Location Rules: You’ll need to specify where these fields will appear. Select your custom post type under the ‘Location’ rules.
- Publish the Field Group: Once you’re satisfied with your fields and settings, hit ‘Publish’ to make them live.
Now that you’ve set up your custom fields, you can personalize your custom post types even more. When editing a post, you’ll see new input areas for these fields, allowing you to add all the extra info you need!
6. Displaying Custom Post Types on Your Website
After you’ve created custom post types and perhaps even added custom fields, the next big step is displaying them on your website. You want your visitors to see all the cool custom content you’ve created, right? Thankfully, WordPress makes this easier than you might think.
Here’s how you can display your custom post types:
- Create a Custom Template: You can create a custom template file in your theme directory. Just copy the
single.phporarchive.phptemplate and rename it tosingle-{post_type}.phporarchive-{post_type}.phpdepending on whether it’s a single post or an archive of posts. - Modify Your Loop: Inside your custom template files, modify the loop to display your custom fields. Use
to output custom field values. - Display in the Sidebar or Widget: If your theme supports widgets, you can use a custom widget or shortcode to display your custom post types in the sidebar, footer, or any widget-ready area.
- Use Shortcodes: Create a shortcode in your theme’s functions.php file to easily display custom post types anywhere in your posts or pages.
Don’t forget to test how they look on the front end! Make sure they fit well with the design of your site, creating an engaging experience for your users.
So, whether you want to showcase a portfolio, recipes, or testimonials, customizing and displaying your post types can make your WordPress site truly unique!
Managing Custom Post Types in the WordPress Dashboard
Once you’ve added custom post types to your WordPress site, managing them is a breeze, thanks to the user-friendly WordPress dashboard. Let’s dive into how you can efficiently manage your custom post types.
When you create a custom post type, it appears in the WordPress dashboard just like regular posts and pages. This means you can easily access it from the left-hand menu. Here’s what to look for:
- Admin Menu: Your custom post type will have its own dedicated section in the admin menu. Click on it to see the list of all items you’ve added.
- Adding New Items: To add a new custom post, click on the ‘Add New’ button. This brings you to a familiar editor, where you can enter your title, content, and any custom fields you’ve set up.
- Editing Existing Items: From the list view, you can edit your custom posts by clicking the title or selecting ‘Edit’ from the options available.
- Categorizing and Tagging: Depending on how you’ve set them up, custom post types can have their own categories and tags, making it easier to organize your content.
- Status Management: You can manage the status of your custom posts, such as Draft, Pending Review, or Published, just like you would with standard posts.
Also, don’t forget to utilize the built-in features like search and filter options to help you quickly find specific content in your custom post type. This makes managing your content much more efficient!
Best Practices for Custom Post Types
Creating custom post types is fantastic for organizing your content more effectively, but there are some best practices to keep in mind to ensure everything runs smoothly.
- Consistent Naming Conventions: When naming your custom post types, stick to a consistent format. Use singular nouns (e.g., ‘Book’ instead of ‘Books’) to avoid confusion.
- Capitalize on Custom Taxonomies: Combine your custom post types with custom taxonomies. This allows for better categorization and filtering of your content.
- Make Use of Custom Fields: Utilize custom fields to add additional information relevant to your post type. This boosts your content’s functionality and presentation.
- Provide a Clear User Interface: If others will be managing the content, ensure that your custom post type’s interface is intuitive. This includes clear labels and helpful descriptions.
- Use Plugins Wisely: While it’s great to have all these features at your disposal, be cautious about overloading your site with too many plugins that create custom post types. Strike a balance to maintain site speed and performance.
By following these best practices, not only will you improve your site’s organization, but you’ll also make it easier for you and others to manage content in the long run. Happy blogging!
Troubleshooting Common Issues with Custom Post Types
Adding custom post types to your WordPress site can breathe new life into your content management, but sometimes, things don’t go as planned. Don’t worry! Here are some common issues you might encounter, along with simple troubleshooting tips to get you back on track:
- Custom Post Type Not Appearing: If your custom post type is not showing up in the dashboard, double-check your registration code. Ensure you have the required parameters set and that you’ve flushed your permalinks by going to Settings > Permalinks and simply clicking Save Changes.
- Content Not Displaying on Frontend: If you’ve added content but it isn’t showing on your site, it could be due to a theme template issue. Check if your theme has a suitable template for your custom post type. If not, you might need to create one manually or use a plugin that supports displaying custom post types.
- Taxonomies Not Working: When taxonomies (like categories or tags) aren’t appearing for your custom post types, make sure they are registered correctly. Review the arguments passed when registering the post type and ensure you’ve included the correct ‘taxonomies’ parameter.
- Permissions Issues: Sometimes, users can’t access or edit custom post types. Check the user roles and capabilities set in the registration function. Ensure that the user has the right permissions to manage and view the custom post types.
By keeping these common issues in mind while adding custom post types, you’ll be able to troubleshoot and maintain a smooth content management experience on your WordPress website!
Conclusion: Enhancing Your WordPress Site with Custom Post Types
Incorporating custom post types into your WordPress site is like adding a fresh coat of paint or a stylish new addition to your home—it enhances its overall appeal and functionality. Whether you’re a blogger, a business owner, or running an online store, custom post types provide versatile ways to organize and present your content.
Here’s why embracing custom post types is a smart choice:
- Improved Organization: You can separate different content types (like portfolios, reviews, or testimonials), making it easier for users to navigate your site.
- Better SEO: By structuring content wisely, search engines can crawl and index it more effectively, leading to potential better rankings.
- Enhanced User Experience: Visitors appreciate a well-organized site, which can lead to higher engagement and conversion rates.
To wrap it all up, custom post types are a powerful tool that, when used effectively, can completely transform how you manage and present content on your WordPress site. Experiment with different types, keep learning, and before you know it, your website will not only look great but function seamlessly!

