WooCommerce is a powerful eCommerce platform that allows you to sell products online easily. One of its notable features is the ability to customize shipping settings, including the “Ship From Location.” This feature lets you specify where your products are shipped from, which can be crucial for managing logistics, calculating shipping costs, and providing accurate delivery estimates to your customers. In this guide, we’ll explore how to effectively add a Ship From Location tag in WooCommerce, ensuring your shipping process runs smoothly.
Why Add a Ship From Location Tag?

So, why should you bother with adding a Ship From Location tag in WooCommerce? Let’s break down the benefits:
- Accurate Shipping Rates: By specifying where your products are being shipped from, WooCommerce can calculate the correct shipping rates based on the distance to the customer’s location. This helps in avoiding overcharging or undercharging for shipping.
- Improved Delivery Estimates: Knowing where the items are shipped from allows for more precise delivery estimates, which enhances the overall customer experience. Customers appreciate being informed about when they can expect their orders to arrive.
- Optimized Logistics: If you have multiple warehouses or suppliers, each with different shipping origins, adding a Ship From Location tag allows for better inventory management and optimized shipping routes.
- Increased Trust: Transparency in shipping processes builds trust between you and your customers. When they see accurate shipping information, they’re more likely to feel confident in their purchase.
In conclusion, adding a Ship From Location tag is an essential step for any WooCommerce store owner looking to streamline shipping logistics and improve customer satisfaction. It pays off in accuracy and trust, making it a worthwhile investment in your eCommerce strategy.
3. Prerequisites for Setting Up Ship From Location
Before diving into the nitty-gritty of adding a “Ship From Location” tag in your WooCommerce store, it’s important to cover a few prerequisites. This ensures a smooth setup process and helps you avoid any hiccups along the way. Here’s what you’ll need:
- WooCommerce Plugin: First off, make sure your WordPress site has the WooCommerce plugin installed and activated. If you haven’t done that yet, no worries! It’s free and easy to install from the WordPress plugin repository.
- Updated WordPress Version: Ensure that you’re using an up-to-date version of WordPress. Outdated versions can lead to compatibility issues, especially with plugins.
- Shipping Class Setup: Familiarize yourself with setting up shipping classes within WooCommerce. If you haven’t created any shipping classes, you’ll want to do that before adding the ship-from location.
- Product Location Information: Prepare the physical addresses from which you’ll be shipping your products. You’ll need this for accurately configuring shipping rates and options for your customers.
- Admin Access: Since you’ll be changing settings in WooCommerce, ensure you have admin-level access to your WordPress dashboard.
Once you’ve got these prerequisites covered, you’ll be ready to move forward in adding the “Ship From Location” tag. It’s all about setting the groundwork for an efficient shipping process!
4. Step-by-Step Guide to Adding Ship From Location Tag
Adding a “Ship From Location” tag in WooCommerce is straightforward, but it can make a huge difference in how you manage your orders and shipping costs. Let’s break it down step-by-step:
- Log into Your WordPress Dashboard: Start by logging into your WordPress admin area. Make sure you’re using admin credentials to access all necessary settings.
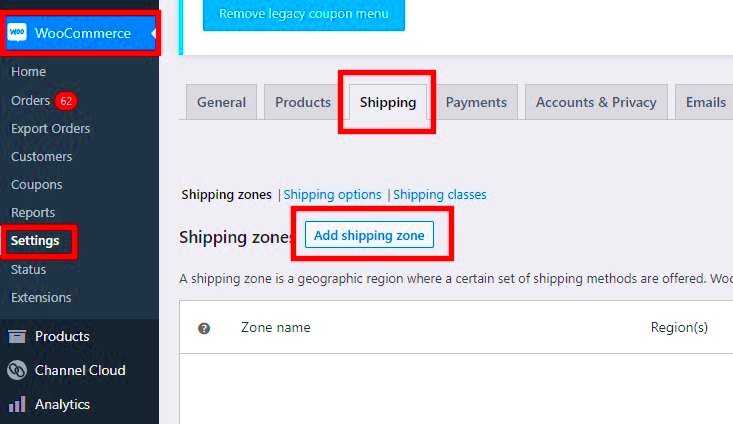
- Navigate to WooCommerce Settings: Once in the dashboard, go to the left sidebar and click on WooCommerce > Settings.
- Open Shipping Settings: Within the WooCommerce settings, you’ll find a tab labeled Shipping. Click on that to access shipping options.
- Add Shipping Zone: If you haven’t already set up shipping zones, you’ll need to do that first. Click on “Add Shipping Zone” and set a name, then specify the region or country.
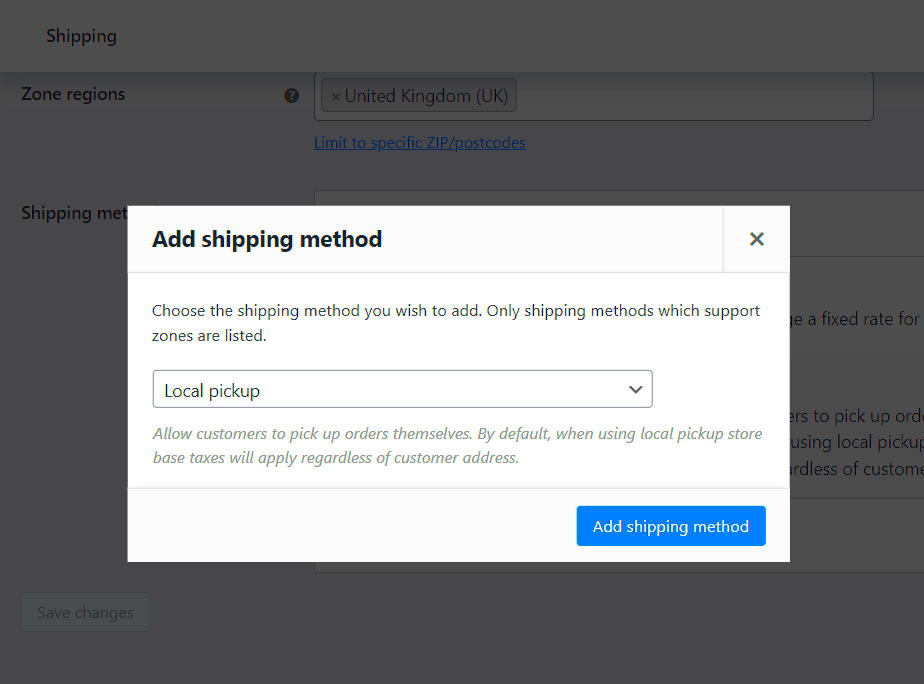
- Add Shipping Methods: After defining your shipping zones, it’s time to add shipping methods. Click “Add shipping method” to include options like flat rate or free shipping.
- Handle Ship From Location: Find the option for managing the “Ship From Location.” You should see fields where you can enter the address or select an existing location from your shipping zones.
- Save Changes: Don’t forget to click the Save Changes button at the bottom of the page to ensure all your new settings are stored.
And there you go! You’ve successfully added a “Ship From Location” tag to your WooCommerce store. This simple yet effective step can help streamline your shipping process and provide better clarity for both you and your customers.
5. Testing Your Ship From Location Configuration
After you’ve set up your “Ship From Location” in WooCommerce, the next step is to ensure everything is configured correctly. Testing your shipping settings helps you confirm that your customers will receive accurate shipping quotes and that you’re able to manage shipping efficiently. Let’s dive into some easy ways to conduct your tests.
Step 1: Create a Test Product
If you don’t already have one, create a simple test product with various shipping classes. This will allow you to see how the shipping rates change based on different conditions.
Step 2: Place a Test Order
- Go to your store and add the test product to your cart.
- Proceed to the checkout page.
- Enter different shipping addresses to see how the “Ship From Location” affects shipping rates.
Step 3: Verify Rates Displayed
Check to see if the shipping rates reflect the expected costs based on your configuration. Remember to examine:
- Local and international shipping rates
- Different shipping classes if applicable
- Any additional handling charges
Step 4: Review Emails
Once the order is placed, send a confirmation email to yourself. Verify that the shipping information corresponds correctly with your configuration.
By running through these steps, you’ll have a better grasp on how your “Ship From Location” is functioning. It’s vital to ensure everything works smoothly to provide a great experience for your customers.
6. Common Issues and Troubleshooting Tips
Even with careful configuration, sometimes issues can arise with your “Ship From Location” settings in WooCommerce. Here are some common problems and how you can tackle them:
Issue 1: Incorrect Shipping Rates
If you notice the shipping rates are higher or lower than expected, it can often be traced back to:
- Inaccurate weights or dimensions for the products
- Incorrect regional settings in your shipping zones
Double-check your product settings and shipping zones to resolve this issue.
Issue 2: Rates Not Showing at Checkout
If shipping rates aren’t appearing for customers at checkout, consider checking:
| Possible Cause | Solution |
|---|---|
| Shipping zones not set up correctly | Ensure you’ve defined shipping zones that match customer locations. |
| Shipping classes not assigned | Ensure all products have proper shipping classes assigned. |
Issue 3: Conflicting Plugins
Sometimes, other plugins can cause conflicts with your shipping settings. If you recently installed a new plugin and notice shipping issues, try deactivating that plugin temporarily to see if the problem persists.
Don’t hesitate to refer to WooCommerce documentation or support channels if you find yourself stuck. Troubleshooting can be tricky, but with patience, you can keep your shipping process running smoothly!
7. Additional Resources and Plugins for Shipping Management
When it comes to efficiently managing shipping in your WooCommerce store, leveraging additional resources and plugins can make a world of difference. With so many options available, it’s important to choose the ones that best fit your needs. Here, I’ll highlight a few essential plugins and resources that can enhance your shipping management process.
1. WooCommerce Shipping & Tax: This official plugin offers an all-in-one solution for calculating shipping rates and tax automatically. It integrates seamlessly with your WooCommerce store, saving you time by keeping everything in one place.
2. Table Rate Shipping: This plugin allows you to create highly customizable shipping rates based on various conditions such as weight, price, and destination. It’s a must-have for businesses that have specific shipping needs.
3. Advanced Flat Rate Shipping: With this plugin, you can manage flat-rate shipping based on different criteria like products, categories, or even customer roles. It’s very user-friendly and makes calculating shipping costs straightforward.
4. UPS, FedEx, and USPS Plugins: If you ship using popular carriers, consider using their dedicated WooCommerce plugins. These tools can help you pull live shipping rates directly from the carriers, ensuring that your customers see accurate shipping costs at checkout.
5. Documentation and Forums: Don’t underestimate the power of online communities! Websites like the WooCommerce Support Forum and various YouTube channels can provide valuable tutorials and troubleshooting tips.
By exploring these resources and plugins, you’ll position your WooCommerce store for more efficient shipping management, translating into smoother operations and happier customers.
8. Conclusion
In conclusion, adding a “Ship From Location” tag within your WooCommerce store is more than just a simple step; it’s a strategic move that can significantly enhance your shipping operations. By understanding how to set it up and leveraging additional resources and plugins for shipping management, you not only streamline your order fulfillment process but also improve customer satisfaction.
Remember, shipping can make or break the shopping experience for your customers. When they know exactly when and where their products are coming from, they feel more secure in their purchase. Plus, having an organized shipping setup makes your life as a store owner so much easier!
So, dive into the world of WooCommerce shipping management, experiment with the plugins mentioned, and don’t hesitate to consult additional resources when needed. The goal here is straightforward: to create a seamless, user-friendly experience that keeps customers returning for more. Happy shipping!


