The Stripe Express API provides a streamlined way for developers to create custom, user-friendly payment solutions. It’s particularly tailored for platforms like WooCommerce, ensuring that online merchants can handle transactions efficiently while offering a smooth user experience. By accessing the Express API, developers can leverage Stripe’s capabilities—offering features such as payment processing, subscription management, and detailed reporting—all with just a few lines of code.
For WooCommerce users, this means integrating powerful payment functionalities without getting bogged down in complex coding or technical details. Whether you’re a seasoned developer or a small business owner looking to enhance your online store, understanding how to access the Stripe Express API can significantly improve your payment handling and customer experience.
Prerequisites for Accessing Stripe Express API

Before diving into the nitty-gritty of the Stripe Express API in WooCommerce, there are several prerequisites you need to check off your list. This will ensure a smooth integration process and avoid potential hiccups along the way. Here’s what you need:
- 1. WooCommerce Installation: Make sure you have a functioning WooCommerce site up and running. You can install WooCommerce from your WordPress dashboard if you haven’t done so already.
- 2. Stripe Account: You’ll need an active Stripe account. If you don’t have one, it’s easy to set up by visiting the Stripe website.
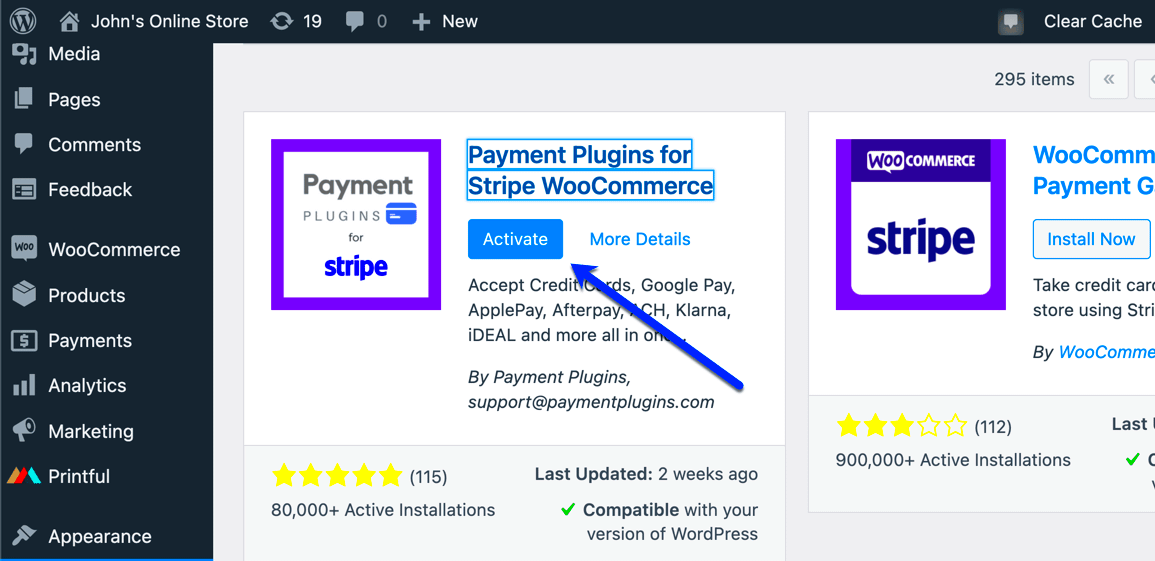
- 3. Stripe Plugin for WooCommerce: Install and activate the official Stripe payment gateway plugin for WooCommerce. This plugin acts as a bridge between WooCommerce and your Stripe account.
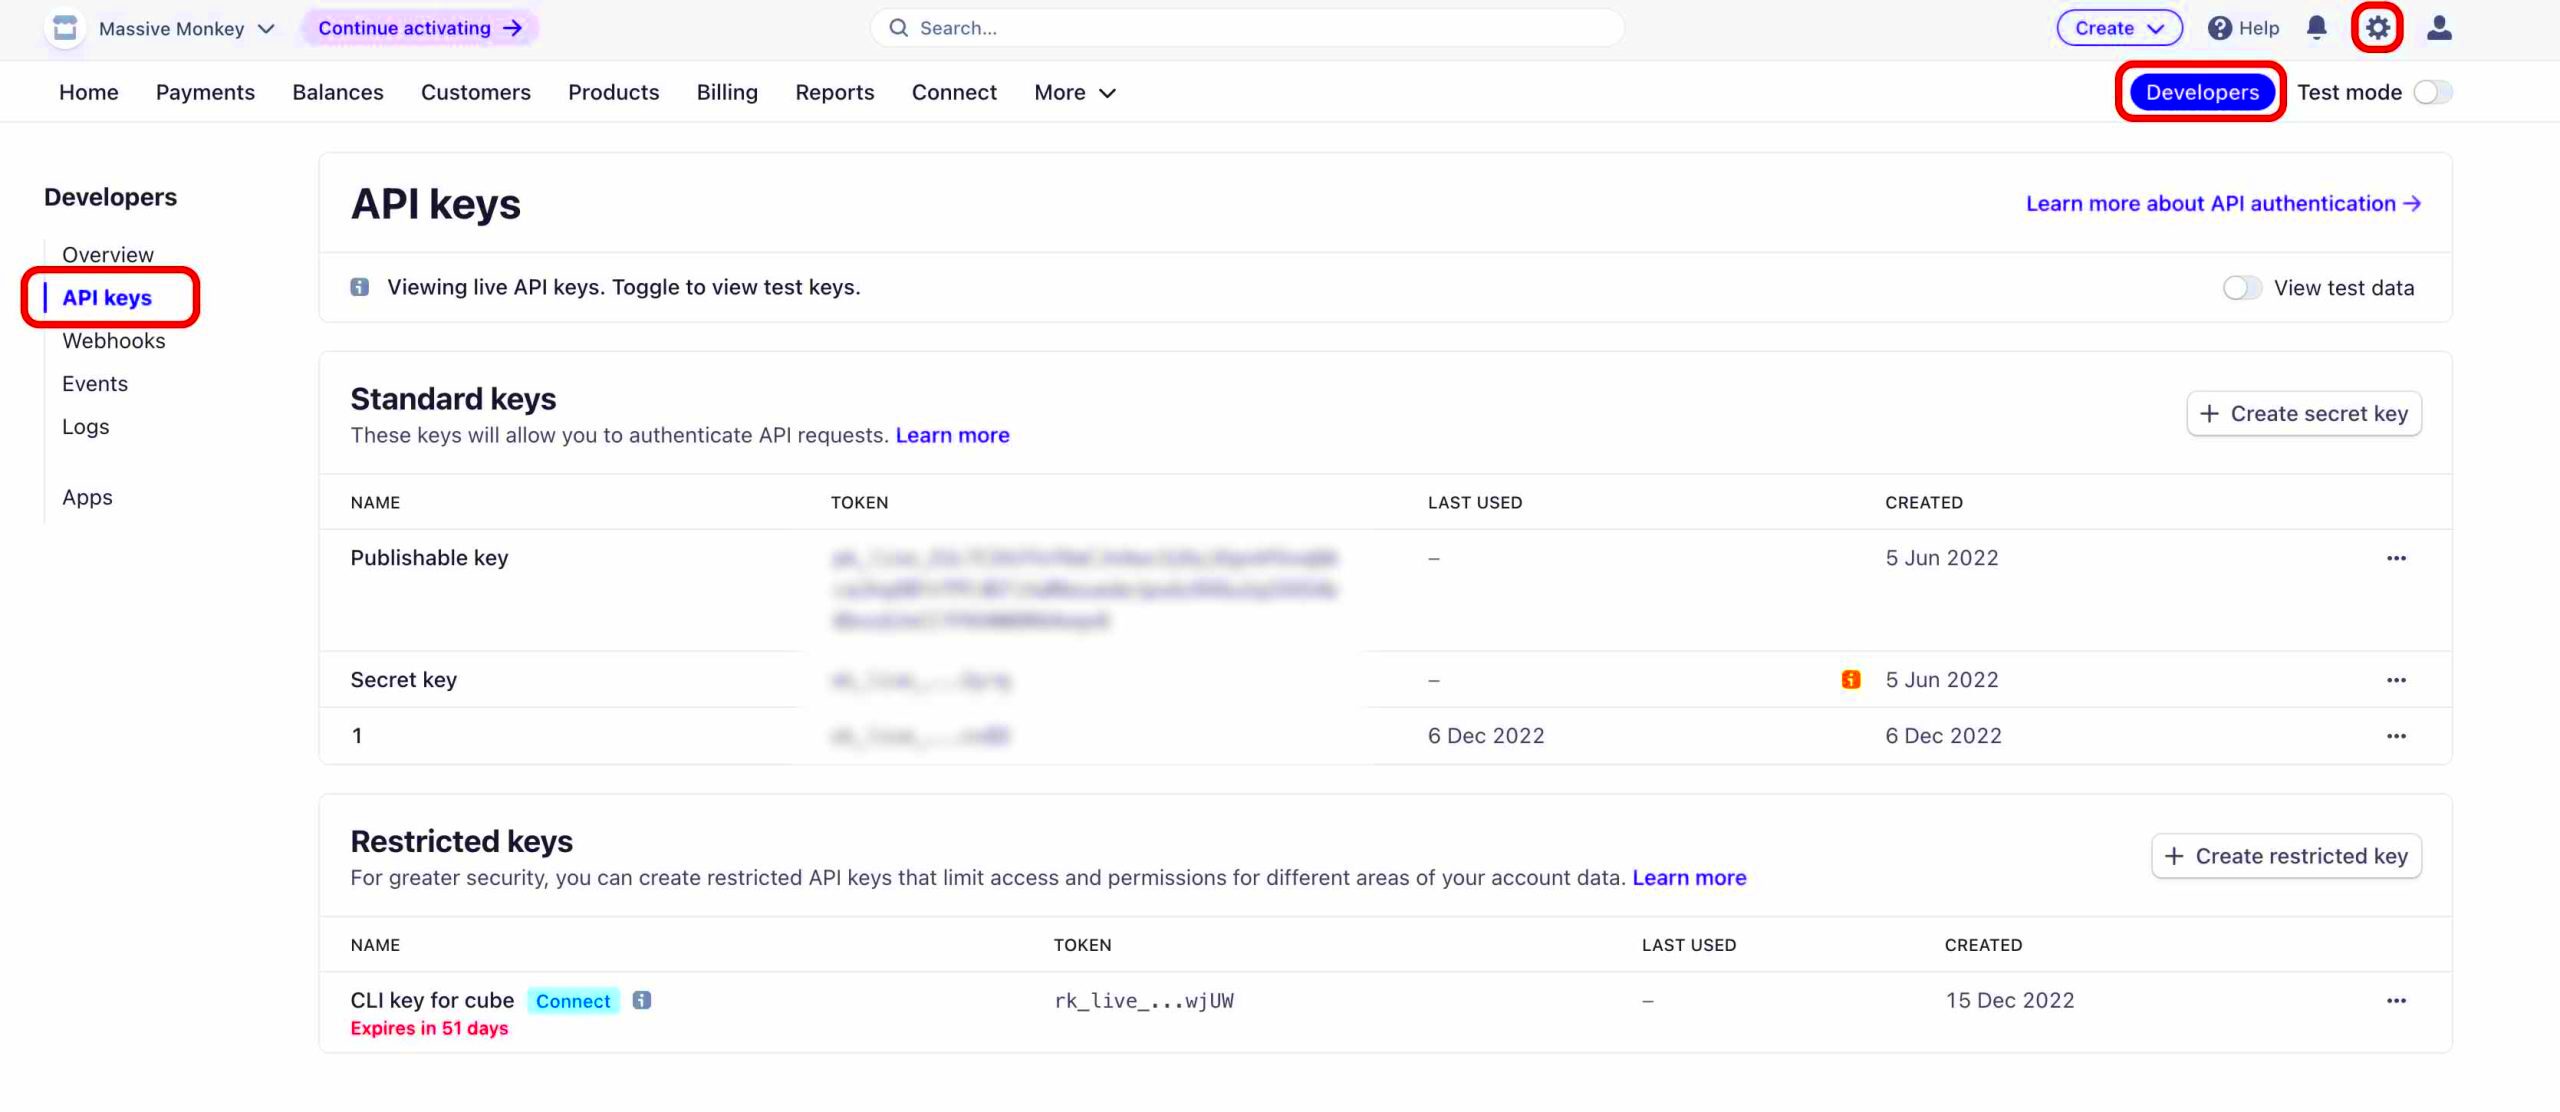
- 4. API Keys: Once you have your Stripe account, obtain your Publishable and Secret API keys from the Stripe dashboard. These are crucial for authentication when accessing the API.
- 5. Knowledge of PHP/HTML: Familiarity with PHP or HTML is essential, especially if you plan to customize the integration. While basic knowledge is sufficient for most tasks, being comfortable with code will help you troubleshoot issues more effectively.
Getting these prerequisites in check will set the stage for a seamless integration process. The better prepared you are, the smoother your journey with the Stripe Express API will be!
Setting Up Your WooCommerce Environment

Before diving into the specifics of integrating the Stripe Express API with your WooCommerce site, it’s essential to ensure that your WooCommerce environment is properly set up. This means you should have a functioning WordPress site with WooCommerce installed and activated. If you’re just getting started, here’s a simple checklist to help you through the setup:
- WordPress Installation: Make sure you have the latest version of WordPress installed. You can download it from the official website and follow the installation guide.
- WooCommerce Plugin: Install and activate the WooCommerce plugin. This can easily be done by navigating to Plugins > Add New in your WordPress dashboard, searching for “WooCommerce”, and clicking install.
- Theme Compatibility: Choose a WooCommerce-compatible theme. Some popular options include Storefront, Astra, and OceanWP, which are optimized for smooth functionality with WooCommerce.
- SSL Certificate: Ensure you have an SSL certificate installed on your site. This is crucial for secure transactions, especially when handling sensitive payment information.
- Enable Permalinks: Set your permalink structure to something user-friendly, like “Post name.” You can find this in your WordPress dashboard under Settings > Permalinks.
Once you have confirmed that your environment is ready, you will have laid a solid foundation for your Stripe API integration. Don’t rush; take your time to ensure that everything is set up correctly. This will save you from potential headaches later on!
Installing the Required Plugins for Stripe Integration

Now that your WooCommerce environment is set up, it’s time to focus on the required plugins for Stripe integration. Fortunately, there are a couple of plugins you’ll need to get the job done. Here’s a quick breakdown of the essential
| Plugin Name | Description | Installation Link |
|---|---|---|
| WooCommerce Stripe Payment Gateway | This is the official Stripe plugin for WooCommerce. It allows you to accept payments through Stripe seamlessly. | Install Here |
| WooCommerce Subscriptions (Optional) | If you plan on offering subscription-based products, this plugin will help manage recurring payments via Stripe. | Install Here |
To install these plugins, navigate to your WordPress dashboard, go to Plugins > Add New, search for the respective plugin names, and click the Install Now button. Once installed, don’t forget to activate them!
With the right plugins in place, you’re now one step closer to integrating the Stripe Express API into your WooCommerce store. These plugins will provide the necessary functionality to process transactions securely, making it an essential part of your eCommerce strategy.
5. Configuring Stripe Express API in WooCommerce

Getting your Stripe Express API set up in WooCommerce isn’t just a straightforward task; it’s an exciting venture into a world of wider payment options for your customers! Once you’ve integrated everything, managing your business finances can get a lot easier. So, how do we configure it effectively? Follow these simple steps:
- Install the Stripe Plugin: Start by installing the official Stripe plugin for WooCommerce from the plugins section in your WordPress dashboard. Simply search for “WooCommerce Stripe Payment Gateway” and install it.
- Activate the Plugin: Once installed, activate the plugin to start using it on your site. You’ll find it listed under the WooCommerce settings.
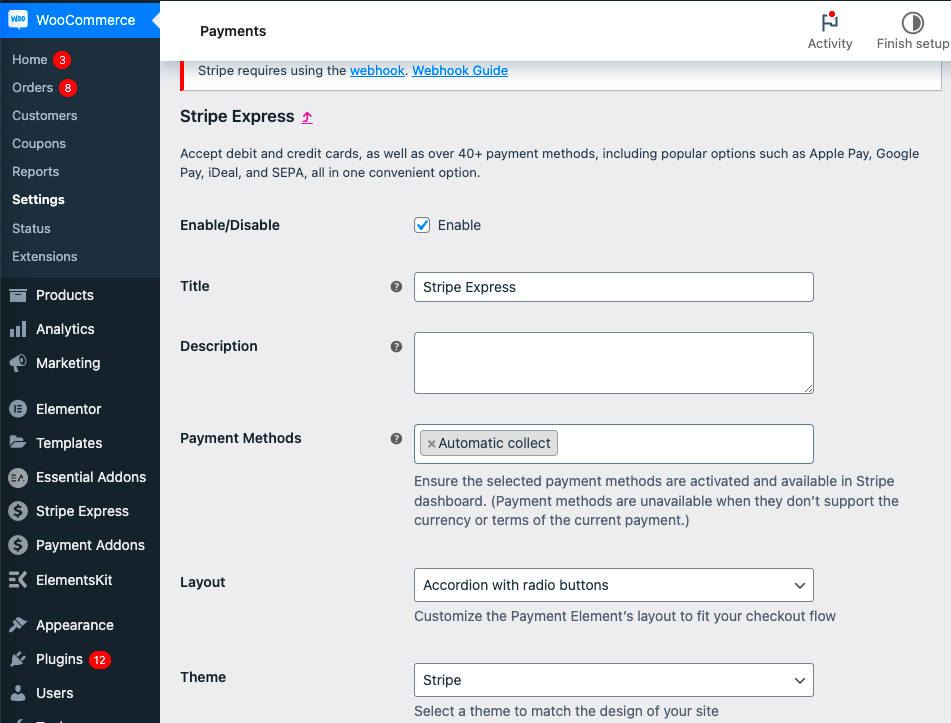
- Initialize Stripe Settings: Navigate to WooCommerce > Settings > Payments. Here, you’ll find a Stripe option. Click on it to access the API key configuration.
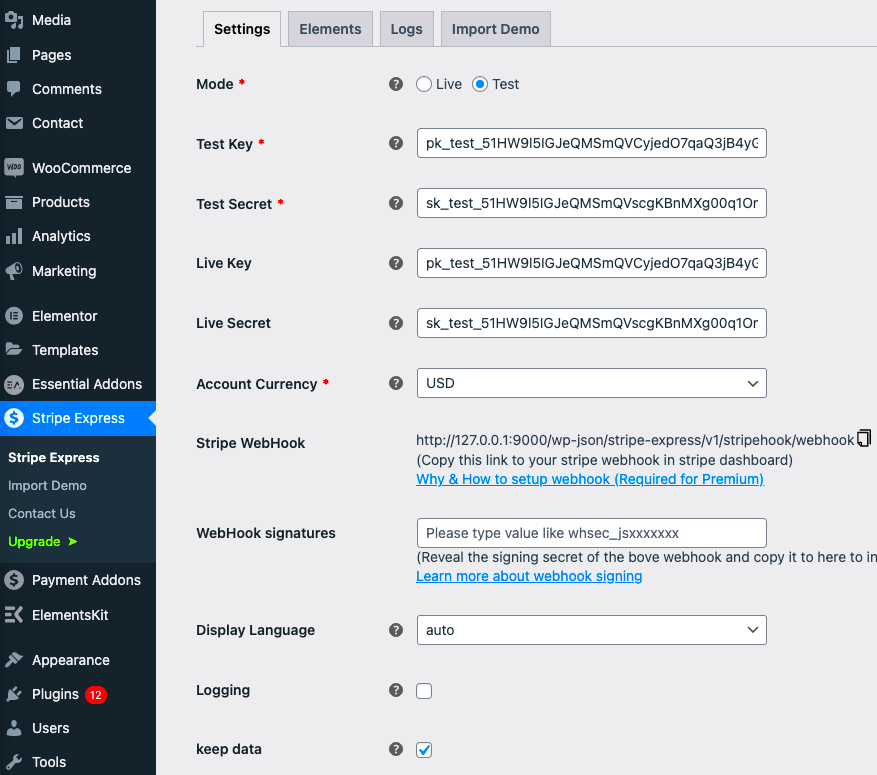
- Input API Keys: You will need to enter both your Stripe Publishable and Secret keys. These can be found in your Stripe account under the API settings. Make sure you’re using the right keys for the environment you’re working in—test or live.
- Enable Express Checkout: Don’t forget to enable the “Express Checkout” feature within the Stripe settings. This is where the true magic happens, allowing for quicker customer checkouts!
- Customize Settings: Adjust any preferences like payment method descriptions, settings for handling refunds, and receipt customization.
Once you save your configurations, your Stripe Express API should be up and running! Make sure to check each setting thoroughly to ensure seamless transactions and a hassle-free experience for your customers.
6. Testing the Integration
Now that we’ve configured the Stripe Express API in WooCommerce, it’s time to ensure everything is working correctly. Testing is a critical step that some may overlook, but it’s vital for smooth operation. Here’s how to go about it:
- Enable Test Mode: Go back to your Stripe settings in WooCommerce and enable test mode. This feature allows you to create test transactions without affecting real customer accounts.
- Use Test Cards: Stripe provides a list of test card numbers. Use these to simulate various scenarios such as successful payments, failed transactions, and cards that require additional authentication.
- Process Transactions: Attempt transactions using the test cards. Ensure that all types of payments (successful, failed, errors) work as expected, and monitor whether the appropriate messages appear during the checkout process.
- Check the Dashboard: Look at your Stripe dashboard to verify that the test transactions appear there. This real-time feedback can help you identify any discrepancies quickly.
| Card Type | Card Number |
|---|---|
| Visa | 4242 4242 4242 4242 |
| MasterCard | 5555 5555 5555 4444 |
| American Express | 3782 822463 10005 |
Remember, tests are not just for the sake of doing them; they can uncover potential issues before your customers do. Once everything is running smoothly, you can confidently switch off test mode and embrace real transactions, knowing you’ve done your due diligence!
Common Issues and Troubleshooting
When integrating the Stripe Express API with your WooCommerce store, you might encounter a few bumps along the way. Don’t worry; these issues are common and can often be resolved with a bit of troubleshooting. Let’s go over some of the most frequently asked questions and their solutions.
1. Connection Errors
If you’re experiencing issues connecting WooCommerce to Stripe, ensure that you’ve correctly set up your API keys. Here are some steps you can take:
- Double-check that the API keys from your Stripe Dashboard have been copied accurately.
- Make sure that you are using the correct mode (Live/Test) that corresponds to your API keys.
- Check your website’s server settings for anything that might be blocking API requests.
2. Payment Declines
If customers face issues with payment declines, this could stem from various reasons:
- Ensure that the customer’s credit card details are entered accurately.
- Verify that the customer’s card is supported by Stripe and that it’s not expired.
- Make sure you don’t have any fraud protection settings in WooCommerce that might inadvertently block legitimate transactions.
3. Plugin Incompatibility
Sometimes, other plugins may conflict with your Stripe integration. To troubleshoot:
- Deactivate other plugins one at a time to see if the issue persists.
- Ensure all plugins are up to date with their latest versions.
Remember, a little patience goes a long way when troubleshooting. If issues persist, don’t hesitate to reach out to Stripe support or check WooCommerce forums for assistance!
Conclusion: Enhancing Your WooCommerce Store with Stripe Express API
Integrating the Stripe Express API into your WooCommerce store can truly elevate your online business. Not only does it make the payment process seamless for users, but it also offers various benefits that contribute to better customer experiences.
1. Streamlined Payments
By utilizing Stripe Express, you can simplify the payment process. With features like one-click checkout, saved payment methods, and easy refunds, you’re catering to your customers’ needs and enhancing their shopping experience.
2. Enhanced Security
Stripe is known for its robust security measures, including PCI compliance and advanced fraud detection. Your customers can shop with peace of mind, knowing that their payment information is safeguarded.
3. Better Insights and Analytics
With comprehensive reporting tools, you’ll gain valuable insights into your sales patterns and customer behavior. Use these insights to make informed business decisions that can drive growth!
In summary, accessing the Stripe Express API within WooCommerce is not just a technical integration; it’s an opportunity to transform your online store into a more efficient, secure, and user-friendly platform. So go ahead, implement these strategies, and watch your store thrive!


