So, you’re ready to dive into the world of blogging or website creation? Awesome choice! One of the most popular platforms to get you started is WordPress, and teaming it up with Bluehost is like hitting the jackpot. WordPress is a powerful content management system (CMS) that allows you to create, edit, and manage your website without needing to be a tech wizard. Bluehost, on the other hand, is a hosting provider that’s highly recommended for
Why Choose Bluehost for Your WordPress Site?

When it comes to selecting a hosting provider, you’ve got options, but Bluehost really stands out. Here are some compelling reasons to consider:
- WordPress Recommended: Bluehost is officially recommended by WordPress.org. This means they specifically design their services to support the WordPress environment, ensuring a smoother experience.
- Easy Installation: Setting up WordPress on Bluehost is a breeze. They offer a one-click installation process, meaning you can get your site up and running in minutes.
- Performance and Speed: Bluehost provides excellent server performance, which means your website will load quickly—something that’s crucial for user experience and SEO.
- 24/7 Customer Support: Encounter an issue? No problem! Bluehost offers round-the-clock support via chat, phone, or email, so help is always just a click away.
- Affordable Plans: With Bluehost, you get a range of hosting plans that cater to different budgets. You can start with a low-cost shared hosting plan and upgrade as your site grows.
- Free Domain Name: When you sign up, Bluehost gives you a free domain for the first year, which is a nice little perk to help you save some cash.
- User-Friendly Control Panel: They offer an intuitive control panel, making it simple to navigate and manage your site settings.
Considering these benefits, Bluehost clearly makes a strong case for being the go-to host for all your WordPress endeavors. If you want a hassle-free experience in building your online presence, selecting Bluehost is a solid move.
Setting Up Your Bluehost Account
Getting started with Bluehost is a breeze! First things first, you need to choose a hosting plan that suits your needs. Bluehost offers a variety of packages, making it easy for beginners and seasoned website owners alike to find the right fit. Most new users typically go for the Basic or Plus plans. Here’s a breakdown:
- Basic: Ideal for hosting a single site, comes with a free SSL certificate, and 50 GB of storage.
- Plus: Great for multiple sites, with no storage limits, plus the same features as the Basic plan.
- Choice Plus: Includes additional features like domain privacy protection and automated backups.
Once you’ve chosen your plan, it’s time to create your Bluehost account. You’ll need to fill in some personal information like your name, email address, and a secure password. It’s essential to choose a password that’s strong and unique to keep your account safe.
After setting up your account details, you’ll be prompted to enter payment information. Bluehost often has promotional offers, so make sure to check if you can snag a discount or a special deal. Don’t forget to review any optional add-ons that might be suggested, such as SEO tools or site backups. However, you can skip these if they don’t align with your current needs.
Once your payment is processed, you’ll receive a confirmation email with your account details. Congratulations! You’re all set to dive into your Bluehost dashboard and start building your website!
Choosing a Domain Name
Your domain name is basically your online address – it’s how people will find you on the web! When it comes to choosing a domain name, you want it to be memorable, easy to spell, and representative of your brand or purpose. Here are a few tips to make the selection process smoother:
- Keep it simple: Aim for a name that’s short and sweet. The easier it is to type, the better! Avoid complex words or unusual spellings.
- Another brainstorming session: Think about keywords related to your site or business. Incorporating relevant terms can help with SEO and give users an idea of what to expect.
- .com is king: While there are many domain extensions, .com is still the most recognizable and trusted by users. It’s the route you generally want to go.
- Check availability: Before you fall in love with a domain, make sure it’s available. You can search on Bluehost’s domain registration page to see if it’s already taken.
Once you’ve found the perfect domain name, you can register it directly through Bluehost during your setup process. If your first choice isn’t available, don’t get discouraged! There are plenty of creative alternatives out there. Consider adding prefixes or suffixes, or trying out different extensions like .net or .co.
Securing a domain name is an essential step in establishing your online presence. It will be the foundation of your brand, so take the time to choose wisely!
5. Installing WordPress on Bluehost
When it comes to setting up your website, installing WordPress on Bluehost can be one of the most exciting steps. Don’t worry if you’re new to all this; the process is straightforward. Let’s break it down step-by-step.
- Create Your Bluehost Account: First, navigate to the Bluehost website. Click on the “Get Started” button, choose your hosting plan, and fill in your details to create your account.
- Select Your Domain Name: Next, you’ll need to choose a domain name for your website. If you already have one, great! If not, you can select a new one during this process. Make sure it reflects your brand; it’s your online identity!
- Choose Your Hosting Plan: Bluehost offers various hosting plans. For beginners, the Basic plan is often enough. It includes one website, 50GB storage, and free SSL. Opt for the Plus or Choice Plus if you anticipate needing more resources down the line.
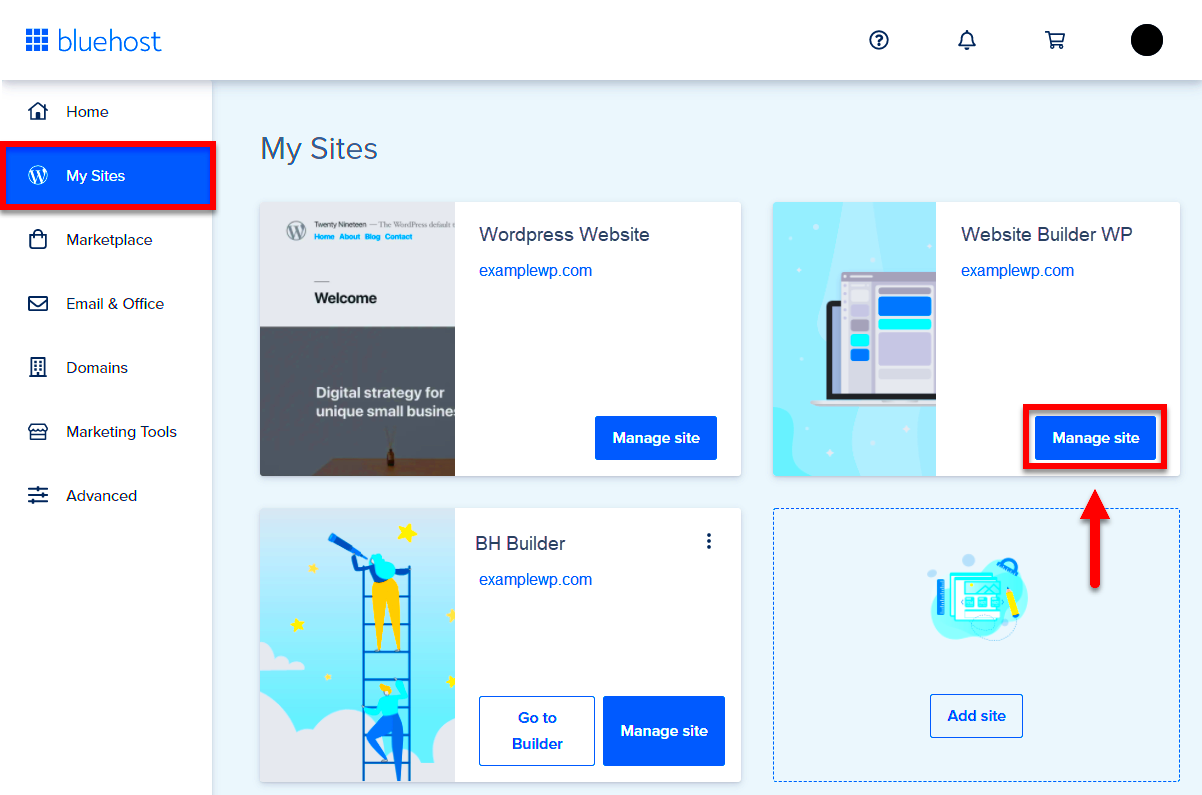
- Install WordPress: After setting up your account and domain, you’ll find an option to install WordPress automatically. Just follow the prompts. In a matter of minutes, you’ll have WordPress installed, and you can start building your site!
- Log Into WordPress: Once installed, you can access your WordPress dashboard by going to yourdomain.com/wp-admin. Use the credentials you created during installation to log in.
Congratulations! You’ve just installed WordPress on Bluehost. This was the first big step towards creating your online presence.
6. Exploring the WordPress Dashboard
Now that you have WordPress installed on Bluehost, the real fun begins! The WordPress dashboard is where all the magic happens. It might look a little overwhelming at first, but once you get familiar with it, you’ll be navigating like a pro.
At a glance, here’s what you’ll find in the dashboard:
- Home: This is your main area for updates, news, and a quick overview of your site’s activity.
- Posts: Create, manage, and organize your blog posts here. You can draft, publish, or schedule them for later.
- Pages: Unlike posts, pages are more static and usually contain information about your website, like an ‘About’ page or ‘Contact’ page.
- Media: This is your library for images, videos, and audio files. Simply upload them here to use throughout your site.
- Appearance: Customize the look and feel of your website here. You can select themes, customize your site’s layout, and add widgets.
- Plugins: Enhance your site’s functionality with various tools. Whether you want SEO capabilities, a form builder, or an eCommerce solution, there’s likely a plugin for it!
- Settings: This is where you can adjust your site’s configurations – from general settings to writing preferences and permalinks.
Take some time to explore each section. Familiarizing yourself with the dashboard not only makes the website management smoother but also empowers you to bring your vision to life. Happy blogging!
Choosing the Right Theme for Your Website
When it comes to creating a website on WordPress, selecting the right theme is one of the most crucial steps you’ll take. A theme not only sets the visual mood for your site but also impacts user experience, functionality, and SEO. So, how do you choose a theme that best fits your needs? Here’s a straightforward guide to help you out:
- Define Your Goals: Before diving into theme options, take a moment to think about what your website is for. Is it a blog, an e-commerce site, or a portfolio? Your goals will inform your theme choice.
- Consider Responsiveness: In today’s world, many users access websites on mobile devices. Ensure your theme is responsive, meaning it looks great on both desktop and mobile screens.
- Check Customization Options: Look for themes that allow you to tweak colors, fonts, and layouts easily. The more customization options you have, the more personal your site can be.
- Look for Quality Support: Choose themes from reputable sources that offer support and updates. This ensures your site remains secure and functional.
- Read Reviews: A quick search for reviews can give you insights into how well a theme performs. Look for themes with positive feedback from users regarding speed and customer support.
Once you’ve found a theme that resonates with your vision, don’t forget to preview it! This allows you to see how your content will look and provides an opportunity to make adjustments before going live. Remember, your website is often the first impression users will have, so choose wisely!
Essential Plugins to Enhance Your WordPress Site
After selecting a theme, it’s time to take your WordPress site to the next level with plugins. These handy tools add functionality, improve your site’s performance, and enhance user experience. Here’s a breakdown of essential plugins you should consider:
| Plugin Name | Function |
|---|---|
| Yoast SEO | Helps optimize your site for search engines, ensuring better visibility. |
| WooCommerce | Turns your site into a fully functional online store. |
| Wordfence Security | Enhances security by protecting your site from malware and hackers. |
| Akismet Anti-Spam | Automatically filters out spam comments on your posts. |
| Elementor | A drag-and-drop page builder that allows for easy design customization. |
These plugins can significantly enhance your site’s capabilities, making it easier to manage and more appealing to visitors. Depending on your specific needs, you might find others that suit your goals, but starting with these essentials will set a solid foundation. Remember, though, that while plugins are incredibly useful, installing too many can slow down your site, so choose wisely and keep it streamlined!
Creating Your First Post and Page
Creating your first post and page on WordPress is like opening the door to a world of creativity and expression. Whether you’re sharing your thoughts, showcasing your business, or building a community, getting the hang of this process is essential!
To get started, follow these simple steps:
- Log into Your WordPress Dashboard: Begin by logging into your Bluehost account and navigate to the WordPress dashboard. This is your command center for everything related to your website.
- Adding a New Post: On the left sidebar, find the Posts option. Click on it, and you’ll see an option to Add New. Burst forth with your creativity by giving your post an engaging title.
- Writing Your Content: Use the block editor to add text, images, and even videos! You can format your text with headers, lists, and links, making it visually appealing. Remember, making your content scannable is key!
- Setting Up Categories and Tags: Help your readers find your posts easily. Use categories for broad topics and tags for specifics. This organization helps you keep your content structured.
- Preview and Publish: Once you’re happy with your post, hit Preview to see how it looks. When it’s ready to shine, click Publish.
Now, let’s talk pages! Whether it’s an About page or a contact form, the process is similar:
- Navigate to Pages in the sidebar.
- Click Add New and go through similar steps as with posts.
And there you go! You’ve successfully created your first post and page! It’s time to share your voice with the world.
Customizing Your Website’s Settings
Once you have your posts and pages set up, it’s time to fine-tune your website. Customizing your website’s settings will not only enhance functionality but also improve user experience. Let’s break it down!
To access your website’s settings, go to your WordPress dashboard and click on Settings in the left sidebar. Here’s what you can customize:
Main Settings Overview
| Setting | Description |
|---|---|
| General | Set your site title, tagline, and timezone, giving your site a personal touch. |
| Reading | Choose your homepage settings and how many posts to show on your blog page. |
| Discussion | Manage comments, including moderation settings and comment notifications. |
| Permalinks | Customize your URL structure for search engine optimization and user-friendliness. |
Here are a few key areas to focus on:
- Site Title and Tagline: Make sure these reflect your brand identity. They’re often the first things visitors will see!
- Timezone: Correctly setting your timezone ensures all your posts are timestamped accurately.
- Discussion Settings: Manage how readers can interact with your posts. Decide if you want to allow comments or require approval.
- Permalink Structure: Opt for a clean, readable URL format (such as Post Name) for better SEO.
After making all your adjustments, don’t forget to click Save Changes at the bottom of each settings page. With these customizations, your website will not only look great but also function seamlessly, offering a fantastic experience to your visitors!
Maintaining and Backing Up Your WordPress Site
Once you’ve set up your WordPress site on Bluehost, maintaining it becomes crucial for its longevity and security. Regular maintenance helps prevent issues that can arise from outdated plugins or themes, and it keeps your site running smoothly. Here are some key aspects to consider:
- Regular Updates: Ensure that your WordPress core, themes, and plugins are up to date. This not only enhances performance but also patches security vulnerabilities.
- Monitoring Site Performance: Keep an eye on your site’s speed and performance. Tools like Google PageSpeed Insights or GTmetrix can help you identify areas for improvement.
- Security Measures: Implement security plugins like Wordfence or Sucuri to protect your site against potential threats. Regularly check for suspicious activities.
- SEO Checks: Ensure your site is optimized for search engines by using tools like Yoast SEO to analyze your content and suggest improvements.
- Backups: Create regular backups of your entire site, including the database and files. Bluehost offers a built-in backup solution that you can use, but third-party plugins like UpdraftPlus are also reliable options.
Backing up your WordPress site is a non-negotiable task. Imagine losing all your hard work due to a technical glitch! Consider scheduling automatic backups weekly and store them in multiple locations, such as your local drive and a cloud storage service like Google Drive or Dropbox.
Conclusion and Next Steps
Congratulations on your journey so far! Starting a WordPress site on Bluehost is just the beginning. Now that your site is live, it’s essential to keep in mind that building and maintaining an online presence is an ongoing process. Here are some next steps to consider:
- Content Creation: Regularly update your blog or website with fresh content. This keeps your audience engaged and improves your SEO rankings.
- Engagement: Foster community by responding to comments and encouraging discussion among your visitors. This creates a loyal readership.
- Analytics: Install Google Analytics to track your site’s performance and gather insights about your audience’s behavior. Use this data to refine your strategy.
- Networking: Connect with other bloggers or businesses in your niche. Collaborations or guest posts can boost your visibility.
Take your time exploring the vast capabilities of WordPress. Experiment with different themes, plugins, and content strategies. Remember, the key to a successful website is learning, adapting, and evolving. Happy blogging!


