Have you ever wondered how to make your Elementor designs even more visually striking? Well, this is where Scalable Vector Graphics, or SVG, comes into play! SVGs are a fantastic way to elevate your design game, and with Elementor, integrating them is simpler than you might think. In this post, we’ll unravel what SVGs are, why they’re beneficial, and how you can enable them seamlessly in your
What is SVG and Why Use It?

So, what exactly is SVG? In the simplest terms, Scalable Vector Graphics (SVG) are XML-based vector images. Unlike traditional images, such as JPEG or PNG, SVGs are resolution-independent, meaning they can scale to any size without losing quality. This makes them particularly useful for web design!
Here’s why SVG holds a special place in web design and why you should consider using them:
- Scalability: No matter how large or small, SVGs maintain crisp edges and clear lines, making them perfect for responsive designs.
- Smaller File Sizes: SVG files are generally smaller than their raster counterparts, leading to faster page load times.
- Animation Capabilities: SVGs can be easily animated using CSS and JavaScript, adding a dynamic touch to your website.
- Editability: Since they are XML files, you can modify SVGs in text editors and customize them as per your needs.
- SEO-Friendly: SVGs can contain metadata, enhancing search engine optimization when used correctly.
In summary, using SVGs in your designs not only improves aesthetics but also enhances functionality. So why not explore the magical world of SVGs in Elementor and take your designs up a notch?
Benefits of Using SVG in Elementor

When it comes to web design, employing scalable vector graphics (SVG) in your Elementor projects offers numerous advantages that can significantly enhance your website’s performance and aesthetics. Let’s dig into the key benefits of using SVG in Elementor:
- Scalability: SVG images are resolution-independent, meaning they can scale effortlessly without losing quality. This ensures that your graphics look crisp on any screen size, whether it’s a smartphone, tablet, or high-resolution display.
- Reduced File Size: Compared to traditional image formats like PNG or JPEG, SVG files typically have a smaller file size. This can lead to faster load times for your website, ultimately improving user experience and potentially boosting SEO rankings.
- Editability: Since SVG files are composed of XML code, you can easily modify them directly in a code editor or graphic design software. This flexibility allows for quick adjustments, whether you want to change colors, shapes, or even animate elements with CSS.
- Interactivity: With SVG, it’s possible to create interactive graphics. You can manipulate SVG elements with JavaScript and CSS, providing engaging experiences such as hover effects and clickable images.
- Consistency Across Platforms: SVG renders consistently across various web browsers, helping to maintain your design integrity. You don’t have to worry about different browser behaviors affecting your visuals.
- Accessibility: SVGs can be made accessible by adding titles and descriptions to the image code. This makes it easier for screen readers to interpret the graphics, enhancing the overall accessibility of your website.
Incorporating SVG into your Elementor projects is not just a trend; it’s a smart move that can lead to a better user experience and more efficient performance.
How to Enable SVG Uploads in Elementor

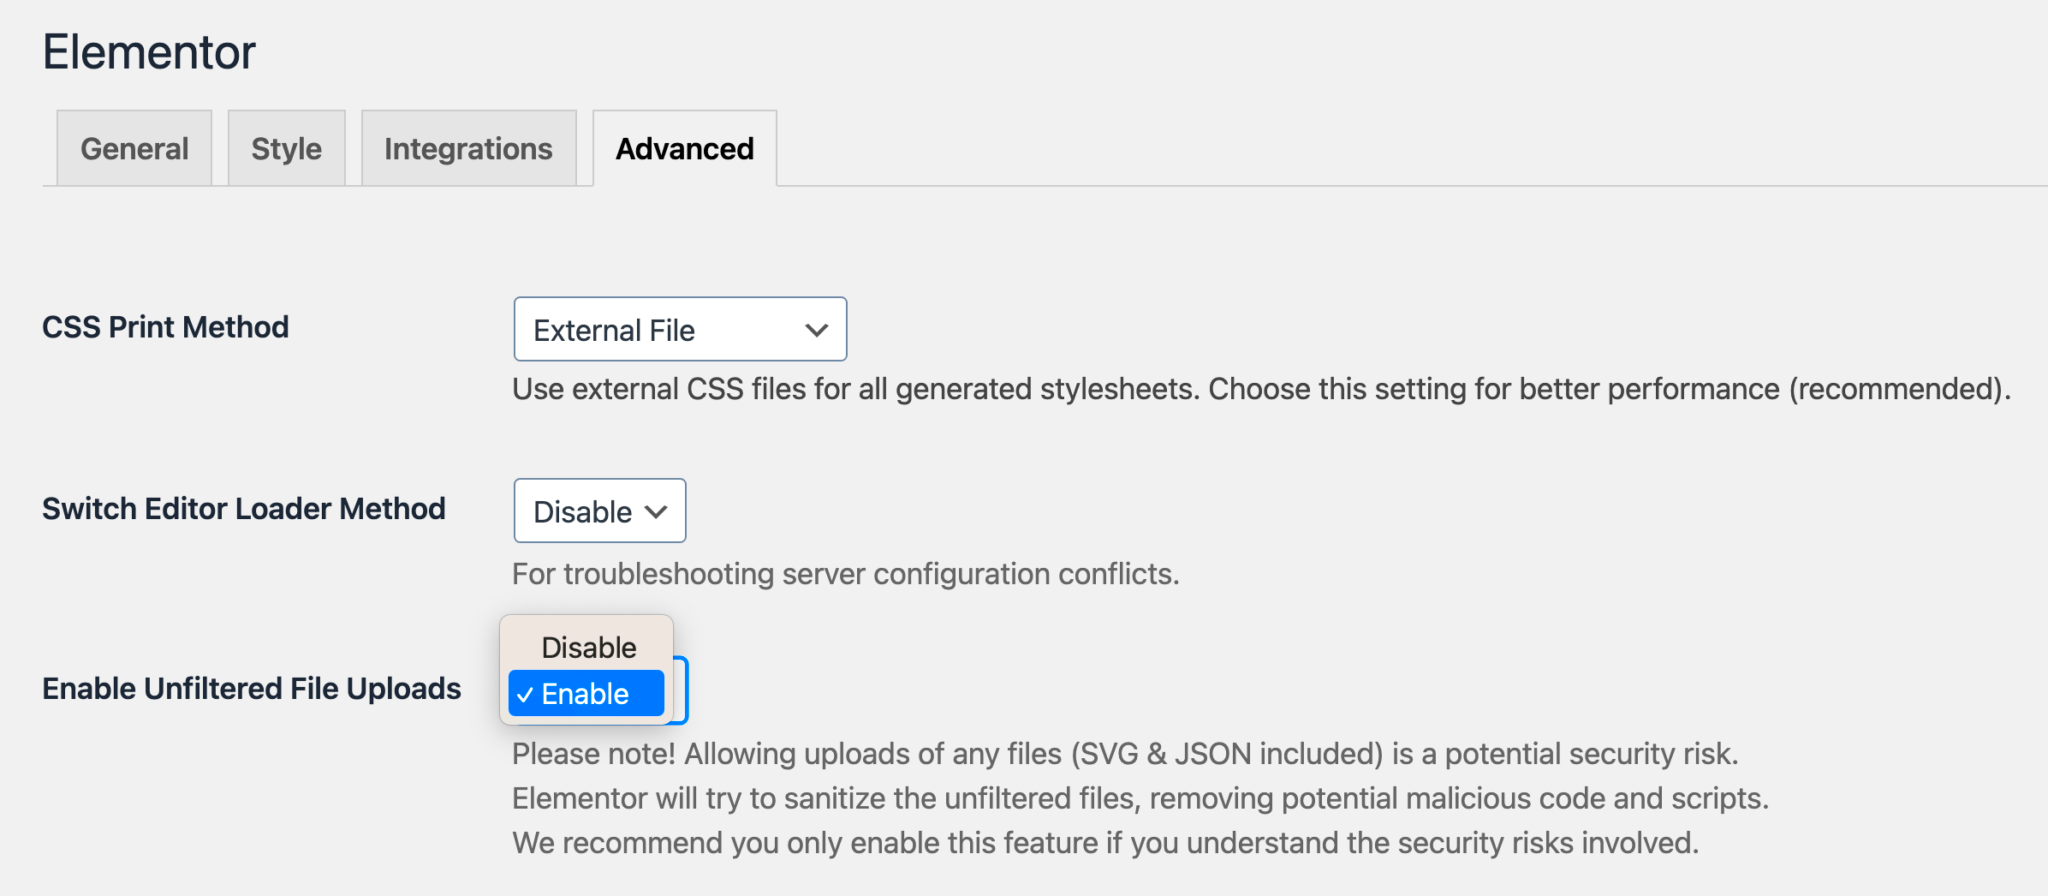
To fully leverage SVG graphics in your Elementor designs, you first need to enable SVG uploads in WordPress. By default, WordPress doesn’t allow SVG files due to potential security risks, but with the right steps, you can enable this feature safely. Here’s how to do it:
- Install a Plugin: The easiest way to enable SVG uploads is by installing a reliable plugin. Some popular choices include:
- Safe SVG: A well-known plugin that sanitizes your SVG files to prevent security issues.
- SVG Support: Another great plugin that enhances SVG support, including inline SVG rendering.
- Activate the Plugin: After installing your chosen plugin, make sure to activate it. You can do this by going to the Plugins section in your WordPress dashboard and clicking on Activate.
- Check SVG Settings: Some plugins come with settings that allow you to customize how SVGs are handled. Navigate to the plugin settings (usually found under Settings > SVG Support) to adjust the parameters as needed.
- Upload Your SVG Files: Once SVG support is enabled, you can now upload SVGs just like any other file type. Go to your media library and click on Add New. Drag and drop your SVG files or select them from your computer.
- Insert SVGs in Elementor: Once uploaded, you can add your SVGs to any Elementor section. Just drag the Image widget into your design and select the SVG file from your media library.
With these simple steps, you’ll be able to utilize the benefits of SVG seamlessly in your Elementor projects, giving your designs the sharpness and interactivity they deserve!
5. Step-by-Step Instructions for Enabling SVG Support
Are you excited to start using SVGs in your Elementor projects but unsure how to enable them? No worries! I’ve got you covered with these simple, step-by-step instructions to get you on the right track.
- Access Your WordPress Dashboard: First, you’ll want to log in to your WordPress dashboard. This is where the magic begins!
- Install a Plugin: To enable SVG support, you’ll need a plugin. I recommend using the Safe SVG plugin. Just go to Plugins > Add New and search for “Safe SVG.” Once you find it, click Install Now and then Activate.
- Configure the Plugin: After activation, you may want to configure the settings. Go to Media > Safe SVG and check the options available. This plugin allows you to control who can upload SVG files and ensures they’re safe to use.
- Test Your SVG Upload: Now it’s time to give it a go! Navigate to Media > Add New and upload an SVG file. If it uploads successfully, congratulations! You’ve enabled SVG support.
- Check Your Theme Settings: Sometimes, themes have specific settings regarding SVGs. Make sure there aren’t any additional restrictions within the theme you’re using.
And there you have it! In just a few clicks, you’ve enabled SVG support on your WordPress site. You’re now ready to unleash the power of SVGs in your Elementor designs!
6. Using SVG Files in Your Elementor Projects
Now that you’ve successfully enabled SVG support, let’s dive into how you can actually use SVG files within your Elementor projects. SVGs can elevate your designs with sharp visuals and lightweight properties, making them an excellent choice for various design projects.
- Add SVGs through the Image Widget: The simplest way to use SVGs in Elementor is through the Image Widget. Just drag the Image Widget to your desired section, click on it, and select your SVG file from the Media Library. Don’t forget to add alt text for accessibility!
- Utilize the Video Widget for SVG Animations: If you have animated SVG files, you can use the Video Widget to incorporate them. Just upload your SVG animation file and embed it just like a video!
- Using SVGs in Backgrounds: You can even apply SVGs as background images for sections or columns. Head to the section’s settings, go to Style, and under Background, you can upload your SVG.
- Custom Code Options: If you feel adventurous, you can also use the HTML widget to directly input SVG code. This method allows for more customization but requires some basic knowledge of coding.
Tips for Using SVGs:
- Always ensure your SVG files are optimized to keep load times fast.
- Keep accessibility in mind by adding appropriate alt text.
- Consider the color settings and ensure they blend with your design theme.
Incorporating SVG files in your Elementor projects can enhance your website’s aesthetic and performance. So, start experimenting and see how SVGs can take your designs to the next level!
Common Issues and Troubleshooting
Working with Scalable Vector Graphics (SVG) in Elementor can be an incredibly rewarding experience, but you may run into a few bumps along the road. Here are some common issues you might face, along with tips to troubleshoot them:
- SVG Not Displaying: One of the most frequent issues is that your SVG may not display correctly. This can often happen if the SVG file is corrupted or not saved properly. Ensure your SVG is correctly formatted and try re-saving it from your graphic design software.
- Incorrect Color Render: Sometimes, SVGs may not display colors as expected. This usually occurs due to misconfigured CSS styles in your SVG. Open the SVG file in a text editor to check that all color attributes are set correctly, or adjust styles directly in Elementor.
- Security Issues: Browsers often block SVGs due to security concerns, especially if they come from an untrusted source. Make sure that your WordPress site is equipped with a proper security framework that allows SVG uploads. You may need to add specific permissions via a plugin.
- File Size Concerns: SVG files can sometimes be larger than you’d anticipate. If your SVG is slow to load, consider optimizing it using tools like SVGOMG or SVGO.
For faster troubleshooting, check your browser’s console for any error messages. It’s always wise to have a backup of your site before making changes, just in case you run into any issues.
Best Practices for Working with SVGs
When integrating SVGs into your Elementor projects, following best practices can save you time, boost site performance, and enhance user experience. Here are some invaluable recommendations:
- Optimize Your SVGs: Before uploading, use optimization tools to compress your SVG files. Smaller files load faster and negatively impact site performance less.
- Use Inline SVGs: Whenever possible, consider using inline SVGs rather than external files. This allows you to manipulate SVG styles directly with CSS, giving you cleaner and more responsive designs.
- Check Compatibility: Not all browsers render SVGs equally. Test your SVGs across different web browsers and devices to ensure they render correctly everywhere.
- Accessibility Considerations: Always remember to set proper
alttext or titles for your SVGs. This helps visually impaired users and enhances SEO for your website. - Keep it Simple: While SVGs allow for detailed designs, overdoing it can lead to complex files and slow load times. Stick to simpler designs when possible to keep performance in check.
By adhering to these best practices, you can significantly elevate the quality of your Elementor projects while ensuring they are both efficient and visually appealing.
Enabling SVG in Elementor
Scalable Vector Graphics (SVG) are becoming increasingly popular in web design due to their versatility and scalability. When using Elementor, enabling SVG can enhance your website’s visual appeal and performance. SVG files are lightweight, resolution-independent, and can be easily manipulated with CSS or JavaScript, making them an ideal choice for logos, icons, and diagrams.
To enable SVG support in Elementor, you may need to modify your site’s settings. Here’s a comprehensive guide:
- Check your hosting settings: Some hosting providers restrict SVG uploads for security reasons. Ensure that your web host allows SVG files.
- Add SVG support to WordPress: You can enable SVG upload capabilities in WordPress by adding a snippet of code to your theme’s functions.php file:
function cc_mime_types($mimes) { $mimes['svg'] = 'image/svg+xml'; return $mimes;}add_filter('upload_mimes', 'cc_mime_types');- Install Security Plugins: Using plugins like Media File Renamer or Safe SVG can help manage and secure your SVG uploads.
- Upload SVG files: Navigate to your media library and upload your SVG files as you would with any other image type.
- Using SVG in Elementor: Once uploaded, you can easily add SVG files to your layouts by selecting the ‘Image’ widget or the ‘Icon’ widget and choosing your SVG file from the media library.
In terms of performance, SVG files can significantly reduce page load times due to their smaller file size compared to traditional image formats. They also offer excellent clarity at any resolution, enhancing user experience across different devices.
Conclusion: Enabling SVG in Elementor equips you with a powerful tool to create visually stunning and high-performance websites, allowing you to leverage the flexibility and scalability of vector graphics effectively.


