Have you ever visited a website only to find a “coming soon” message or a simple note saying, “We’re currently performing maintenance”? That’s what we call Maintenance Mode in WordPress! It’s a handy feature that temporarily takes your site offline to allow for updates or repairs. Whether you’re tweaking the design, installing new plugins, or improving content, maintenance mode ensures that visitors know what’s up while you make your site shine. Let’s dive into why this mode is so essential and how you can easily implement it!
Why Use Maintenance Mode?

Now you might be wondering, why should I bother with maintenance mode? Here are some compelling reasons:
- User Experience: By enabling maintenance mode, you give your visitors a heads-up that your site is undergoing changes. This helps maintain a positive experience, even if they can’t access all the content right now.
- SEO Benefits: If you take your site down without informing search engines, you may lose rankings. A proper maintenance page lets search engines know you’re in the process of updating, keeping your SEO intact.
- Design and Development: When making significant changes, sometimes elements can break or conflict. Maintenance mode prevents visitors from stumbling upon a broken site, which could lead to frustration and loss of trust.
- Time to Test: It gives you the chance to thoroughly test new features before they go live, ensuring everything functions as intended without any rush.
In summary, using maintenance mode effectively safeguards both your site and its audience, providing that little pause while you work on improvements. It’s a simple step with a big impact!
How to Enable Maintenance Mode in WordPress

Enabling Maintenance Mode in WordPress is a thoughtful way to prepare your visitors for changes or updates you’re making to your site. It ensures that users don’t encounter broken links or unfinished changes while you’re working. Here’s a step-by-step guide to getting this feature up and running:
- Access Your WordPress Admin Dashboard: Start by logging into your WordPress admin panel. This is usually found at
yourwebsite.com/wp-admin. - Utilize a Custom Code Snippet: If you prefer a hands-on approach, you can add a maintenance mode code directly to your theme’s functions.php file. Simply navigate to
Appearance > Theme Editorand select the functions.php file. Insert this simple code:
if ( !current_user_can( 'administrator' ) ) { wp_die('Site is undergoing maintenance. Please check back later.');}This code ensures that only administrators can see the site while it’s in maintenance mode.
- Save Changes: After adding the code, be sure to save your changes. You can now test the maintenance mode by logging out and viewing your site.
- Disable Maintenance Mode: Once you’re done with your updates, simply remove the code from functions.php and save again.
And just like that, you have successfully enabled maintenance mode manually! But if coding isn’t your style, don’t worry—there are simpler alternatives.
Using a Plugin to Activate Maintenance Mode
If you’re not comfortable messing around with code (and honestly, who has the time?), using a plugin to activate Maintenance Mode is a breeze! Here are some popular options and how to use them:
- SeedProd: This is a powerful landing page builder that lets you set a maintenance mode page easily.
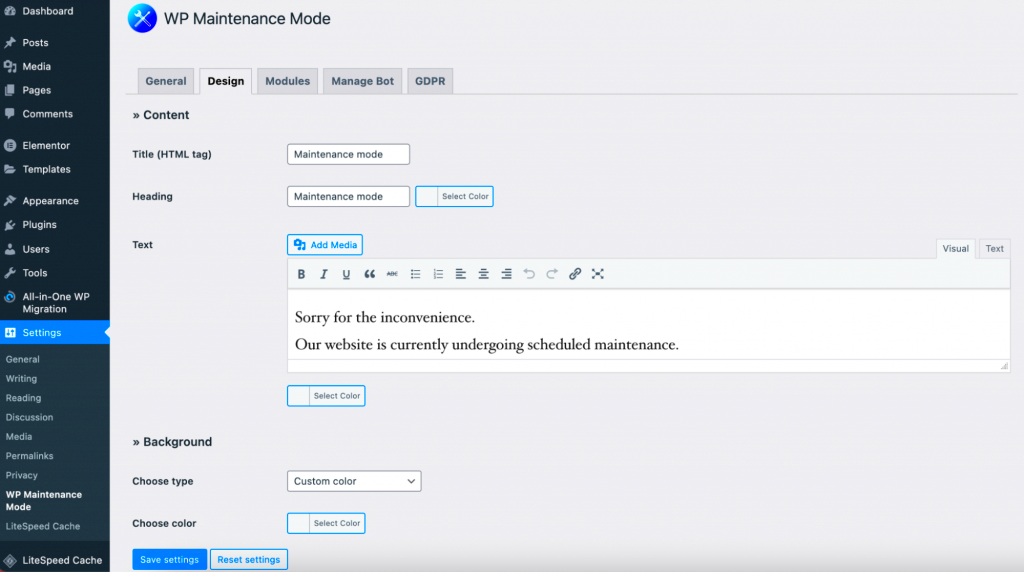
- WP Maintenance Mode: A user-friendly option to customize your maintenance mode messages and settings.
- Coming Soon Page & Maintenance Mode by SeedProd: This plugin provides a host of features to whip up a stunning maintenance page within minutes.
Here’s a quick guide on how to use a plugin:
- Install Your Preferred Plugin: Navigate to
Plugins > Add Newand search for your chosen plugin. ClickInstall Nowfollowed byActivate. - Configure Settings: Once activated, visit the plugin’s settings. Here, you can customize various aspects, such as text, colors, and images that will appear while in maintenance mode.
- Enable Maintenance Mode: Most plugins offer a simple toggle to enable/disable maintenance mode. Make sure to save your changes!
With this approach, you not only save time and hassle but also maintain a professional look while your site undergoes updates. Plus, you’ll have more options to personalize your maintenance page! So go ahead—choose the method that works best for you and keep your visitors informed while you spruce things up.
5. Manually Enabling Maintenance Mode
Are you planning some updates on your WordPress site and want to let your visitors know you’re working on things? Manual maintenance mode is your best friend in this scenario! It’s a simple, effective way to prevent visitors from seeing a half-finished site while you’re tinkering under the hood. Let’s dive into how to enable it manually.
To enable maintenance mode manually, you’ll need to make a few minor adjustments to your site’s files. Here’s a quick step-by-step guide:
- Access Your Site via FTP: Use an FTP client like FileZilla to connect to your WordPress site.
- Locate the wp-config.php File: This file is located in the root directory of your WordPress installation.
- Add Maintenance Mode Code: Insert the following code snippet before the line that says “/* That’s all, stop editing! Happy blogging. */”:
- Save and Upload: Save changes and upload the modified wp-config.php back to your server.
- Test It Out: Visit your site in an incognito window to confirm that maintenance mode is active. You’ll see a general maintenance message!
define('WP_MAINTENANCE_MODE', true); When you’re done with your updates, simply remove or comment out that code you added. Voila! You’re ready to go live again.
6. Customizing Your Maintenance Mode Page
Now that you know how to enable maintenance mode, let’s talk about customizing your maintenance mode page. A default page just won’t cut it if you want to keep visitors informed and engaged. Customization makes your maintenance mode feel personalized and on-brand.
Here’s what you can do to enhance your maintenance page:
- Add Your Branding: Use your logo and brand colors to make the page reflect your website’s identity.
- Provide Clear Messaging: Inform visitors about what’s going on. Consider phrases like:
- Add a Countdown Timer: Keep your visitors in the loop on how long it’ll take, if possible.
- Include Social Media Links: Offer alternative ways for them to engage with you while waiting.
| Message | Purpose |
|---|---|
| “We’re currently performing scheduled maintenance.” | Simple, informative. |
| “We’ll be back shortly!” | Promises a quick return. |
By customizing your maintenance mode page, you’ll enhance user experience and possibly even keep them coming back after you’re done. Trust me, a little attention to detail goes a long way!
7. Testing Your Site in Maintenance Mode
When you enable maintenance mode on your WordPress site, it’s essential to ensure that everything is functioning as expected. Testing your site while it’s in maintenance mode can help you identify any potential issues before making your updates live. Here’s a step-by-step guide to help you through the testing process:
- Accessing the Frontend: First, visit your website’s URL in a private or incognito browsing window. This allows you to see what your visitors will see when your site is in maintenance mode. You should see a maintenance message instead of your usual site content.
- Check Essential Functions: While in maintenance mode, try performing essential functions like login attempts or checking any contact forms or e-commerce functionality. This helps ensure that your site is still responsive and that users can’t access restricted areas.
- Review the Maintenance Message: Look over the message displayed on your maintenance mode page. Does it effectively communicate what’s happening? Consider whether you need to make adjustments to transparency or timeframes.
- User Experience: Pay attention to how user-friendly the maintenance mode experience is. You want to avoid any frustration for your visitors, so think about how they might perceive the downtime.
Once you’ve gone through these steps, you can confidently proceed with your updates knowing that your maintenance mode setup works efficiently. Taking the time to test now can save future headaches when users try to access your site!
8. Best Practices for Using Maintenance Mode
Utilizing maintenance mode correctly can help improve your site’s user experience and ensure a smoother process while you make updates. Here are some best practices to consider when putting your WordPress site in maintenance mode:
- Clear Communication: Always communicate clearly with your visitors. Your maintenance message should include an estimated downtime or explain the reason for the maintenance so users are not left guessing.
- Keep It Short: Try to minimize the duration of your maintenance mode. If possible, schedule maintenance during off-peak hours to lessen the impact on your audience.
- Test Before Going Live: As discussed in the previous section, always test your site in maintenance mode before going live. This simple step can save you from potential issues later.
- Responsive Design: Ensure that your maintenance mode message is mobile-friendly. A significant portion of users may access your site on their phones, and you want them to have a seamless experience.
- Reassurance: If your maintenance is extended, consider sending followers updates through social media or your email list to keep them informed and engaged.
By applying these best practices, you’ll maintain a professional presence during updates and keep your visitors informed and satisfied, making it easier for them to return once you’re back online!
Conclusion
Enabling maintenance mode in WordPress is an essential step when performing site updates, ensuring that visitors are informed and protected from incomplete or unstable changes. Using maintenance mode helps improve user experience and maintains your site’s professionalism. By following the outlined methods, you can seamlessly implement maintenance mode without affecting your site’s reputation. Whether you choose a plugin, code snippet, or a hosting provider’s built-in feature, it’s crucial to seamlessly transition back to your site once the updates are completed. Remember to monitor your site after updates to address any potential issues quickly.


