Hey there! If you’re looking to enhance your website’s typography, you’ve come to the right place. The Elementor Custom Fonts Plugin is a fantastic tool that allows you to easily incorporate unique fonts into your Elementor-built pages. With this plugin, you can elevate your site’s design, make your content more engaging, and ultimately improve your user experience. So, let’s dive into what this plugin is all about and how it can transform your website!
Benefits of Using Custom Fonts in Elementor
Using custom fonts in Elementor can be a game-changer for your website’s visual identity. Here’s why you should consider it:
- Enhanced Visual Appeal: Custom fonts can add a unique flair to your site, differentiating it from the plethora of websites that use standard system fonts.
- Brand Consistency: You can tailor your font choices to align with your brand’s personality, ensuring consistency across all platforms.
- Improved Readability: Different fonts can enhance readability based on your audience and content type, making it easier for users to digest your information.
- Design Flexibility: Custom fonts allow for greater creative freedom, letting you construct a layout that truly reflects your vision.
- Better User Engagement: Engaging typography can capture attention and keep users on your site longer, increasing the chances of conversions.
By implementing custom fonts, you not only enrich your design but also boost user interaction. So, why stick with basic options when you can easily personalize your site with the Elementor Custom Fonts Plugin? The possibilities are endless!
Installing the Elementor Custom Fonts Plugin
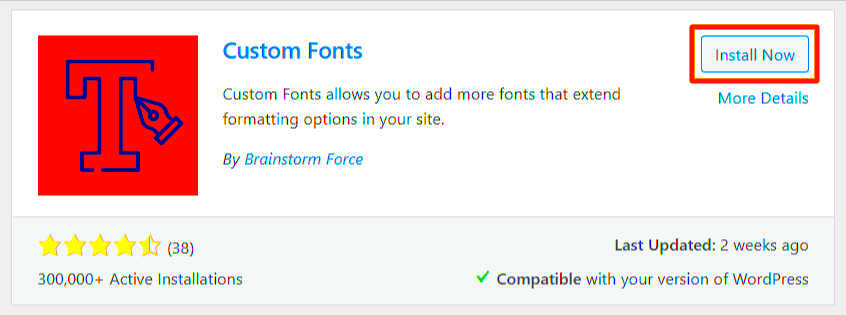
So, you’ve decided to enhance your website’s typography using the Elementor Custom Fonts Plugin. Awesome choice! The installation process is straightforward, and you’ll be on your way to customizing fonts in no time. Let’s break it down step-by-step.
First things first—make sure you have Elementor installed on your WordPress site. The Custom Fonts Plugin is an add-on that works alongside Elementor, so you’ll need the base plugin to get started. Once you’ve confirmed that, you can proceed with the installation of the Custom Fonts Plugin.
Here’s how to install the plugin:
- Access Your WordPress Dashboard: Log in to your WordPress admin area, and you’ll be greeted by the familiar dashboard.
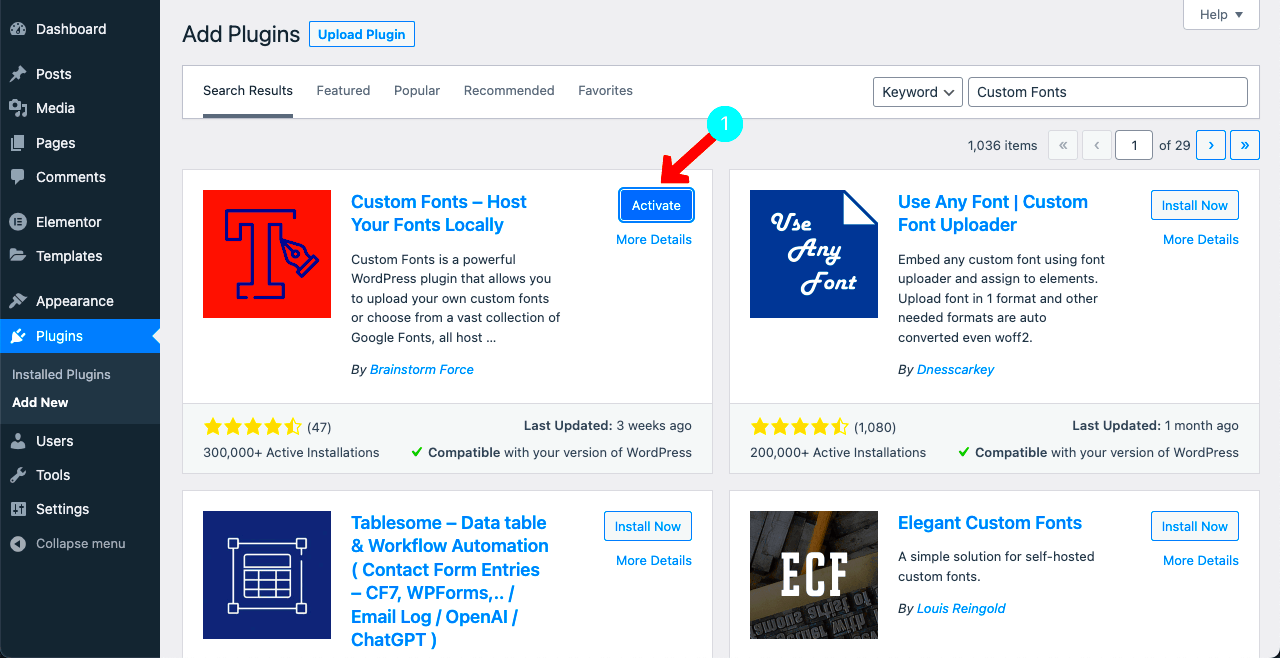
- Navigating to Plugins: On the left-hand menu, hover over the ‘Plugins’ option and then click on ‘Add New.’
- Searching for the Plugin: In the search bar, type in “Elementor Custom Fonts.” You should see the plugin in the search results.
- Install the Plugin: Click the ‘Install Now’ button next to the plugin. After installation, a button will appear to ‘Activate’ the plugin. Click that as well.
And there you have it! The Elementor Custom Fonts Plugin is now installed and activated on your website. It’s time to dive into the next exciting step—setting up your custom fonts!
Setting Up Custom Fonts in Elementor
Now that you have the Elementor Custom Fonts Plugin installed, it’s time to set up your custom fonts. This is where the real magic happens, allowing you to personalize your website’s text to align with your brand identity. Ready? Let’s go!
Here’s a step-by-step guide to get your custom fonts added in Elementor:
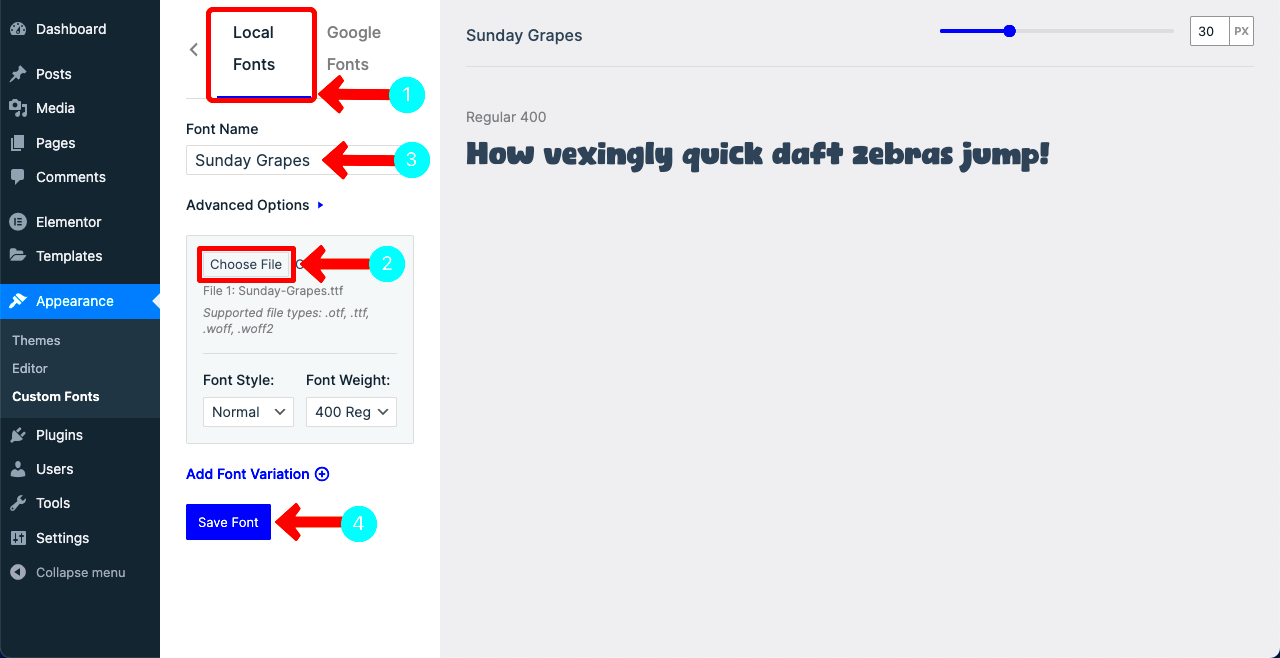
- Accessing the Custom Fonts Panel: From your WordPress dashboard, navigate to ‘Elementor’ on the sidebar. You’ll find a new option labeled ‘Custom Fonts’—click on that!
- Adding a New Font: Click the ‘Add New’ button to start the process. This opens a new panel where you can configure your font settings.
- Name Your Font: Give your custom font a unique name. This will help you easily identify it later while editing your pages.
- Upload Font Files: You can upload multiple font formats for better browser compatibility. Typically, you’ll want to include:
- TTF (TrueType Font)
- WOFF (Web Open Font Format)
- WOFF2 (Compression for WOFF)
- Configure Styles: Specify the font styles (like Regular, Bold, Italics, etc.) and set the font weights accordingly.
- Save Your Changes: Once you’ve uploaded your font files and configured the settings, make sure to click the ‘Publish’ button to save your changes.
Congratulations! You’ve successfully set up custom fonts for your Elementor website. Now, when you edit your pages, you can easily select your new fonts from the typography options in Elementor’s editing panel. It’s a fantastic way to give your site that unique touch! Happy designing!
5. Adding Custom Fonts to Your Elementor Projects

Adding custom fonts to your Elementor projects is not just a way to beautify your site; it’s also about reflecting your brand’s unique identity. With Elementor, the process is seamless! Let’s walk through how you can do this step-by-step.
Step 1: Install the Elementor Custom Fonts Plugin
Before diving into fonts, ensure you have the Custom Fonts plugin installed. You can do this by navigating to the ‘Plugins’ section in your WordPress dashboard, clicking ‘Add New,’ and searching for “Elementor Custom Fonts.” Once found, click ‘Install’ and then ‘Activate’ it.
Step 2: Upload Your Custom Fonts
Once activated, you’ll find a new option under the Elementor menu called ‘Custom Fonts.’ Click on it, and then hit the ‘Add New’ button. Here, you can upload your font files. Usually, you’ll want formats like .woff, .woff2, .ttf, and .svg for optimal compatibility. Fill in the required fields, including Name and Font Styles.
Step 3: Using Your Custom Fonts
Now, the fun part! Go back to any page or post where you’re using Elementor. Click on the widget where you want to apply the new font, and in the ‘Style’ tab, you’ll notice the font-family dropdown. Your custom font will appear there, ready for selection. Adjust the weight and size as needed!
Step 4: Preview and Publish
Don’t forget to preview your changes! Once satisfied, hit publish, and enjoy your newly styled text. It’s all about making your site stand out.
6. Best Practices for Using Custom Fonts
While custom fonts can really elevate your design, it’s important to use them wisely. Here are some best practices to keep in mind:
- Limit Your Font Choices: Stick to 2-3 custom fonts maximum. Overusing fonts can make your site look cluttered.
- Ensure Readability: Always prioritize readability. Some artistic fonts can be hard to read, especially in smaller sizes.
- Check Loading Speed: Custom fonts can impact your website’s loading speed. Optimize font files and consider using only needed styles.
- Use Web Safe Fonts as Backup: Always have a fallback option. If custom font fails to load, your site should still be legible with a web-safe font.
- Maintain Branding Consistency: Make sure the fonts align with your brand’s personality and voice.
- Test Across Devices: Always check how fonts render on different devices and browsers. You want a uniform experience for all visitors.
By following these best practices, you’ll enhance not just your site’s aesthetics but also its performance and user experience!
Common Issues and Troubleshooting
Using the Elementor Custom Fonts plugin can significantly enhance your website’s design, but like any tool, you might run into some hiccups. Here are a few common issues users experience and how to tackle them.
- Font Not Displaying: One of the biggest frustrations can be when your custom font simply doesn’t show up on the frontend. This often boils down to caching issues. Make sure to clear your browser and website cache. If you’re using a caching plugin, clear its cache as well.
- Fonts Not Loading: Fonts might not load due to incorrect file permissions. Ensure that the font files you upload have the necessary permissions set, usually 644 for files.
- Browser Compatibility Issues: Sometimes, certain fonts may not display correctly across all browsers. Make sure to test your website on different browsers (Chrome, Firefox, Safari) to identify any discrepancies. If a font doesn’t work on one browser, consider using a different format like WOFF or WOFF2.
- Performance Issues: Using multiple custom fonts can slow down your site. If you notice performance lag, try limiting the number of fonts used. Additionally, optimizing font files can improve load times.
- CSS Conflict: Occasionally, custom CSS might override your font settings. Double-check your theme’s CSS and any additional custom styles you’ve added to ensure there’s no conflict.
If you encounter issues beyond these, don’t hesitate to check out Elementor’s support forums or the documentation provided with the plugin. Community help is always a great resource!
Conclusion
Incorporating custom fonts into your website using the Elementor Custom Fonts plugin is a straightforward process that can dramatically enhance your site’s aesthetics. Whether you’re aiming for a unique brand identity or simply want to improve the readability of your content, using custom fonts can help achieve those goals.
To recap, here are the main steps involved:
- Install and activate the Elementor Custom Fonts plugin.
- Upload your desired font files in the plugin’s settings.
- Select your font from the Elementor editor for specific elements.
- Preview the changes and adjust as needed.
Remember, as with any aspect of web design, testing and adjusting are key. Always make sure to check how your chosen fonts look across various devices and browsers for the best user experience. If you run into any common issues, use the troubleshooting tips provided to get you back on track.
Ultimately, with a bit of creativity and attention to detail, the Elementor Custom Fonts plugin can transform your website’s visual appeal and help convey your brand’s personality effectively. So, go ahead—give it a try, and let your creative flair shine!

