When it comes to building stunning websites, visual impact is essential. Elementor, a popular WordPress page builder, offers a fantastic feature known as background slideshows. These captivating visual elements can turn a simple webpage into an engaging experience, drawing in visitors and encouraging them to explore your content.
Background slideshows allow you to showcase multiple images in a seamless, dynamic way without overwhelming your site. With easy customization options and compatibility with various plugins, Elementor makes it a breeze to integrate a background slideshow into your design. With the right techniques, like using the Advanced Custom Fields (ACF) plugin, you can take your background slideshows to the next level. Let’s dive in and discover how you can effectively harness the power of background slideshows in Elementor!
What is ACF (Advanced Custom Fields)?

Advanced Custom Fields, commonly referred to as ACF, is a powerful WordPress plugin that allows you to customize your edit screens and add custom fields to your WordPress edit pages. Whether you’re a developer or a novice, ACF enables you to create tailored content management experiences, making it easier to manage complex data effectively.
Here’s a quick overview of what makes ACF so valuable:
- User-Friendly Interface: ACF features an intuitive interface that allows you to add custom fields quickly, without any coding knowledge.
- Field Types: It offers a variety of field types including text, image, file upload, gallery, and many more, giving you flexibility in your content management.
- Conditional Logic: You can set up conditional fields, meaning certain fields will only appear based on specific user input, streamlining data entry and ensuring you only see what you need.
- Integration with Elementor: ACF works seamlessly with Elementor, allowing you to pull in custom fields directly into your page designs.
Using ACF in conjunction with Elementor not only enhances your creative control but also enriches the user experience by providing dynamic content options. Next, let’s explore how we can leverage ACF galleries for creating stunning background slideshows in Elementor!
Setting Up ACF for Your Gallery
Advanced Custom Fields (ACF) is an amazing tool that allows you to create custom fields in WordPress, enabling more flexibility for your content. If you want to set up ACF for a gallery specifically for a background slideshow, you’re in for a treat! Let’s walk through the process step-by-step.
First and foremost, you’ll need to install and activate the ACF plugin from the WordPress repository if you haven’t done so already. Once that’s done, you can navigate to the ACF dashboard. Here’s what to do next:
- Access ACF: Go to your WordPress admin dashboard. Look for the “Custom Fields” option on the sidebar and click on it.
- Create a New Field Group: You can start by creating a new field group dedicated to your slideshow. This is where all your gallery images will reside.
- Choose Field Type: For a background slideshow, you will primarily need the “Gallery” field type. This will allow you to add multiple images at once.
Don’t forget to save your changes! After saving, you can then assign this field group to a specific post type. For a slideshow, you might want to assign it to a page or a custom post type. Remember, organization is key!
With ACF set up for your gallery, you’ve essentially crafted the foundation for your stunning background slideshow. Next, let’s talk about creating the actual field group we need.
Creating a New Field Group for the Slideshow
Now that ACF is set up for your gallery, it’s time to carve out a dedicated field group for your background slideshow. This is a crucial step because having an organized structure will streamline not just the management of your images but also enrich the display on your website.
Here’s how to create your new field group:
- Navigate to the Field Groups: From the ACF dashboard, click on “Field Groups” and then the “Add New” button. This is where the magic begins!
- Name Your Field Group: Give your new field group a name that reflects its purpose, like “Background Slideshow Images.” This name aids in organization.
- Add a Gallery Field: Click on “Add Field” and select the “Gallery” type. Give it a label that makes sense, like “Slideshow Images.” You can add a description for clarity.
- Adjust Settings: Play around with the settings! You can specify the minimum and maximum number of images, even set a default value. This helps in keeping your slideshow dynamic yet controlled.
- Location Rules: Set where this field group should appear. For instance, select “Page” if you want it on specific pages or custom post types.
Once you’re happy with your setup, just hit that save button! Congratulations, you’ve created a tailored field group for your slideshow. The next step involves adding images to this gallery, which will transform your website’s look and feel. Excited? You should be!
5. Uploading Images to ACF Gallery
Uploading images to the Advanced Custom Fields (ACF) Gallery is a straightforward process that allows you to create stunning visual content for your website. To get started, you’ll need to ensure that the ACF plugin is installed and activated on your WordPress site. Once that’s done, you can dive into uploading your images.
Here’s a step-by-step guide on how to upload images into the ACF Gallery:
- Navigate to ACF Field Groups: Head to the “Custom Fields” section in your WordPress dashboard. From there, click on “Field Groups” to either create a new group or edit an existing one.
- Add Gallery Field: If you’re creating a new group, click ‘Add Field’, and then select the ‘Gallery’ type from the field type options. If you’re editing an existing group, locate your gallery field and click on it.
- Configure the Field: Give your gallery field a label and set any additional options that suit your needs, such as the maximum number of images or whether images can be sorted.
- Upload Images: Once your field is set, go to the post or page where you want to add images. You’ll see the ACF Gallery field; click on the ‘Add Images’ button. This opens up your media library.
- Select Images: Choose images from your media library or upload new ones. After you’ve selected the images you want, hit the ‘Add to Gallery’ button.
And just like that! You’ve successfully uploaded images to your ACF Gallery. With a bit of customization, you now have a pool of beautiful images at your disposal!
6. Integrating ACF Gallery with Elementor
Now that you’ve uploaded some gorgeous images to your ACF Gallery, it’s time to integrate it with Elementor and create a stunning slideshow for your visitors. This integration is where the magic happens, allowing you to fully leverage Elementor’s design flexibility.
Follow these steps to seamlessly integrate your ACF Gallery with Elementor:
- Open Elementor Editor: Choose the page or post where you want to display your slideshow and click “Edit with Elementor.” This opens the Elementor interface where you can start customizing your layout.
- Add an Image Widget: In the Elementor panel, search for the ‘Image’ or ‘Image Carousel’ widget. Drag this widget onto your page, wherever you’d like the slideshow to appear.
- Dynamic Content Settings: With the image widget selected, go to the ‘Content’ settings. Here, you’ll see an option for ‘Dynamic’ content. Click on the dynamic tags icon, which looks like a database or stack of papers.
- Choose ACF Gallery: From the list that appears, select ‘ACF Gallery’. This tells Elementor to pull in the images from your ACF Gallery field.
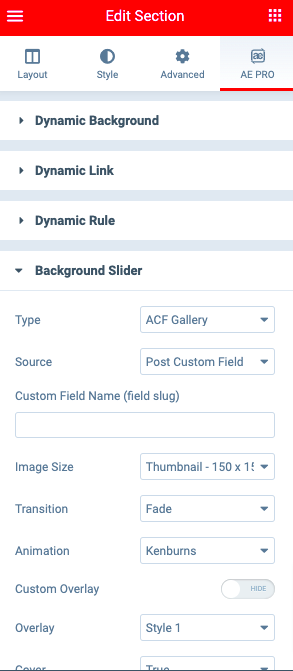
- Customize Your Display: After linking the ACF Gallery, you can customize the layout, style, and transitions. Elementor offers many options, allowing you to fine-tune how your slideshow looks, whether you prefer a fade effect, slide transitions, or even specific timings.
Once you’ve set everything up, don’t forget to preview your changes and hit ‘Publish’ to make your stunning ACF Gallery slideshow live! Your visitors will surely enjoy the engaging visual experience!
7. Configuring Elementor to Use the ACF Gallery
Once you’ve set up your Custom Fields using ACF (Advanced Custom Fields), the next big step is to configure Elementor to leverage this gallery. It’s quite straightforward, and before you know it, you’ll have stunning background slides at your fingertips!
First off, make sure you have both ACF and Elementor installed and activated on your WordPress site. Once you’ve done that, follow these steps:
- Navigate to Your Page: Open the page or post where you want the slideshow. Click on “Edit with Elementor.”
- Add a New Section: Click on the “+” icon to add a new section. Choose your preferred structure, but typically, a single-column layout works best for background slides.
- Access Section Settings: Hover over the section and click on the “Edit Section” icon (the one that looks like a six-dot grid).
- Set the Background: In the Elementor panel on the left, go to the “Style” tab. Here’s where the magic begins! Instead of choosing a static image, you’ll want to pull in the ACF Gallery.
- Dynamic Tags: Click on the background option and then on the dynamic tags icon (the database symbol). From the dropdown that appears, select ‘ACF Gallery’.
- Select Your Field: Choose the gallery field that you created earlier with ACF. Hit “Update”.
That’s it! You’ve configured Elementor to use your ACF gallery. Next up, let’s dive deeper into customizing your slideshow settings.
8. Customizing the Slideshow Settings in Elementor
Now that everything is configured, you’re probably itching to add that special flair to your slideshow! Elementor gives you many customizable options that can take your gallery from good to stunning.
Here are a few key settings you can tweak:
| Setting | Description |
|---|---|
| Image Duration | Control how long each slide is displayed. This is crucial for maintaining viewer engagement. |
| Transition Effects | Add dynamic transitions like fade or slide to make the change between images smoother. |
| Slideshow Overlay | You can add a color overlay for a stylish effect or to ensure text readability over the images. |
| Navigation Arrows | Enable or disable navigation arrows, allowing visitors to manually browse through the slides. |
| Pagination Dots | Show small dots as indicators for users, giving them a visual cue about how many slides exist. |
To customize these settings, return to the “Style” tab of the section you’re working on, and explore ‘Slideshow Settings’ or ‘Background Overlay’ options. Play around, and don’t hesitate to experiment—this is where your creativity shines!
Once you’re satisfied, just hit “Update” and preview your masterpiece. Happy building!
Best Practices for Image Selection and Optimization
When it comes to creating a stunning Elementor background slideshow using ACF Gallery, image selection and optimization play a pivotal role in the overall success of your project. Selecting the right images not only enhances the visual appeal but also improves loading times and user experience.
Here are some best practices to consider:
- Choose High-Quality Images: Always opt for high-resolution images that are relevant to your theme or message. This will help maintain the visual integrity of your slideshow.
- Keep Context in Mind: Select images that tell a story or convey a particular mood. Think about how each image relates to your overall message and to each other.
- Mind the Dimensions: Ensure that your images are sized appropriately for the slideshow area. A common size for web background images is 1920×1080 pixels, but it can vary based on your design.
- Optimize File Size: Use tools like TinyPNG or ImageOptim to compress images without sacrificing quality. Smaller file sizes improve loading times, making sure your slideshow runs smoothly.
- Format Matters: Choose the right file format. For most cases, JPEG is ideal for photographs whereas PNG works best for images requiring transparency or text overlay.
- Consider Color and Tone: Consistent color tones can create a cohesive look, thus improving the overall aesthetic. You might want to edit images to share a similar palette.
By following these best practices, you can ensure your Elementor background slideshow is not just beautiful but also user-friendly!
Troubleshooting Common Issues
Even the best-laid plans can sometimes go awry, and if you encounter issues while setting up your Elementor background slideshow using ACF Gallery, don’t fret! Here are some common problems and easy fixes to get you back on track:
| Issue | Solution |
|---|---|
| Images Not Displaying | Check to ensure images are correctly uploaded to your ACF Gallery and that you’re referencing the correct field in Elementor. |
| Slow Load Times | Optimize your images using compression tools and ensure they are the appropriate size for your background needs. |
| Slide Transition Issues | Make sure your Elementor and ACF plugins are updated. You might also want to check transition settings in Elementor. |
| Mobile Responsiveness Problems | Utilize Elementor’s responsive editing options to adjust images and layouts specifically for mobile devices. |
| Image Quality Loss | Ensure that you are using a high-quality image and verify that it hasn’t been overly compressed beyond usability. |
By being prepared for these common issues, you can tackle obstacles head-on, ensuring that your Elementor background slideshow shines beautifully without a hitch!
Conclusion
In this guide, we explored how to create stunning background slideshows in Elementor using the ACF (Advanced Custom Fields) Gallery. By linking ACF with Elementor, you can elevate your website’s design and user experience significantly. Here’s a quick recap of the steps we covered:
- Setting Up ACF: Create a new ACF field group and add a gallery field.
- Integrating ACF with WordPress: Assign the field group to the desired post type.
- Configuring Elementor: Utilize the “Dynamic” feature in Elementor to pull in images from ACF.
- Customizing the Slideshow: Adjust settings within Elementor to fine-tune the look and transition effects of your slideshow.
Using ACF Gallery in Elementor is an effective way to showcase your images dynamically and responsively. Here are some additional tips to ensure your slideshow looks its best:
| Tip | Description |
|---|---|
| Choose High-Quality Images | Use images that are high resolution for better visual appeal. |
| Optimize Image Size | Ensure your images are optimized for web to improve loading speed. |
| Test on Different Devices | Check the slideshow on various devices to ensure it is responsive. |
By following this guide, you can effectively utilize Elementor and ACF to create visually engaging background slideshows that enhance your website’s functionality and aesthetics.


