Welcome to the world of WooCommerce! If you’re an online store owner or a developer looking to spice up the backend dashboard, you’re in for a treat. Customizing the WooCommerce backend dashboard can enhance your productivity, streamline operations, and make managing your online business a more enjoyable experience. In this guide, we’ll walk you through the ins and outs of customizing your WooCommerce dashboard to fit your specific needs. So, let’s dive in!
Understanding the WooCommerce Backend Dashboard

The WooCommerce backend dashboard is the control center for your online store. It’s where all the magic happens, from managing products to processing orders. Understanding its structure is crucial for efficient operations. Here’s a breakdown:
- Admin Menu: Located on the left side, the admin menu allows you to navigate through various sections like Orders, Products, Customers, and more. You can quickly jump to any part of your store’s management by clicking on these links.
- Dashboard Overview: Upon logging in, you’re greeted with an overview screen displaying key metrics such as:
- Sales Overview
- Stock Levels
- Recent Orders
- Customer Insights
- Widgets: The dashboard is equipped with customizable widgets that present data in a visually appealing manner. You can see:
- Sales Reports
- Order Statistics
- At-a-glance Product Information
- Settings and Configurations: Central to your store’s functionality, the settings area allows you to customize payment options, shipping methods, and manage taxes, ensuring your store is compliant and efficient.
Understanding these elements not only helps you navigate the WooCommerce backend dashboard effectively but also empowers you to customize it in ways that align with your business goals. Ready to take the next steps? Let’s explore how to make these customizations!
Why Customize Your WooCommerce Dashboard?
Customizing your WooCommerce dashboard is like giving your online store a personal touch that not only enhances usability but also boosts productivity. Every business is unique, and so are its needs. By tailoring your dashboard, you can:
- Improve Efficiency: A customized dashboard can streamline your workflow. You can highlight the most important metrics that matter to your business, such as sales performance, inventory levels, or customer insights, allowing you to make informed decisions swiftly.
- Enhance User Experience: A cluttered dashboard can confuse new users or even experienced admins. Simplifying the layout and focusing on essential features creates a more intuitive experience, encouraging faster navigation.
- Boost Engagement: Personalization keeps users engaged. Whether you’re adding visuals like graphs or changing colors to align with your brand, a dashboard that resonates with your style keeps you motivated and involved.
- Focus on KPIs: Key Performance Indicators are crucial for growth. Customizing your dashboard allows you to track what you consider vital for your business’s success, providing better insights over time.
- Adapt to Changes: As your business grows, your needs will evolve. Customization allows you to adapt your dashboard to reflect new products, services, or strategies, keeping you agile in a dynamic market.
In essence, a customized dashboard translates into time savings, better organization, and a smoother operation of your WooCommerce store. Wouldn’t you agree that a bit of personalization can make a huge difference?
Getting Started with Customization
Ready to dive into customizing your WooCommerce dashboard? Awesome! It might seem daunting at first, but with the right approach, you can make your dashboard truly yours. Here’s how to get started:
- Identify Your Needs: Take a moment to review your current dashboard setup. List the features and data you frequently rely on. Ask yourself, what information do I need at a glance? This will form the basis of your customization.
- Choose the Right Tools: You can customize your WooCommerce dashboard using various plugins and tools tailored for this purpose. Popular options include Adminimize, which helps you control what users see, or Dashboard Widgets Suite, which allows you to add or remove dashboard widgets.
- Leverage Widgets: Widgets can be a great way to display information dynamically. You can add sales graphs, recent orders, and even customer satisfaction stats as widgets on your dashboard for easy access.
- Use Code Snippets: If you’re comfortable with coding, you can write snippets in PHP to tweak your dashboard further. This allows for deeper customization, such as changing user roles or modifying how data is displayed.
- Regularly Update and Review: Lastly, customization is an ongoing process. As your business evolves, revisit your dashboard setup periodically to ensure it continues to meet your needs effectively.
Getting started with customization is an exciting journey. With just a few steps, you can transform your WooCommerce dashboard into a personalized hub that reflects your business and enhances your management experience!
Using Built-in WooCommerce Options
WooCommerce comes packed with several built-in features that can help you customize your backend dashboard without diving deep into code. These options are user-friendly, making them a fantastic choice for store owners who may not have a technical background. Let’s explore some of these valuable features!
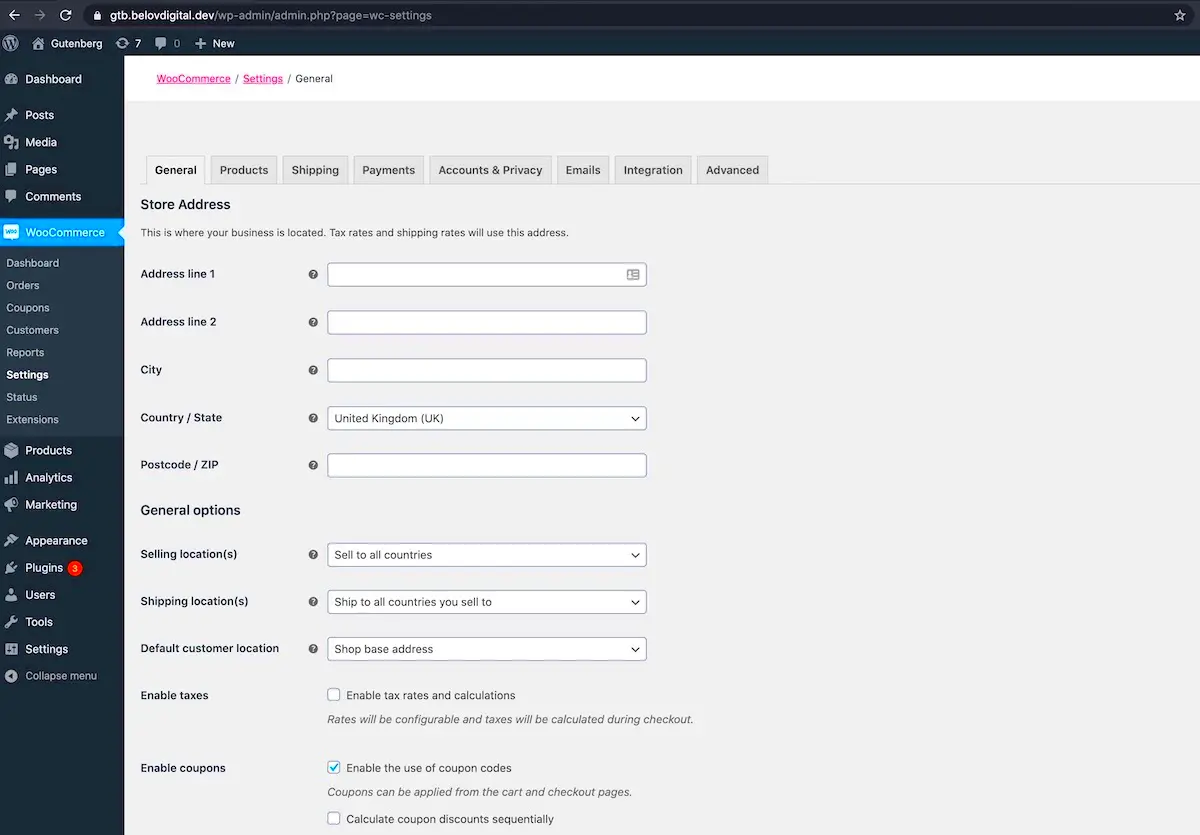
First up, the Settings section. You can modify various aspects of your store here. Navigate to WooCommerce > Settings. You’ll find tabs like General, Products, Shipping, Payments, and more. Each tab holds specific configurations. For instance:
- General: Adjust your store’s location, currency, and other basic settings.
- Products: Manage product settings, including inventory and downloadable product options.
- Shipping: Set up shipping zones and methods tailored to your audience.
- Payments: Choose which payment methods to offer your customers.
Aside from standard settings, WooCommerce allows you to change the look and feel of your dashboard using custom Dashboard Widgets. You can add widgets to display important sales data, recent orders, and more valuable insights. To do this, simply go to your dashboard preferences and choose widgets that you find useful.
Moreover, WooCommerce’s user roles can be adjusted to customize who sees what on the backend. You can assign different capabilities to various users, making it easier to maintain control over your store’s management. By utilizing these built-in options, you’ll already start to see a more streamlined and efficient dashboard tailored to your needs!
Installing Plugins for Enhanced Customization
While WooCommerce includes a variety of built-in options, sometimes you need a bit more flexibility. That’s where plugins come into play! The WordPress marketplace has a plethora of plugins designed specifically for WooCommerce that can significantly enhance your backend dashboard. Let’s break it down!
Why Use Plugins? Plugins are like magical add-ons that can transform your dashboard experience. Whether you want to manage your inventory better, get advanced reporting analytics, or simplify order processing, there’s likely a plugin that fits the bill. Here’s a list of popular WooCommerce plugins for backend customization:
- WP Admin Dashboard: Customize the layout and appearance of your admin dashboard.
- WooCommerce Admin: Enhanced analytics that visualize your store’s performance.
- Product Add-Ons: Allow customers to add extra options to their products.
- Advanced Custom Fields: Create custom fields for products to gather more information.
To install a plugin:
- Go to your WordPress admin panel.
- Select Plugins > Add New.
- Search for the desired plugin.
- Click Install Now, and then activate it.
Pro Tip: Always ensure that your plugins are compatible with the latest WooCommerce and WordPress versions to avoid conflicts. Also, check user reviews and support options for peace of mind!
By installing the right plugins, you’ll not only make your WooCommerce backend dashboard more efficient but also tailored to suit your specific business needs. So go ahead, explore the plugin store, and enhance your workspace!
Customizing Dashboard Widgets
The WooCommerce backend dashboard is an essential hub for managing your online store, and customizing dashboard widgets can significantly enhance your productivity. Widgets provide you with quick access to crucial information and tools, making them indispensable for daily operations.
To begin customizing your dashboard widgets, you can:
- Remove Unwanted Widgets: If you find certain widgets cluttering your dashboard, you can easily remove them. Simply click on the ‘Screen Options’ tab at the top of the dashboard and uncheck any widget you don’t need. This helps to declutter your workspace and keeps your focus on what really matters.
- Add Useful Widgets: WooCommerce allows you to add custom widgets that can display sales stats, inventory levels, or recent orders. Consider using plugins like WooCommerce Admin to gain access to more advanced widgets that give you deeper insights into your shop’s performance.
- Rearrange Widgets: You have the flexibility to drag and drop widgets to rearrange them based on your preferences, allowing you to place the most important information at your fingertips.
Moreover, if you’re comfortable with a bit of coding, you can create your own custom dashboard widgets using hooks and filters provided by WordPress. This allows you to display exactly what you want, in the style that fits your brand. Remember, an organized and personalized dashboard not only enhances your experience but also contributes to a more efficient workflow!
Adding Custom Menu Items
Elevating your WooCommerce backend dashboard can be accomplished by adding custom menu items. This feature allows you to create a tailored navigation system that meets the specific needs of your online business.
To add custom menu items, follow these steps:
- Utilize a Custom Plugin: There are various plugins available, such as Admin Menu Editor, that allow you to create and manage custom menu items without touching any code. This is a great option for those who prefer a user-friendly interface.
- Add Custom Links: If you’re adept at coding, you can add links to your functions.php file. Here’s a snippet to get you started:
add_action('admin_menu', function() { add_menu_page('My Custom Page', 'Custom Menu', 'manage_options', 'custom-menu', 'custom_page_function', 'dashicons-admin-generic'); });This function creates a new menu item labeled ‘Custom Menu’ that leads to your custom page.
- Organize Existing Items: You can also reorder and remove existing menu items to create a simpler navigation experience. A cleaner menu not only looks better but makes it easier for you to find what you need quickly!
Adding custom menu items can go a long way in enhancing user experience within the dashboard. It helps you organize your tools and insights according to your workflow, making it easier to manage your store efficiently. Personalization in the backend leads to a more enjoyable management process, allowing you to focus on what matters: growing your business!
9. Implementing User Roles and Permissions
When you’re managing an online store through WooCommerce, understanding user roles and permissions is crucial for maintaining a secure and efficient backend. WooCommerce comes with a set of predefined roles, but you might find them either too restrictive or too permissive for your specific needs. This is where customizing user roles can make a significant difference.
First things first, let’s break down the default user roles in WooCommerce:
- Administrator: Has full control over the site, including user management and plugin installation.
- Shop Manager: Can manage the store’s products, orders, and customers but has limited access to settings.
- Customer: Can browse the store and make purchases.
- Subscriber: Can only manage their profile and view content.
To customize these roles, you can use a plugin like “User Role Editor” or “Members.” These tools allow you to:
- Modify existing roles: Adjust what users in specific roles can and cannot do.
- Create new roles: Tailor roles for specific needs, such as a “Content Editor” or a “Support Agent.”
- Assign or revoke capabilities: Fine-tune the permissions for each role to ensure the right people have the right access.
By implementing customized user roles, you enhance cooperation among your team while safeguarding sensitive areas of your WooCommerce store. This definitely helps streamline operations and boosts productivity!
10. Customizing Admin Notices and Messages
Admin notices and messages play a pivotal role in the day-to-day management of your WooCommerce store. They’re your first line of communication when it comes to alerts, errors, or important updates. However, the generic messages that come out of the box may not always suit your brand’s voice or may not provide the details your team needs for optimal workflow.
Fortunately, customizing these notices can help create a seamless experience not just for your team but also for your customers. Here’s how you can go about it:
- Use Custom Code: If you’re comfortable with a bit of coding, you can utilize hooks (like
add_action) to add your custom admin notices. An example could look like this:
<?phpadd_action('admin_notices', 'custom_admin_notice');function custom_admin_notice() { echo '<div class="notice notice-success">'; echo '<p>Your custom message here!</p>'; echo '</div>';}?>
- Utilize Plugins: If coding isn’t your forte, there are plugins like “WP Notification Bars” or “Admin Notices Manager” that can simplify this process. With these plugins, you can quickly add, customize, and schedule notices without diving into code.
- Tailor Messages for Context: Make sure the messages are context-specific. For example, if there’s a new feature, create a notice explaining how it benefits the user.
- Keep it Concise: Make your notices clear and to the point. Remember, the goal is to inform without overwhelming.
By customizing admin notices and messages, you not only improve communication within your team but also increase overall efficiency. It’s those little details that can make all the difference in running a smooth eCommerce operation!
Creating Custom Reports
When managing a WooCommerce store, having access to tailored reports can significantly enhance your decision-making process. Custom reports allow you to focus on specific metrics that matter to you, enabling you to analyze sales trends, customer behavior, and inventory management more effectively.
To create custom reports in WooCommerce, you can utilize a variety of plugins or build your own tailored solution if you’re comfortable with coding. Some popular plugins for generating reports include:
- WooCommerce Google Analytics Integration: This plugin allows you to connect your WooCommerce store with Google Analytics, providing you with detailed insights into customer behavior directly through your dashboard.
- Metorik: Metorik offers advanced reporting features, including customer segmentation, cart abandonment tracking, and product performance analysis.
- WooCommerce Admin: Built into WooCommerce, this feature gives you access to core metrics, and with some customization, you can export the data into your desired formats.
To implement these reports effectively, ensure you define clear goals for what you want to analyze. For example:
| Report Type | Metrics to Track |
|---|---|
| Sales Report | Total Revenue, Average Order Value, Total Orders |
| Customer Report | New vs. Returning Customers, Customer Acquisition Cost |
| Product Report | Top Selling Products, Inventory Levels, Return Rates |
By focusing on these metrics, you can create reports that not only inform you about your current performance but also help you strategize for the future.
Best Practices for Customizing the Dashboard
Customizing your WooCommerce backend dashboard can make navigating and managing your online store a breeze. However, it’s essential to strike a balance between personalization and usability. Here are some best practices to keep in mind:
- Limit the Clutter: Only include widgets and information that are crucial for your daily operations. Too much information can overwhelm you and lead to critical metrics being overlooked.
- Use User Roles Wisely: If you have multiple users, customize the dashboard according to their roles. For example, store managers might need different insights compared to customer support agents.
- Highlight Key Performance Indicators (KPIs): Ensure that your most important metrics stand out. This can be achieved through color coding, larger fonts, or placing them at the top of your dashboard.
Additionally, consider the following tips for an effective dashboard:
- Utilize Dashboard Widgets: Adding or removing widgets is straightforward in WooCommerce. Choose widgets that align with your objectives.
- Regularly Review and Adjust: Your business needs may change over time, so be sure to revisit your dashboard customization periodically.
- Get Feedback: If you have a team, ask for their input on the dashboard layout and functionality. Collaboration can lead to an optimized setup.
By following these best practices, you ensure that your WooCommerce dashboard not only meets your needs but also enhances your overall productivity. Happy customizing!
Conclusion
Customizing the WooCommerce backend dashboard is an essential step for enhancing your eCommerce experience. By tailoring the dashboard to fit your business’s unique needs, you can streamline processes, make data-driven decisions quicker, and ultimately improve your store’s performance.
Throughout this guide, we explored various strategies and methods to effectively customize your WooCommerce backend. Key points included:
- Understanding User Roles: Tailoring the dashboard based on the roles of different users can improve efficiency.
- Utilizing Plugins: Many plugins are available that allow for greater flexibility in dashboard customization.
- Customizing Widgets: Adding, removing, or rearranging dashboard widgets helps focus on the most important metrics.
- Optimizing Reports: Customizing reports to display key performance indicators can help track your business’s health.
Furthermore, it’s important to regularly evaluate your dashboard’s layout and content to ensure it stays relevant as your business evolves.
Remember that a well-customized WooCommerce backend is not just about aesthetics; it plays a crucial role in boosting productivity and user satisfaction. By applying the techniques discussed here, you can create a more intuitive and effective backend experience for yourself and your team.


