If you’re running an online store using WooCommerce, you know that the dashboard is your central hub for managing products, orders, and customers. But did you know that you can tailor this dashboard to better fit your unique business needs? Customizing your WooCommerce dashboard allows you to streamline your workflow, making it easier to access important information quickly. In this guide, we’ll explore why and how to customize your
Why Customize Your WooCommerce Dashboard?

So, why should you consider customizing your WooCommerce dashboard? Well, there are several compelling reasons!
- Improved Efficiency: A customized dashboard lets you place the most important elements at your fingertips. By eliminating unnecessary clutter, you can focus on what matters most — running your business!
- Personalized Experience: We all have different preferences. Customizing your dashboard creates a more personalized experience that aligns with your workflow and style.
- Quick Access to Critical Metrics: Want to keep track of key performance indicators (KPIs) like sales and stock levels? A custom dashboard lets you feature these metrics prominently, enabling quicker decision-making.
- Enhanced Collaboration: If you have a team, customizing the dashboard allows you to control what each team member sees based on their role. This means that everyone gets the information relevant to them without the distraction of irrelevant data.
- Update Flexibility: Your business evolves over time, and so should your dashboard. Customizing it means you can regularly update it to meet changing needs, ensuring it remains effective.
In short, customizing your WooCommerce dashboard isn’t just about aesthetics; it’s about enhancing functionality to support your online store’s growth and efficiency. Are you ready to dive into the world of WooCommerce dashboard customization? Let’s get started!
Understanding the Default WooCommerce Dashboard Layout
The default WooCommerce dashboard serves as the command center for your online store. It’s designed to provide crucial insights at a glance and facilitate smooth day-to-day operations. Before diving into customization, it’s essential to understand what elements are included in the default layout.
Firstly, when you log into your WordPress admin area, you’ll see the WooCommerce menu on the left side. Here’s a rundown of the primary sections you encounter:
- Orders: This area displays all orders placed in your store. You can manage, filter, and update order statuses with ease.
- Products: This section allows you to add new products, manage existing ones, and categorize them for better organization.
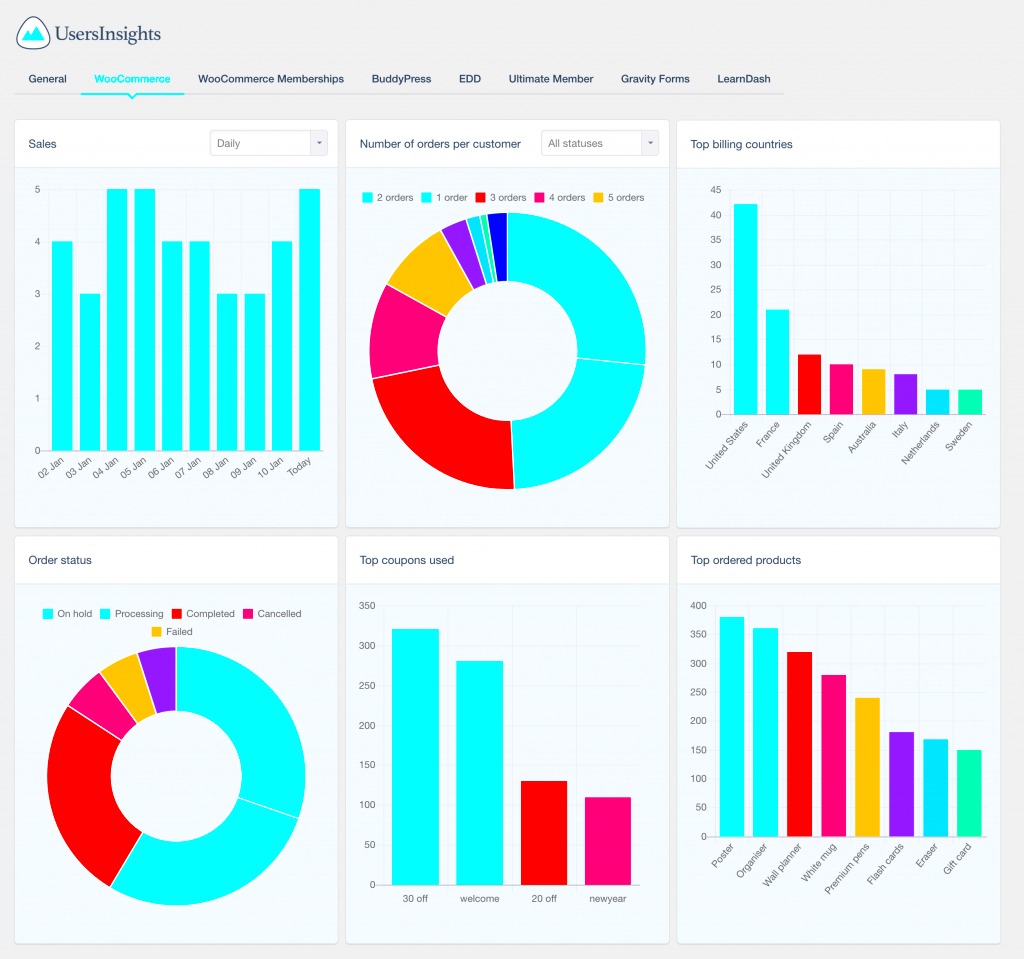
- Reports: It provides analytical insights, showcasing sales data, customer behavior, and stock status. Here, you can view graphs and tables to track your business performance.
- Coupons: Offers an overview of any discount codes you’ve created, granting you the ability to add, edit, or delete promotions easily.
- Settings: The nerve center for configuring every aspect of your store. Here you can set up payment methods, shipping options, tax settings, and more.
Additionally, the dashboard features a summary section on the home screen that gives a quick snapshot of total sales, net sales, and the number of orders processed. Understanding this layout is crucial since it sets the foundation for any changes or enhancements you might want to implement.
Exploring Customization Options
Now that we’ve navigated the default WooCommerce dashboard layout, let’s explore the exciting world of customization options. The flexibility of WooCommerce allows you to tailor the dashboard according to your specific needs and preferences, making it more user-friendly and aligned with your business goals.
Here are some popular customization options you might want to consider:
- Dashboard Widgets: You can add, remove, or rearrange widgets to prioritize information that matters most to you. For instance, if you frequently check sales statistics, you might want a sales graph to appear front and center.
- Custom Admin Themes: Several plugins allow you to change the look and feel of your dashboard. You can select themes that reflect your brand’s identity, turning a bland interface into a captivating workspace.
- User Permissions: Customize the dashboard view for different user roles. For example, if you have a store manager, you might want them to see only the orders and products sections, minimizing distractions and keeping focus on their responsibilities.
- Custom Shortcuts: You can create shortcuts for frequently used actions. This can speed up your workflow significantly by allowing quick access to essential features without navigating through multiple menus.
- Analytics Plugins: Integration with analytics tools can enhance your reporting capabilities. With plugins like “Google Analytics for WooCommerce”, you can fetch detailed insights right from your dashboard.
By diving into these customization options, you can transform your WooCommerce dashboard into a powerful tool that resonates more closely with your workflow and business objectives. The more tailored your dashboard is, the more efficiently you can manage your store, ultimately leading to increased productivity and success.
Using Plugins for Dashboard Customization
When it comes to customizing your WooCommerce dashboard, plugins can be your best friends. These little tools can significantly enhance your dashboard functionality without requiring any coding. Actually, with the right plugins, you can transform your dashboard into a tailored workspace that meets your specific needs. Let’s explore how plugins can help you customize your WooCommerce dashboard effectively.
Here are a few popular plugins that can aid in this endeavor:
- Adminimize: This plugin allows you to hide unnecessary items from the WordPress admin area, letting you focus on what truly matters. This is quite useful for shop owners who might find the default dashboard overwhelming.
- WP Custom Admin Interface: This plugin gives you the capability to modify the layout and look of your admin screens. You can customize how the WooCommerce dashboard looks by changing colors, icons, and even layout.
- WooCommerce Custom Dashboard: Specifically designed for WooCommerce, this plugin can help you create a dashboard that shows essential metrics at a glance, like sales, orders, and customers, right on the front page.
Using these plugins not only simplifies the admin interface but also enhances the overall user experience. Remember to check compatibility with your current theme and plugins to avoid any conflicts. Overall, customizing your WooCommerce dashboard using plugins is a straightforward, user-friendly way to make your eCommerce management even more efficient.
Step-by-Step Guide to Customizing the Dashboard
If you’re ready to dive into customizing your WooCommerce dashboard, this step-by-step guide will walk you through the process. Don’t worry – it’s simpler than you might think! Just follow along, and soon, you’ll have a dashboard that feels uniquely yours.
Step 1: Accessing the Dashboard Settings
First things first. Log into your WordPress admin panel. From the left sidebar, navigate to WooCommerce > Settings.
Step 2: Customize Your Home Screen
From the settings, you’ll be able to adjust various features. Click on the Advanced tab and head to the Dashboard section. Here, you can select what you want to feature on your dashboard.
Step 3: Use Data Widgets
WooCommerce provides various widgets that display key metrics. Drag and drop these widgets onto your dashboard to showcase important data points like total sales, recent orders, and more.
Step 4: Organize Your Layout
To make your dashboard truly yours, you can reorganize the layout. Simply grab the edges of each widget and drag them to your desired location. You can also remove widgets you don’t find useful.
Step 5: Save Your Changes
Once you are happy with your customized dashboard, don’t forget to hit Save! Your WooCommerce dashboard will be updated, reflecting your unique setup.
By following these simple steps, you’ll create a dashboard that doesn’t just look good but also works for you. Enjoy the enhanced user experience, and make those eCommerce tasks a breeze!
7. How to Add Custom Widgets to the Dashboard
Enhancing your WooCommerce dashboard with custom widgets can significantly improve your workflow and help you keep essential information at your fingertips. But how do you go about adding these custom widgets? Let’s break it down!
First, you need to familiarize yourself with the concept of widgets in WordPress:
- Widgets are small blocks that perform specific functions, allowing you to display information, stats, or tools on your dashboard.
- Widgets can be custom-built, allowing you to tailor them to your specific needs.
To add custom widgets, you’ll primarily work with PHP and WordPress’ widget API. Here’s a simple step-by-step method:
- Create a Custom Plugin: Start by creating a new plugin or adding to your theme’s functions.php file.
- Register the Widget: Use the
wp_add_dashboard_widget()function to register a new dashboard widget. Here’s a simple code snippet:
<!--?phpfunction my_custom_dashboard_widget() { echo "My Custom Widget"; echo "Welcome to your custom dashboard widget!
";}wp_add_dashboard_widget('my_custom_widget', 'Custom Dashboard Widget', 'my_custom_dashboard_widget');?>
- Customize the Output: Inside your widget function, you can add HTML, CSS, or even JavaScript to customize what’s displayed.
- Test Your Widget: Once you’ve added your code, refresh your dashboard to see your new widget in action!
And just like that, you have your custom dashboard widget! Remember, the possibilities are endless—you can create widgets for sales stats, product performance, or even a quick overview of pending orders. Have fun customizing!
8. Hiding Unnecessary Widgets and Sections
If your WooCommerce dashboard feels cluttered, you’re not alone! Many store owners prefer a cleaner view, free from unnecessary widgets and sections. The good news is that hiding them is quite simple!
WordPress allows you to manage dashboard widgets directly. Here’s how you can hide those pesky distractions:
- Using Built-in Options: Some plugins come with built-in options to disable specific dashboard widgets. Navigate to the
Screen Optionstab at the top right of the dashboard to see what you can toggle off. - Custom Code: For more control, you can use a bit of PHP code. Adding this snippet to your functions.php file will help you hide unwanted widgets:
- Using a Plugin: Consider using plugins like Adminimize or Dashboard Commander. These plugins provide user-friendly interfaces to manage dashboard widgets without touching any code.
- Role Management: If you’re running a multi-user store, some plugins allow you to hide widgets based on user roles, ensuring each user sees only relevant information.
Taking a moment to customize your WooCommerce dashboard not only declutters your workspace but also helps you focus on what matters. So, roll up those sleeves and remove the distractions today!
Rearranging Dashboard Elements
One of the most appealing aspects of WooCommerce is its flexibility, particularly when it comes to customizing your dashboard. Rearranging dashboard elements can significantly enhance your workflow by placing the most important tools right at your fingertips. But how do you go about this? Let’s break it down step-by-step.
First, log in to your WooCommerce dashboard. You’ll see different widgets displaying various metrics, analytics, and informational panels. To rearrange these elements, simply hover over the widget you want to move. You’ll notice a dotted outline appear around it, along with a drag handle in the top-left corner.
Here’s how to rearrange your dashboard elements:
- Select the Widget: Click and hold the drag handle.
- Drag and Drop: Move it to your desired location within the dashboard. You’ll see space open up as you drag.
- Release: Once you’ve placed the widget where you want, let go of the mouse button.
It’s that simple! Want to personalize your experience further? Consider grouping related widgets together. For instance, you may want all sales-related widgets in one area and customer analytics in another.
Pro Tip: Regularly assess your dashboard layout. As your store grows, the metrics that matter to you might change. Keep things fresh and aligned with your current goals!
Saving and Sharing Your Customized Dashboard Layout
After putting in all that hard work customizing your WooCommerce dashboard, you’ll want to ensure your layout is saved and shareable with your team. This becomes even more crucial if you work collaboratively with multiple team members. Thankfully, WooCommerce allows you to save your customized layout, making it a breeze to share or revert to your preferred setup.
To save your customized dashboard layout, follow these simple steps:
- Finalize Layout: Make sure you’re happy with your dashboard arrangement.
- Save Changes: Depending on the theme or plugins you’ve installed, look for a ‘Save Layout’ button within dashboard settings. Click it!
- Check Accessibility: Ensure your team members have permission to view these changes, especially if they’re logging in from different accounts.
You can also share your dashboard layout with your colleagues. Most WooCommerce setups allow you to export your layout settings. You can do this by navigating to the dashboard settings and selecting the option to Export Layout. Share the exported file with your team members, and they can import it on their end.
Remember: If your teammates are going to make their customizations, ensure there’s open communication to avoid layout conflicts. Encouraging everyone to adopt a consistent workflow can significantly streamline operations.
11. Best Practices for WooCommerce Dashboard Customization
Customizing the WooCommerce dashboard can significantly enhance your productivity and give you better control over your online store. However, there are best practices you should consider to ensure a smooth experience. Here are some key tips:
- Understand Your Needs: Before diving into customization, clearly define what you need from your dashboard. Are you focusing on sales metrics, order management, or customer engagement? Knowing your priorities helps streamline the customization process.
- Choose the Right Plugins: Lots of plugins are available to customize your dashboard. However, not all are created equal. Look for plugins that are well-reviewed and actively maintained to avoid compatibility issues in the future.
- Minimalism is Key: Avoid cluttering your dashboard with too many widgets. Focus on the most important information and remove any components that don’t add value to your daily tasks. A clean, minimal layout allows you to find what you need quickly.
- Regularly Update Customizations: Stay on top of your customizations! Regular reviews can help you identify what’s working and what needs improvement. As your business grows, your dashboard needs might change too.
- Document Changes: Keep a record of the customizations you make. This not only helps in troubleshooting but also in keeping other team members informed about the dashboard setup.
By following these best practices, you can create a WooCommerce dashboard that is tailored to your specific needs, making it a powerful tool for managing your online store effectively.
12. Troubleshooting Common Customization Issues
Even with the best practices in place, you may encounter some hiccups while customizing your WooCommerce dashboard. Here are common issues and how to resolve them:
- Missing Widgets: If widgets are missing after updating your theme or plugins, try reactivating the plugin that controls those widgets. If the problem persists, check for conflicts with other plugins.
- Performance Issues: Sometimes, heavy customizations can slow down your dashboard. If you notice slow loading times, consider removing unnecessary widgets or optimizing your existing customizations.
- Errors After Updates: After a WordPress or plugin update, changes you made might not work as intended. In this case, clear your cache and check for compatibility issues. It might also help to roll back the update temporarily while you troubleshoot.
- Permissions Issues: Ensure that all users have the correct permissions to see customized sections. If some team members report they can’t access certain features, verify their user roles and capabilities.
- Unresponsive Dashboard: If your dashboard becomes unresponsive, this could be due to JavaScript errors or conflicts between plugins. Use the browser’s developer mode to check for errors and consider disabling non-essential plugins to isolate the issue.
By keeping these troubleshooting tips in mind, you can maintain a smooth, effective customization experience for your WooCommerce dashboard, enabling you to manage your business with confidence.
Customize the WooCommerce Dashboard: A Complete Guide
The WooCommerce dashboard is the control center for your online store, and customizing it can significantly enhance your workflow, improve productivity, and give you a clearer overview of essential metrics. Tailoring the dashboard to meet your specific needs can be achieved through a variety of methods. Here’s how you can take control:
1. Use Custom Widgets
Widgets can be added, removed, or rearranged to suit your preferences. Consider incorporating the following:
- Product Sales Figures: Display real-time sales data for quick access.
- Stock Levels: Keep track of your inventory directly from the dashboard.
- Recent Orders: Get a quick overview of the latest transactions.
2. Adjust Dashboard Layout
You can change the layout of the dashboard to increase efficiency. Here is a simple table showing options:
| Layout Option | Description |
|---|---|
| Grid View | Best for visual-heavy administration. |
| List View | Ideal for detailed reports and in-depth data reviews. |
3. Third-Party Plugins
Leverage plugins such as:
- Admin Columns: Add custom columns to your product listings.
- Dashboard Widgets for WooCommerce: Create tailored dashboard widgets for further insights.
4. User Roles and Permissions
Control access by customizing user roles. This ensures that team members only see relevant data, enhancing security and clarity.
In summary, customizing your WooCommerce dashboard is not just about aesthetics; it is about enhancing functionality, improving user experience, and streamlining management processes. By implementing these changes, you can create a dashboard that perfectly aligns with your business needs, empowering you to manage your online store more effectively.


