WordPress is a fantastic platform for creating all kinds of content, but sometimes, the built-in post and page types just don’t cut it. This is where Custom Post Types come into play. They allow you to create unique content types that suit your specific needs—be it portfolios, testimonials, or product listings. In this guide, we’ll walk you through the ins and outs of creating custom post types, so you can harness the full power of WordPress tailored to your project.
Why Use Custom Post Types?

So, you might be asking yourself, “Why bother with Custom Post Types?” Well, let’s break it down a bit. Here are some compelling reasons to consider:
- Flexibility: Custom Post Types allow you to organize your content in a way that makes sense for your website. Instead of cramming everything into the default ‘Posts’ or ‘Pages,’ you can create categories tailored to your specific content types.
- Improved Organization: Having a dedicated post type can help streamline your content management. Imagine having a separate section just for products, events, or portfolios—it’s much easier to find what you need!
- User-Friendly: If you’re working with a team, Custom Post Types can make content creation more intuitive. Team members won’t have to sift through unrelated posts; instead, they can focus on the specific content type that they need to manage.
- SEO Benefits: Custom Post Types can also enhance your website’s SEO. By organizing content better and targeting specific keywords, you can improve your visibility on search engines.
In short, Custom Post Types provide you with the tools to create a more structured, organized, and effective WordPress site. Let’s dive deeper into how to set them up!
Step 1: Understanding Post Types in WordPress
When diving into the world of WordPress, one of the foundational concepts you’ll encounter is that of post types. Essentially, a post type in WordPress defines the kind of content you’re dealing with. By default, WordPress comes with several built-in post types, which include:
- Posts: The traditional blog entries that are displayed in reverse chronological order.
- Pages: Static content that is not time-sensitive, ideal for “About” or “Contact” sections.
- Attachments: Media files that are uploaded to your site.
- Revisions: Previous versions of your posts or pages.
However, the magic of WordPress lies in its extensibility. You can indeed create custom post types to cater to your specific needs. Imagine a scenario where you run a movie review site; creating a “Movie” post type would allow you to categorize and manage movie reviews more effectively, separate from standard posts or pages.
Custom post types help you:
- Organize Content: Keep your content structured and easy to manage.
- Enhance Functionality: Facilitate the use of custom fields and taxonomies.
- Boost Usability: Allow non-technical users to easily add and manage specialized content.
In essence, understanding and leveraging post types can significantly enhance your WordPress site’s functionality. With that clarity, let’s jump into the preparations needed for creating custom post types.
Step 2: Preparing Your WordPress Environment
Before you start creating custom post types in WordPress, it’s essential to ensure your environment is ready and optimized for this endeavor. Here are the steps you should consider:
- Backup Your Website: Always have a backup in place. You can use plugins like UpdraftPlus or BackupBuddy to secure your current site data.
- Update WordPress: Make sure your WordPress installation is up to date. An outdated site may lead to compatibility issues when introducing custom post types.
- Choose a Child Theme: If you’re working on a theme that’s likely to be updated, use a child theme. This way, your customizations won’t be lost during updates.
Also, consider setting up a local development environment. Tools like Local by Flywheel or MAMP can help you create a safe space to play around with code without affecting your live website.
Lastly, it’s good practice to familiarize yourself with basic programming concepts, especially PHP, as custom post types involve coding. Don’t worry if you’re a newbie; there are countless resources available, and you’ll pick it up along the way.
By making these preparations, you’ll ensure that your journey into creating custom post types is smooth and efficient. With all this set up, you’re almost ready to dive into the fun part of actually building those custom post types!
Step 3: Registering a Custom Post Type
Now that you’ve got your concept in mind, it’s time to dive into the fun part: registering your custom post type (CPT). This essentially tells WordPress that you want to create a new type of content, separate from posts and pages. Don’t worry, the process is quite straightforward and only requires a few lines of code!
You’ll want to add this code in the functions.php file of your theme. But before you do, make sure you have a backup just in case you run into any hiccups. Here’s a basic template to get you started:
function create_custom_post_type() { register_post_type('your_custom_post_type', array( 'labels' => array( 'name' => __('Your Custom Posts'), 'singular_name' => __('Your Custom Post') ), 'public' => true, 'has_archive' => true, 'supports' => array('title', 'editor', 'thumbnail'), 'rewrite' => array('slug' => 'your-custom-posts'), ) );}add_action('init', 'create_custom_post_type');This code registers a new post type called “Your Custom Post“. Here are a few parameters you might want to tweak:
- labels: Customize how your post type appears in the WordPress dashboard.
- public: Set to true to make it visible on the front end.
- supports: Choose which features you want to include (like the editor, thumbnail, etc.).
- rewrite: Change the permalink structure to suit your needs.
Save your changes, and voilà! Your custom post type is now registered. You should see it in your WordPress dashboard menu. Exciting, right?
Step 4: Adding Custom Fields and Taxonomies
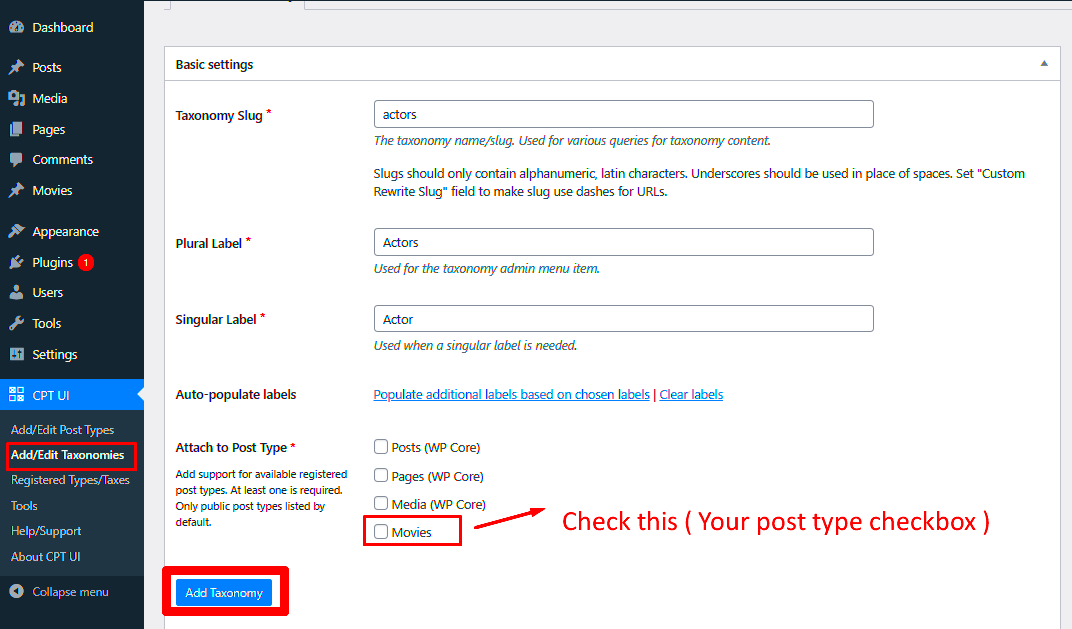
With your custom post type up and running, you’re probably noticing that it’s a bit bare-bones. To fully exploit the potential of your new CPT, it’s time to add custom fields and taxonomies. Think of custom fields as extra information you can collect for each post and taxonomies as a way to classify your posts.
For custom fields, there are excellent plugins like Advanced Custom Fields (ACF) that make the process super easy. Just install the plugin, create a field group, and add fields that suit your specific needs. Here’s how to go about it:
- Install and activate the ACF plugin.
- Create a new field group and provide a title.
- Add your fields (like text boxes, images, etc.).
- Select the location to show this field group (e.g., your custom post type).
- Save the field group.
When you go back to your custom post type, you’ll see these fields ready to be filled in.
Now, when it comes to taxonomies, you can create custom categories and tags specifically for your new post type. This makes it easier for your audience to navigate through related content. Here’s a quick code snippet to register a custom taxonomy:
function create_custom_taxonomy() { register_taxonomy( 'your_custom_taxonomy', 'your_custom_post_type', array( 'label' => __('Your Custom Taxonomy'), 'rewrite' => array('slug' => 'your-custom-taxonomy'), 'hierarchical' => true, ) );}add_action('init', 'create_custom_taxonomy');After you add this code, your custom taxonomy will appear alongside the WordPress tags and categories. Now your custom post type is enriched with all the extra info and classification it needs to thrive!
Step 5: Displaying Custom Post Types on Your Website
Congratulations on creating your custom post type in WordPress! The next crucial step is displaying it on your website so your audience can engage with the content. Let’s break it down:
There are various ways to display your custom post types, but primarily you’ll use either templates or shortcodes. Here’s how you can do it:
- Template Files: You can create a custom template file in your theme. For example, if your custom post type is ‘portfolio’, you might create a file named
archive-portfolio.php. This file will control how your portfolio items are displayed when users visit that section of your site. - Using Shortcodes: If you want to embed the posts in other pages, consider using shortcodes. You might create a custom shortcode to display a list of your custom post types. This is particularly handy for using them in posts or pages without having to dive into template editing.
- Widgets: You can also add custom post types to your sidebar or footer using widgets. Some themes might have built-in options, or you can use plugins to help you display your custom post types as widgets.
Don’t forget to style your custom post type listings to make them visually appealing. You can customize the loop in your template files, using CSS to make sure they match the overall look and feel of your website. A well-defined layout makes a huge difference in user experience!
Step 6: Managing and Editing Custom Post Types
Once your custom post types are visible on your site, it’s essential to know how to effectively manage and edit them. This ensures your content remains relevant and user-friendly. Here’s how to navigate this process:
WordPress makes it pretty straightforward to manage your custom post types. On the admin dashboard, you’ll typically see a new menu item corresponding to your custom post type, such as “Portfolio” or “Testimonials.” Once you’re there, you can:
- Add New Entries: Click on the “Add New” button to create a fresh entry. You’ll have the same editing interface as regular posts, allowing you to add a title, content, and any custom fields you defined.
- Edit Existing Posts: To modify an existing entry, simply hover over it and click “Edit”. You can update content, change images, or tweak any other details as required.
- Bulk Actions: If you need to manage multiple entries at once, take advantage of the “Bulk Actions” dropdown. You can quickly delete, edit, or change the status of several posts simultaneously.
Regular maintenance is vital. Check back periodically to update or remove content that may no longer be relevant. Keeping your custom post types fresh will not only engage visitors but also positively impact your site’s SEO. Remember, with great power comes great responsibility—so manage your custom post types wisely!
Troubleshooting Common Issues
Creating custom post types in WordPress is generally a smooth process, but sometimes things can go awry. No need to worry! Here, we’ll tackle some common issues you might encounter when setting up your custom post types and how to resolve them.
1. Custom Post Type Not Showing in Admin Menu:
If your newly created post type isn’t visible in the admin menu, here are a couple of things you should check:
- Ensure that you have registered the post type properly in your theme’s functions.php file.
- Check the
show_uiparameter in your registration function. It should be set totrue.
2. Permalink Issues:
Sometimes, after creating a custom post type, you might encounter 404 errors when trying to view it on the front end. The solution is simple:
- Go to Settings > Permalinks in your WordPress dashboard.
- Click the “Save Changes” button without altering anything. This action refreshes the permalinks.
3. Missing Custom Fields:
If you find that custom fields are not showing up for your post type:
- Ensure that you’ve included support for custom fields when registering the post type.
- Confirm that you’ve opted into using custom fields in the WordPress editor.
4. Theme Compatibility:
Not all themes are optimized for custom post types. If you’re facing issues with layout or appearance:
- Check your theme’s documentation for compatibility.
- Consider creating a custom template for your post type.
By following these troubleshooting tips, you’ll be able to iron out common problems and make your custom post types work seamlessly.
Conclusion and Best Practices
Congratulations on your journey in creating custom post types in WordPress! While diving into custom post types might seem intimidating at first, it equips you with the power to organize your content more effectively and present it in a way that resonates with your audience.
Best Practices: To wrap up, here are some best practices to follow:
- Keep it Organized: Ensure to name your post types intuitively. This makes it easier to manage later.
Example: If you’re creating a video custom post type, consider naming itvideo_postsinstead of a generic name. - Utilize Taxonomies: Include custom taxonomies where needed to categorize your content effectively.
Example: For a recipe post type, you might want to create taxonomies forcuisineormeal type. - Test Responsiveness: Always check how your custom post types render on different devices.
- Leverage Plugins: Make use of plugins that enhance functionality without heavy coding.
- Regular Backups: Always back up your website before making significant changes.
By following these guidelines and best practices, you’ll ensure that your custom post types are not only useful to you but also a delight for your visitors. Happy blogging!


