Welcome to our guide on creating button links in Elementor! If you’re looking to enhance your website’s user experience, buttons are a fantastic way to encourage visitors to explore more. They’re eye-catching, easy to navigate, and can lead users exactly where you want them to go. In this post, we’ll dive into everything you need to know about button links in Elementor, making sure that by the end, you’ll be able to create some striking buttons that link to any page in a breeze.
Understanding Button Links in Elementor
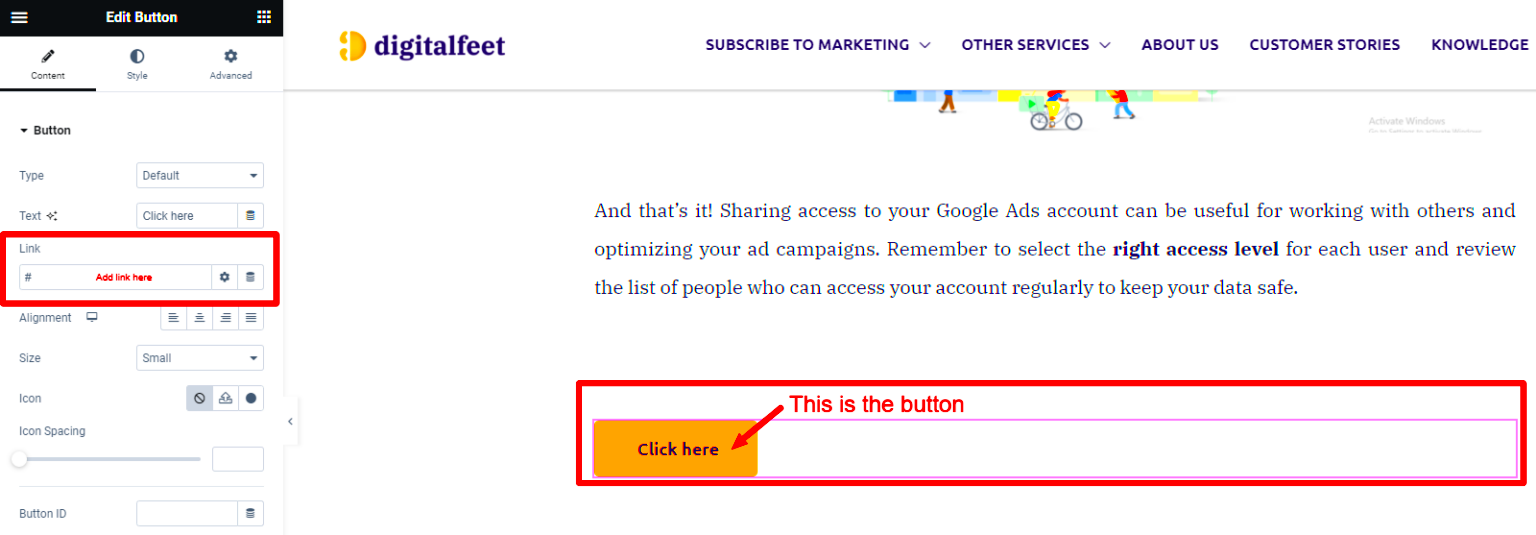
Button links in Elementor serve as a fundamental element for engaging website visitors. They not only guide users through your site but also improve your site’s overall interactivity. Let’s break down why they’re important and how they function:
- Navigation Simplified: Buttons provide a quick way for users to navigate through various pages or sections of your site without the need for excessive scrolling or clicking.
- Enhanced Aesthetics: A well-designed button can enhance the visual appeal of your website, making it more welcoming and functional.
- Action-Oriented: Buttons are typically associated with action—whether it’s signing up, buying a product, or viewing more content, they encourage users to take the next step.
Now that we’ve highlighted their importance, here’s what you need to know about creating these buttons:
| Feature | Description |
|---|---|
| Link Settings | Choose the URL you want the button to direct to, whether it’s internal (another page on your site) or external (different website). |
| Style Customization | Modify the button’s appearance, including color, size, border, and hover effects to match your site’s design. |
| Alignment & Position | Easily align your button within a section, column, or widget to achieve your desired layout. |
Understanding these features will set the foundation for creating effective button links that resonate with your audience. Ready to jump in? Let’s get started!
Setting Up Your Elementor Page
Before we jump into creating button links, let’s set the stage by setting up your Elementor page. If you’re new to Elementor, it’s a fantastic drag-and-drop page builder for WordPress that makes designing your website a breeze. Let’s get started!
First things first, you need to have the Elementor plugin installed and activated on your WordPress site. If you haven’t done this yet, just head over to the “Plugins” section, search for Elementor, install it, and activate.
Once you’ve got Elementor running:
- Go to your WordPress Dashboard.
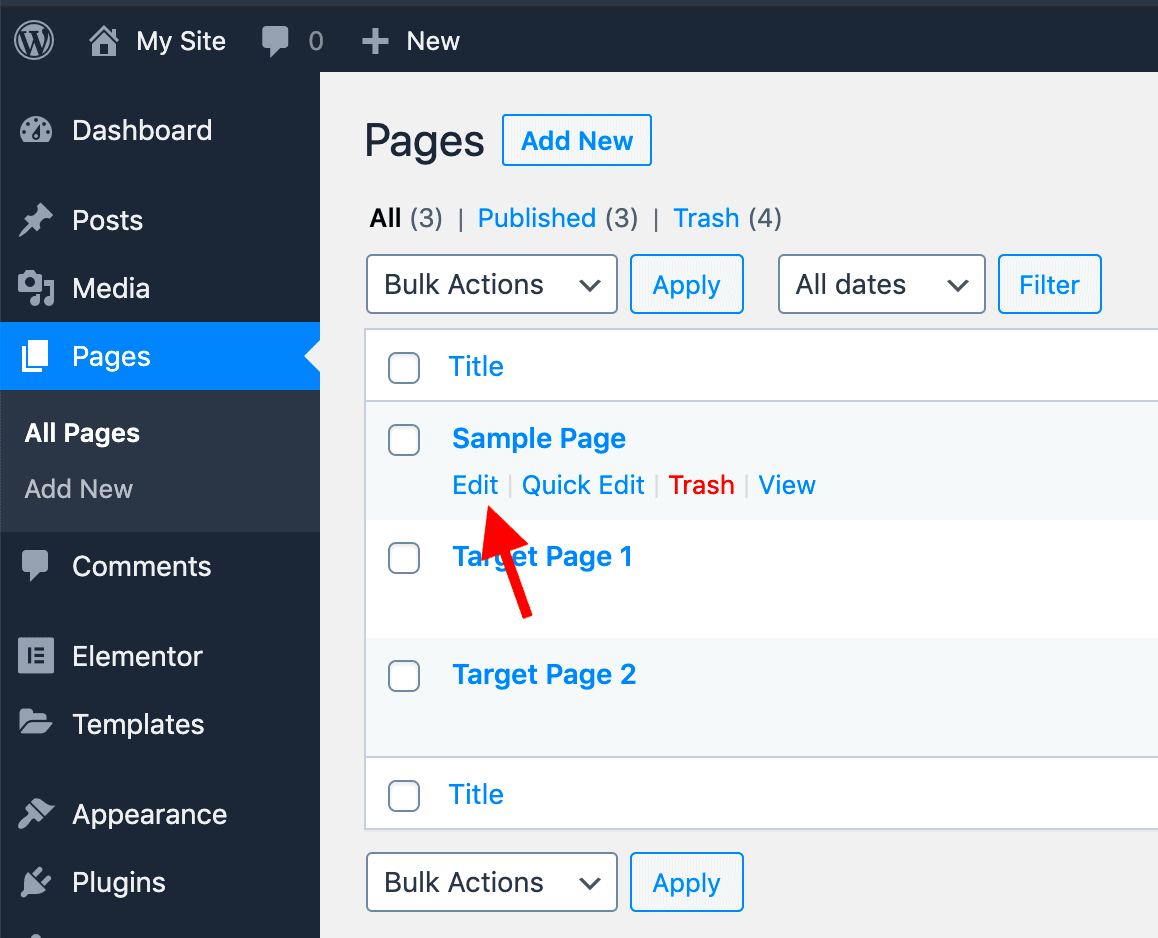
- Navigate to “Pages” and either create a new page or edit an existing one.
- Click on the “Edit with Elementor” button to launch the Elementor interface.
Now that you’re in the Elementor editor, you’ll see a blank canvas on one side and a panel of widgets on the other. It’s like a sandbox where your creativity can run wild!
To make your layout more structured:
- Add Sections: Use sections to create the primary divisions on your page.
- Insert Columns: Each section can contain multiple columns, allowing you to design layouts that fit your needs.
- Choose Structure: Elementor gives you various structure options like single-column, two-column, or three-column layouts to work with.
Once you’ve set up your structure, you’re all set to start adding elements, including button links. Just make sure to save your work as you go along!
Adding a Button Widget
Now that your Elementor page setup is complete, let’s dive into the fun part: adding a button widget! Buttons are not just decorative; they’re essential for guiding your visitors to take action, whether it’s leading them to another page, signing up for a newsletter, or making a purchase.
Here’s how you can effortlessly add a button widget to your page:
- In the Elementor editor, look over to the panel on the left where you’ll find a variety of widgets.
- Type “Button” into the search bar, or scroll down until you see the Button widget.
- Simply drag and drop the Button widget into your designated section on the right side of the page.
Now, let’s configure that button!
Customizing Your Button
Once you’ve placed the button, you’ll see various options to customize its appearance:
- Text: Change the button text to something catchy like “Learn More” or “Get Started.”
- Link: This is where the magic happens! Input the URL of the page you want to link to. Make sure to use “https://” for external links.
- Alignment: Choose how you want the button aligned—left, center, or right.
- Icon: You can also add an icon to your button to make it visually appealing!
Don’t forget to explore the Style tab for more customization options such as color, typography, and hover effects. Making it visually stand out can enhance user interaction significantly.
Once you’re satisfied with your button’s appearance and settings, hit the “Publish” or “Update” button, and voila! You’ve successfully added a button link to your Elementor page. Now your site visitors have a clear pathway to follow! Happy designing!
Configuring Button Link Settings
When it comes to creating button links in Elementor, one of the first crucial steps is configuring the button link settings properly. This ensures that your buttons lead users exactly where you want them to go, enhancing the usability and interactivity of your site. Luckily, Elementor makes this incredibly intuitive, even for those who may not be tech-savvy.
To start, click on the button widget you’ve added to your page. Then, look at the left panel where you’ll see the ‘Content’ tab. Within this tab, you’ll find the ‘Link’ field. Here’s where you can input the URL for the destination page. You might want to:
- Link to another page on your website.
- Direct users to an external website.
- Set up an email link that opens the user’s email client.
- Link to a phone number for easy calling.
Moreover, this is the perfect time to configure how the link will behave when clicked. Elementor allows you to set a target for the link:
| Target Setting | Description |
|---|---|
| Default | Opens the link in the same tab. |
| New Window | Opens the link in a new tab or window. |
By thoughtfully configuring your button link settings, you’re ensuring a smooth user experience that aligns with how you want your visitors to engage with your content.
Customizing Button Appearance
The appearance of your buttons can be just as important as their functionality. After all, a well-designed button not only attracts attention but also encourages clicks, driving users to take action. In Elementor, you have an array of customization options at your fingertips!
To begin, select your button widget and navigate to the ‘Style’ tab in the left panel. Here, you can adjust multiple elements of your button’s aesthetics:
- Background Color: Choose a color that stands out against your website’s background. Contrast is key!
- Text Color: Ensure that the button text is easily readable by selecting a color that complements the background.
- Border Radius: To give your button a softer look, adjust the border radius. A small radius provides a modern touch.
- Padding: Control the space inside the button. Adding padding increases the clickable area, making it easier for users to interact.
- Typography: Customize the font style, weight, size, and letter spacing to align with your branding.
Don’t forget about hovering effects! These nifty effects add an interactive element to your button. Under the ‘Hover’ section, you can change the background color, text color, or even add an animation to make your button pop.
By investing time into customizing your button appearance, you’re not only enhancing your website’s visual appeal but also improving the overall user experience. A great-looking button helps convert visitors into customers—so make it count!
7. Setting Up Button Actions
When it comes to creating button links in Elementor, setting up the right actions is key to ensuring a seamless user experience. With Elementor’s intuitive interface, you can easily customize button actions to lead your visitors exactly where you want them to go!
To begin, select the button widget you want to work with. In the settings panel on the left side, you’ll find a field labeled ‘Link.’ This is where you’ll enter the URL of the page you want the button to link to. You can link it to internal pages, external websites, or even sections within the same page. Here’s how to approach this:
- Internal Links: If you’re linking to another page on your website, simply start typing the page name in the Link field. Elementor will suggest the relevant internal pages for you. This is a great way to keep users engaged and decrease bounce rates.
- External Links: For an external URL, make sure to use the full URL, including http:// or https://. This ensures your button leads to the right destination.
- Anchor Links: To navigate to a specific section on the same page, prefix the section ID with a hashtag. For example, if the section is named “services,” use #services.
Additionally, under the ‘Advanced’ tab in the button settings, you can set the target for the link action. Choose between ‘Same Window’ or ‘New Window’ depending on how you want users to interact with the link. Providing a convenient way for users to open links in new tabs can enhance their browsing experience.
Don’t forget to customize the button’s appearance, including its size, color, and hover effects, to ensure it stands out. After setting everything up, preview your changes to see how your button performs!
8. Mobile Responsiveness Considerations
In today’s world, mobile responsiveness is crucial. With more users accessing websites via their smartphones, ensuring your buttons are mobile-friendly is essential. Luckily, Elementor provides various tools to guarantee your button links look and function great on all devices!
First, it’s important to preview how your button appears on mobile. With Elementor, you can easily switch to mobile view by clicking on the responsive mode icon at the bottom of the sidebar. This allows you to make adjustments specifically for mobile users without altering the desktop layout.
- Button Size: Ensure that your button is neither too small nor too large. A button that’s too small can be hard to click, while an oversized button may clutter the screen. A good size is around 44×44 pixels, which is widely considered the minimum for touch targets.
- Padding and Margins: Adjust the padding and margins in mobile view to ensure adequate space around the button. This helps prevent accidental clicks on adjacent elements!
- Text Size: Make sure the text on your button is legible. You can adjust the typography settings separately for mobile to ensure readability on smaller screens.
- Testing: After making adjustments, test the button on actual devices if possible. Simulators are helpful, but real-world testing can uncover any usability issues.
Remember, a seamless mobile experience increases the likelihood that users will engage with your content and explore further. By paying attention to mobile responsiveness, you’ll create a more functional and welcoming web environment for all visitors!
9. Testing Your Button Links
Once you’ve created your button links in Elementor, the next crucial step is testing them. This isn’t just the final cherry on top; it’s essential to ensure everything functions smoothly! A broken link or a redirection error could frustrate your visitors and deter them from exploring your site further. Let’s dive into how to effectively test your button links.
First off, here are a few simple steps you can follow to make sure your links are working as intended:
- Preview Your Page: Use the preview option in Elementor to check how your buttons look and function before publishing. It’s a great way to see things from a visitor’s perspective.
- Click Away: Go ahead and click on each button. Are they directing you to the expected page? Make sure each link works without any hitches!
- Check on Different Devices: Don’t limit your testing to just your computer. Test your links on mobile devices and tablets to ensure they’re responsive and user-friendly across all platforms.
- Use Tools for Verification: There are various online tools available that can help you check for broken links on your website. Tools like Screaming Frog SEO Spider can be quite handy.
By taking the time to test your button links, you’re not just ensuring that they work; you’re also making sure that your visitors have a smooth and enjoyable user experience. In the end, a well-tested link contributes greatly to retaining your readers and enhancing their journey through your site.
10. Conclusion
Creating button links in Elementor is a straightforward yet powerful way to enhance user navigation on your website. With just a few clicks, you’ve learned how to design eye-catching buttons that can lead your audience to critical content, whether it be another page, a signup form, or even a third-party service.
In summary, remember these key points:
- Design Matters: Make your buttons visually appealing. Use contrasting colors, clear text, and adequate padding to grab attention.
- Placement is Key: Position your buttons prominently for maximum visibility. They should be easy to find, ideally above the fold, and in logical spots on your page.
- Testing is Essential: Never skip the testing phase! Verify that all your links are functional and seamless across devices.
By implementing these strategies, you’ll not only create effective button links but also contribute positively to your website’s overall user experience. So, go on, take these tips and start building button links that guide your users on an exciting journey through your site!

