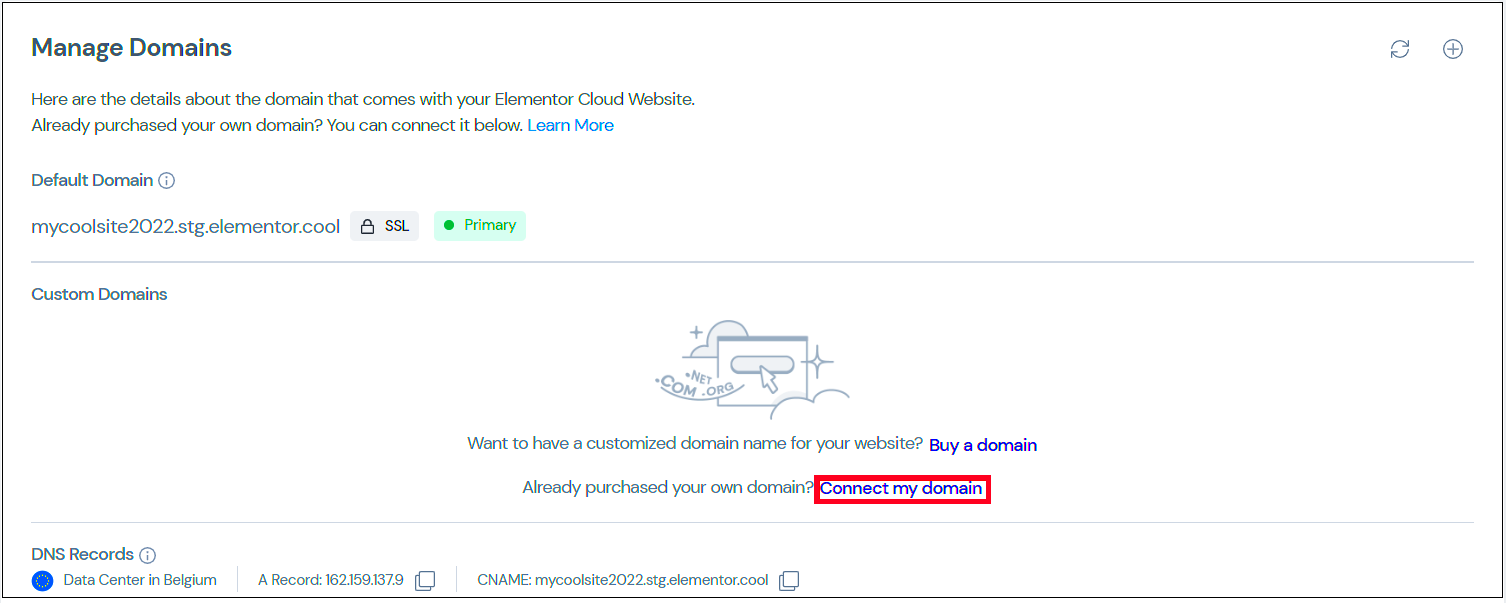
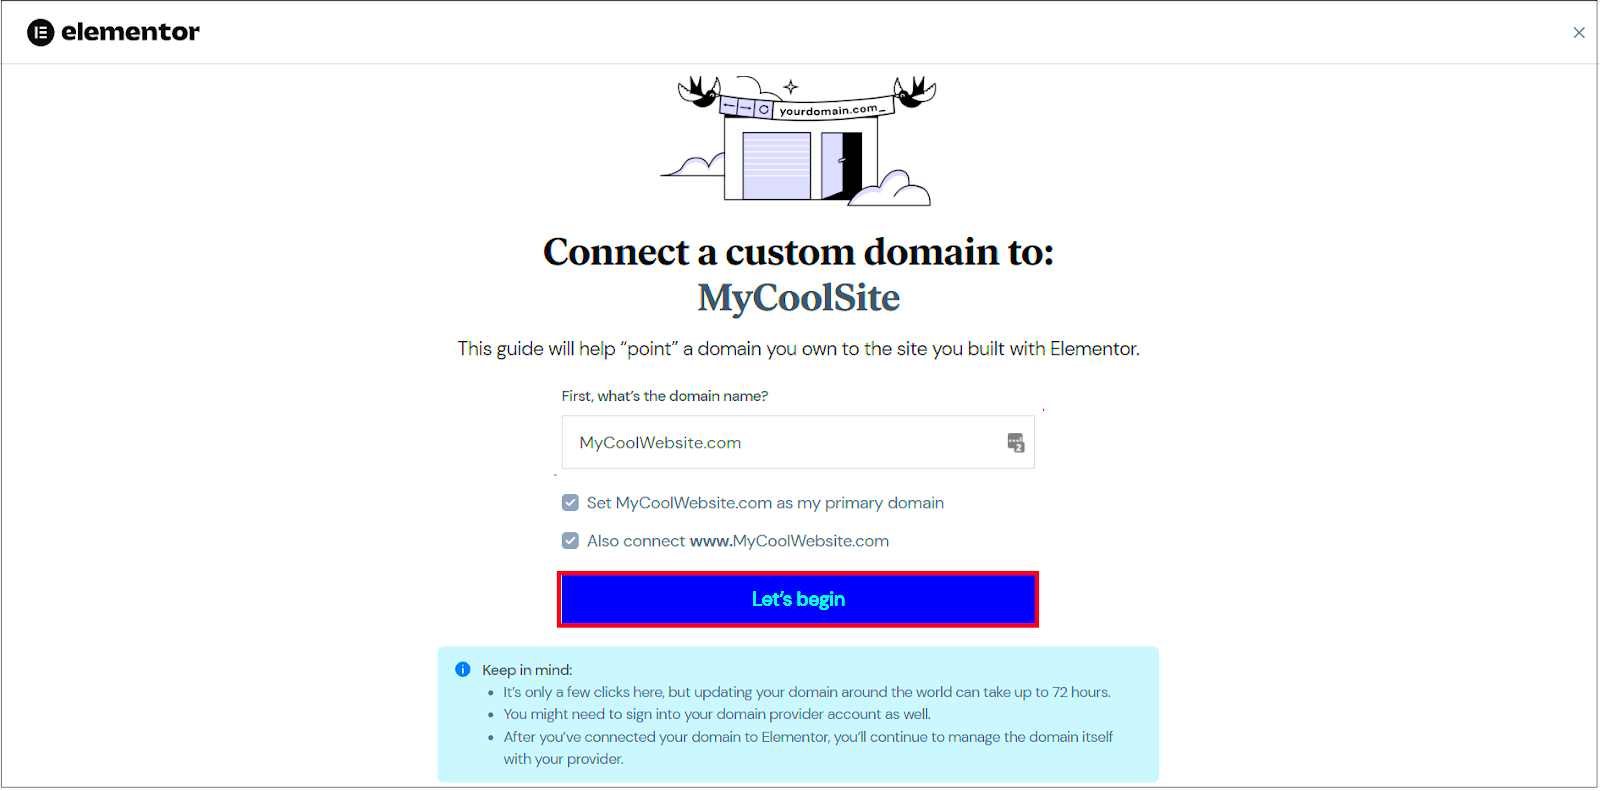
Connecting a new domain to your Elementor page can unlock a world of possibilities for your online presence. Whether you’re launching a blog, a small business site, or an online portfolio, having the right domain name is crucial for branding and accessibility. In this guide, we’ll walk you through the essential steps to connect another domain to your Elementor-built page. So, let’s dive in and get your website ready for the spotlight!
Understanding Domains and Elementor

Before we jump into the technical details, let’s take a moment to understand what domains and Elementor are, and why they matter for your website.
What is a Domain?
A domain is essentially your website’s address on the internet. It’s what users type into their browser to access your site. For example, www.yoursite.com is a domain name. Here are a few key points about domains:
- Unique Identifier: Every domain is unique; no two websites can have the same domain.
- URL Structure: A domain is part of a larger URL structure that can include subdomains, paths, and query parameters.
- Domain Extensions: Domains come with different extensions like .com, .org, .net, etc., which indicate the type or purpose of the website.
What is Elementor?
Elementor is a popular WordPress page builder that allows you to create beautiful, responsive websites without any coding knowledge. Here’s why Elementor is loved by many:
- User-Friendly: It features a drag-and-drop interface, making it super easy to design web pages.
- Customization: With a wide range of widgets and templates, you can customize every aspect of your page.
- Responsive Design: Elementor ensures that your website looks great on all devices, from desktops to mobile phones.
Understanding these fundamentals will set you up for success as we guide you through the process of connecting another domain to your Elementor page.
3. Prerequisites Before Connecting a Domain
Before you dive into connecting a new domain to your Elementor page, it’s crucial to ensure that you have all the pre-requisites in place. This step can save you time and simplify the process, making it much smoother. So, let’s break it down.
1. Domain Name: Firstly, you need to have a domain name ready. If you haven’t picked one yet, think about the purpose of your site. The name should be memorable and relevant to your content.
2. Hosting Provider: You’ll need a reliable hosting provider that supports your Elementor page. Some popular options include Bluehost, SiteGround, and HostGator. Make sure your hosting package allows for domain connections.
3. Access to DNS Settings: It’s vital to have access to the Domain Name System (DNS) settings of your current domain. This usually requires your login credentials for your domain registrar’s portal.
4. Elementor Installed: Ensure that you have Elementor installed on your WordPress website. If you haven’t done this yet, it’s easily done through your WordPress dashboard.
5. Backup Your Site: To avoid any panic during the connecting process, back up your existing website. This way, you can restore it if something goes wrong.
6. Knowledge of FTP or File Manager: It’s handy to have basic knowledge of FTP (File Transfer Protocol) or your File Manager, just in case you need to access files during the process.
Once you’ve ticked off these prerequisites, you’re all set to move on to the next step of purchasing your new domain. It’s going to be a thrilling ride, so buckle up!
4. Step 1: Purchase Your New Domain
Alright, let’s get this show on the road! The first step in connecting a new domain to your Elementor page is purchasing that shiny new domain name you’ve been eyeing. Here’s a walkthrough to help you through the process.
1. Choose a Domain Registrar: Start by picking a reputable domain registrar. Some widely used websites include:
- GoDaddy
- Namecheap
- Bluehost
- Google Domains
2. Search for Your Domain: Using the registrar’s search tool, type in your desired domain name to see if it’s available. If it is, fantastic! If not, don’t worry—most registrars will suggest similar alternatives.
3. Consider Domain Extensions: Think about which extension (TLD) you want. While .com is popular, there are many others like .net, .org, and even niche-specific ones like .design or .tech. Choose one that fits your brand.
4. Add to Cart: Once you land on the perfect domain, add it to your cart. You’ll usually have options for extra features such as domain privacy protection, which keeps your personal information secure.
5. Complete Your Purchase: Finally, proceed to checkout. Fill in your information, and make sure to double-check everything. After payment, you should receive a confirmation of your purchase along with details on how to access your domain settings.
Congrats! You’re now the proud owner of a new domain. In the next steps, you’ll be hooking this domain up to your Elementor page, so stay tuned!
Step 2: Access Your Domain Registrar Account
Alright, let’s jump into the nitty-gritty of connecting your new domain to your Elementor page. The first thing you need to do is log into your domain registrar account. This is the platform where you originally purchased your domain, like GoDaddy, Namecheap, or Bluehost. Don’t worry if you’re not sure where to go; just remember to find that welcome email or confirmation message when you bought your domain—that’ll have the details you need!
Once you’re logged in, you’ll typically see a dashboard. It can be a bit overwhelming, so let’s break it down:
- Dashboard Overview: This is where you’ll find your domain(s) listed. It might say something like “My Domains” or “Domain Management.”
- Select Your Domain: Click on the domain that you wish to connect to your Elementor site.
- Account Security: If you’ve set up any security measures like two-factor authentication, have your phone ready to confirm your identity.
It’s important to keep your registrar account secure. Never share your login credentials with anyone, and consider using a password manager to help you keep track of all your passwords. Once you are in, you’re just a step away from updating those vital settings!
Step 3: Update DNS Settings
Now onto the exciting part—updating your DNS (Domain Name System) settings! DNS settings essentially translate your domain name into the IP address of the server where your Elementor website is hosted. Changing these settings can seem daunting, but I promise, you’ve got this!
Here’s how to do it:
- Locate DNS Management: In your domain registrar’s dashboard, look for an option that says “DNS Management” or “DNS Settings.” Click on that. This will open up the area where you can make changes.
- Add Records: Here’s where you’ll input the information that points your domain to your Elementor site. You will typically be adding an A record or CNAME record, depending on your needs:
- Save Your Changes: Don’t forget to hit that save button! If you don’t see a save option, it might be an “Update” or “Apply Changes.”
- Propagation Time: One last thing—be prepared to give it some time to take effect. Sometimes it can take a few hours for your changes to propagate fully across the internet.
| Record Type | Name/Host | Value/Target |
|---|---|---|
| A Record | @ | Your IP Address |
| CNAME Record | www | Your Domain Name (e.g., yoursite.com) |
And there you go! You’ve successfully updated your DNS settings. Give yourself a pat on the back because you’re one step closer to having your Elementor page fully functional with your new domain! If you run into any hiccups, don’t hesitate to reach out to your domain registrar’s support—they’re usually pretty helpful!
Step 4: Connect the Domain to Your Hosting Provider
Alright, you’ve got your new domain ready to go, now it’s time to connect it to your hosting provider. This step is crucial because without this connection, your domain won’t point to the actual website you created with Elementor!
Here’s how to do it:
- Log into your domain registrar: Go to the website where you purchased your domain. Common registrars include GoDaddy, Namecheap, and Google Domains.
- Find the DNS settings: Once logged in, locate the DNS settings or Domain Management section. It can usually be found in your account dashboard or under a specific domain you want to configure.
- Update Name Servers: You’ll need to find the option to update your name servers. Replace the existing name servers with the ones provided by your hosting provider. These typically look something like this:
- ns1.yourhostingprovider.com
- ns2.yourhostingprovider.com
- Save Changes: Don’t forget to save your changes! It’s easy to overlook this step!
- Propagation Time: Keep in mind that it might take anywhere from a few minutes to 48 hours for these changes to propagate globally.
Once you’ve completed these steps, your domain should be connected to your hosting provider, paving the way for your Elementor site to go live!
Step 5: Configure Elementor Settings
Now that your domain is all set up and connected to your hosting, it’s time to tweak some settings in Elementor to make sure everything runs smoothly. This step’s essential because it ensures that your website starts looking and functioning the way you envision it!
Here’s a breakdown of what to do:
- Open Your WordPress Dashboard: Start by logging into your WordPress site. You can do this by adding “/wp-admin” to the end of your domain in your browser.
- Go to Elementor Settings: Once in your dashboard, navigate to the sidebar and click on “Elementor.” Then, go to “Settings.” Here, you’ll find a variety of options that will allow you to customize how Elementor behaves on your site.
- Set the Site URL: Ensure your site URL reflects your new domain. You can do this under “Settings” > “General.” Make sure to provide the domain that you connected in Step 4.
- Compatibility Settings: Under the “Advanced” tab in Elementor settings, check that toggles for “Switch Editor Loader Method” are activated if you’re experiencing any performance issues.
- Save Changes: After making adjustments, don’t forget to hit the “Save Changes” button at the bottom of the page!
With these settings configured, your Elementor-powered website is ready to shine on your new domain. It’s an exciting time, and you’re just a few steps away from launching your masterpiece! Good luck!
Step 6: Verify the Domain Connection
After completing the setup to connect another domain to your Elementor page, it’s crucial to verify that the connection has been established correctly. This step not only confirms that everything is working properly but also helps identify any potential problems early on.
To verify the domain connection, follow these steps:
- Open Your Web Browser: Start by launching your preferred web browser, whether it’s Chrome, Firefox, or Safari.
- Type in the Domain Name: In the address bar, enter the domain name that you just connected to your Elementor page and hit Enter.
- Check for the Correct URL: Ensure that the URL displayed in the browser corresponds to your Elementor page. If you see the page you’re expecting, you’re on the right track.
- Review Notable Features: Look for specific features that should be present on your Elementor page. These might include layouts, images, and other design elements, to confirm it’s displaying as intended.
- Use Online Tools: You can also utilize online tools such as DNS checker sites to see if the new domain points to the correct IP address associated with your Elementor site. Enter your domain name, and the tool will display DNS records.
If everything checks out, congratulations! Your domain connection is verified. If not, don’t worry—there might be an easy fix. Continue to troubleshooting to ensure all configurations are correct!
Troubleshooting Common Issues
As with any technical process, connecting a new domain to your Elementor page can come with its own set of challenges. Fortunately, most issues are common and can be resolved with a few simple troubleshooting steps. Below are some frequent problems you may encounter, along with actionable solutions:
| Issue | Potential Solution |
|---|---|
| Domain Not Resolving | – Check if your domain’s DNS records are correctly set to point to your hosting provider. – Ensure you’ve allowed sufficient time for DNS propagation, which can take up to 48 hours. |
| SSL Certificate Not Active | – Make sure you have an SSL certificate installed. This is necessary for secure connections. – You can use web hosting services to install the SSL if you haven’t done so already. |
| Broken Links or Images | – Verify that all media files are properly linked within your Elementor site. – Consider regenerating your permalinks in the WordPress settings to refresh URLs. |
| Inconsistent Page Layout | – Double-check the formatting settings within Elementor to ensure everything matches your design preferences. – Update any outdated plugins or themes for optimal compatibility. |
If you still face challenges after trying these solutions, reaching out to your hosting provider or Elementor support can provide tailored assistance. Remember, patience is key—most issues can be resolved with time and troubleshooting!
Conclusion
Connecting another domain to an Elementor page is a straightforward process that enhances your website’s functionality and reach. By following the step-by-step instructions provided, you can ensure that your new domain properly links to your Elementor-built pages, allowing for seamless navigation and user experience. Whether you’re looking to redirect traffic from an old domain or simply want to expand your online presence, the methods outlined will help you achieve your goals effectively. Remember to double-check your DNS settings and ensure everything is correctly configured for optimum performance.


