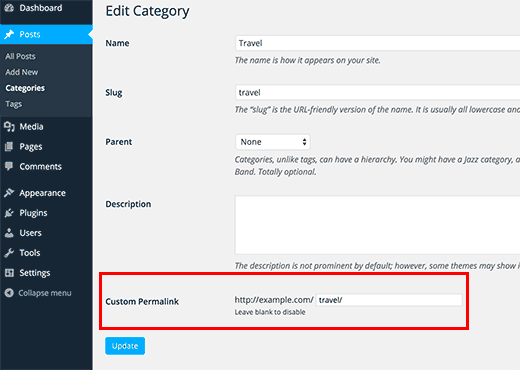
Permalinks are a crucial part of any WordPress site, serving as the unique URLs for your posts and pages. Understanding how to effectively utilize permalinks can greatly enhance your site’s SEO and user experience. In this post, we’ll explore how you can change permalinks specifically for a single category in WordPress, helping you create more meaningful and memorable URLs.
Understanding WordPress Categories
Categories in WordPress are like the chapters of a book. They help you organize your content, making it easier for your visitors to find related posts. Did you know that categories can also influence your site’s URL structure? Here’s what you need to know:
- Hierarchical Structure: Categories can have a parent-child relationship. For instance, you can have a main category like “Travel” and subcategories like “Adventure” and “Culinary.” This hierarchy helps visitors navigate your content more intuitively.
- Improved Navigation: By assigning categories to your posts, you create a structured navigation system, allowing readers to easily jump from one post to another within the same topic.
- SEO Benefits: Properly categorized posts can lead to better SEO because search engines use this information to understand the context of your content more clearly.
- Default Permalinks: By default, your category names may appear in the URL. For instance, a post titled “Best Hiking Trails” under the “Adventure” category may look like this:
yoursite.com/adventure/best-hiking-trails.
Understanding how categories work in WordPress is essential for making smart decisions about your permalink structure. By changing the permalinks for a specific category, you can boost your site’s organization and search engine visibility!
Why Change Permalinks for a Specific Category?
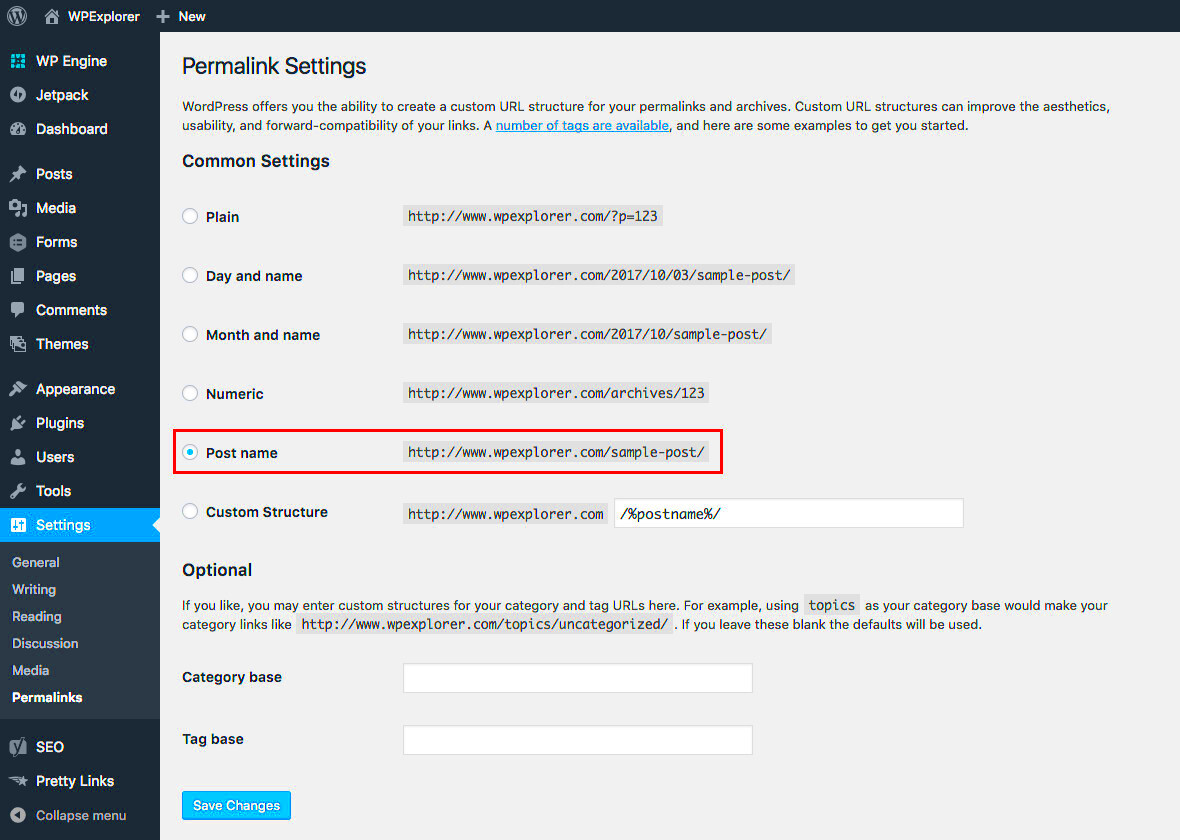
Changing permalinks for a specific category is a powerful tool in your WordPress arsenal, and there are several reasons you might want to consider making that change.
- Improved SEO: Search engines like Google favor clean, descriptive URLs. By adjusting permalinks, you make it easier for them to understand what your category pages are about, which can lead to better rankings.
- Enhanced User Experience: When visitors see a URL that clearly describes the content they are about to view, they are more likely to click on it. Short and descriptive permalinks make navigation intuitive, increasing the chances of visitors sticking around.
- Brand Consistency: If your brand has a specific naming convention, aligning your permalinks with that can help reinforce your brand identity. This consistency makes your website more recognizable.
- Facilitates Marketing Strategies: Particular categories may need specific campaigns or promotional strategies. Tailored permalinks can assist in effectively segmenting your audience and targeting them with relevant content.
- Better Tracking: When you use unique permalinks for each category, analyzing traffic data becomes a breeze. It’s much easier to see which categories are performing well and which ones need adjustment.
So, when you change your permalinks for specific categories, you’re not just making cosmetic changes; you’re taking actionable steps to enhance your site’s performance, engage your audience better, and optimize your marketing efforts.
Step-by-Step Guide to Changing Category Permalinks
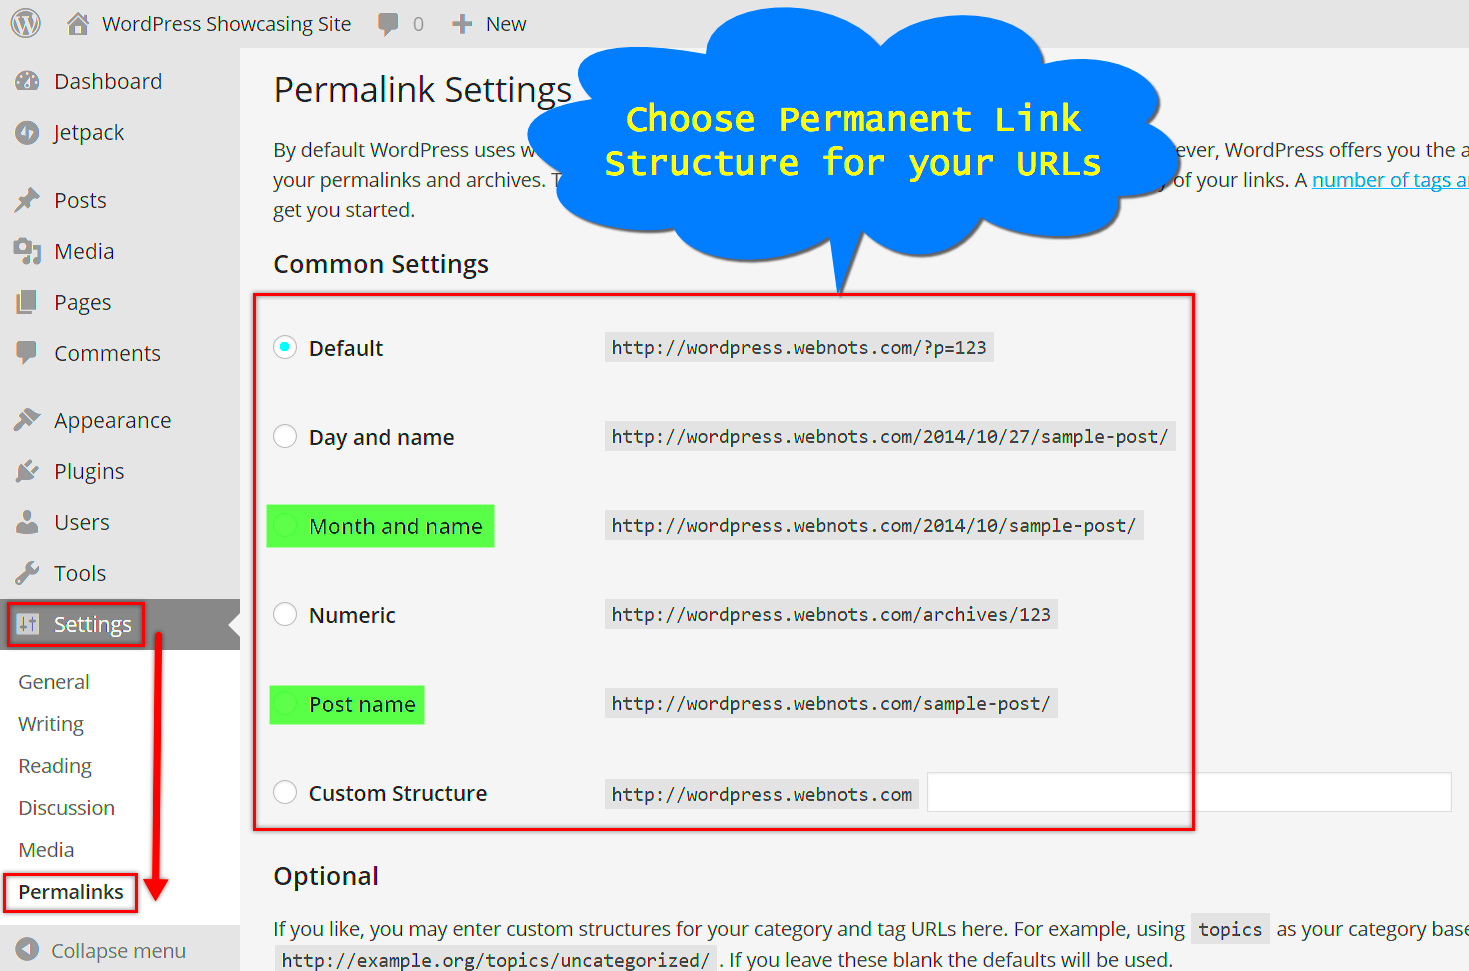
Ready to change your category permalinks in WordPress? Follow this simple step-by-step guide to ensure you do it right!
- Access Your WordPress Dashboard: First, log in to your WordPress admin panel. You can usually do this by adding
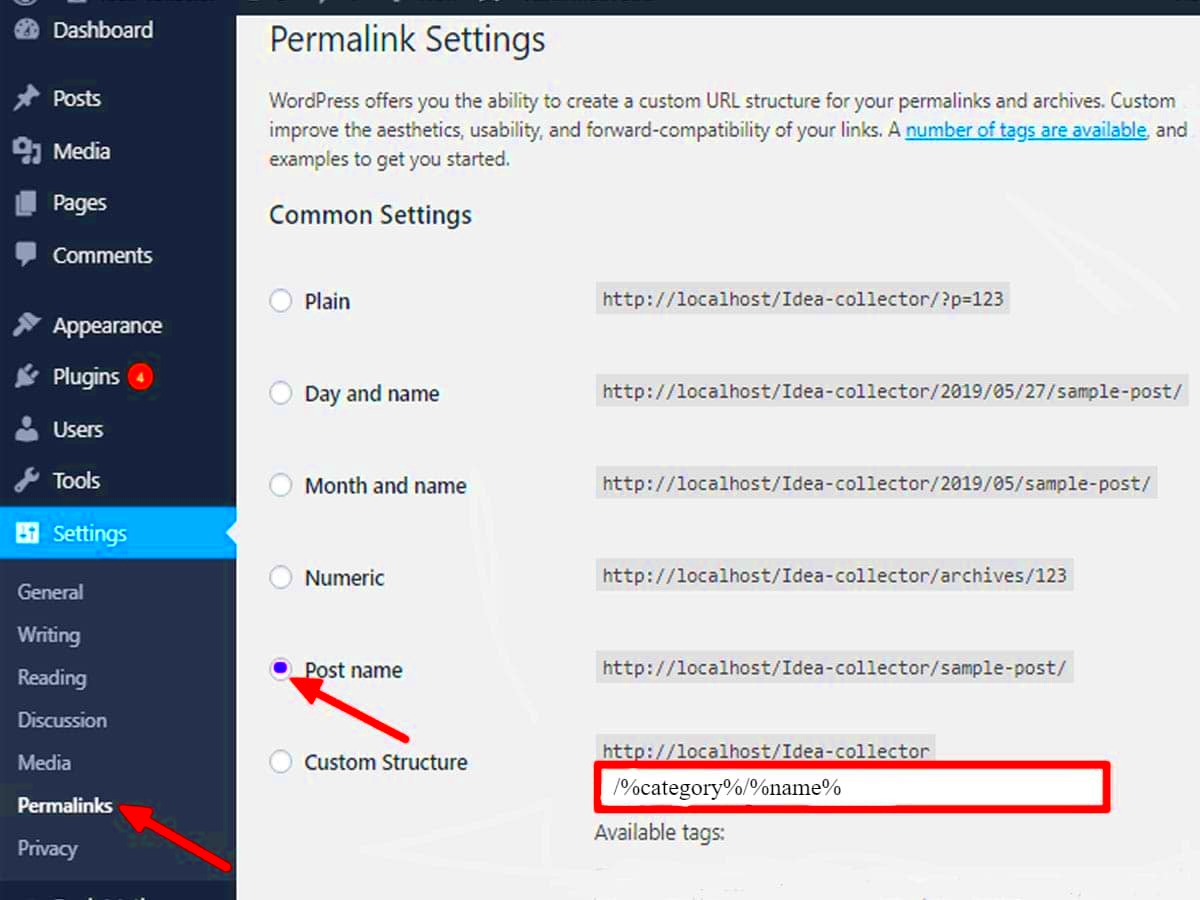
/wp-adminto your site’s URL. - Navigate to Settings: Once you’re in, find the Settings option on the left-hand side menu of the dashboard. Click on it, and then select Permalinks.
- Choose Permalink Structure: Here, you will see various permalink settings. To change specific category permalinks, select the Custom Structure option. You can add elements like
/category/followed by the category slug you want to customize. - Use Category Base: If you want to add a base for your categories, consider using the Category base field. This allows you to add a prefix to your category URLs, like
/my-category/. - Save Changes: After you’ve made your modifications, scroll down and hit the Save Changes button. This action will apply your new permalink settings instantly.
- Check for 301 Redirects: If you’re using old URLs, it’s good practice to set up 301 redirects to ensure visitors and search engines don’t encounter dead links.
And that’s it! Changing category permalinks in WordPress is straightforward, and with these steps, you’ll set yourself up for success. Just remember to keep an eye on your site’s performance and adjust as needed!
Using Custom Permalink Structures
When it comes to WordPress, one of the most powerful features it offers is the ability to customize your permalinks. By default, WordPress uses a standard permalink structure that may not be SEO-friendly or user-friendly. However, by tweaking your permalink settings, especially for a single category, you can enhance your website’s overall navigability and searchability. Let’s dive into how to set up a custom permalink structure for your specific category.
To get started, head over to your WordPress dashboard and navigate to Settings > Permalinks. Here, you’ll see several checkbox options along with a custom structure field. If you want to create custom permalinks for a specific category, you can use the following setup:
- Category Base: Consider using a category base to differentiate your categories better. For example, you might have
/blog/as your base. - Post Name: Using the post title in your permalink can improve SEO and make links more readable, such as
/blog/category-name/post-title.
Furthermore, if you’re comfortable with a bit of coding, you can employ filters in your theme’s functions.php file to apply a specific structure for a single category:
add_filter('post_type_link', 'custom_permalink', 10, 2);function custom_permalink($permalink, $post) { if ($post->post_type == 'your_custom_post_type') { return site_url('/blog/' . $post->category . '/' . $post->post_name); } return $permalink;}
This will allow you to maintain a clean and organized structure that relates directly to your content. Remember to think about your audience while crafting these structures—keeping it simple yet informative will help enhance user experience!
Testing Your New Permalinks
So, you’ve set up your custom permalinks—great job! But before celebrating, it’s important to verify everything is working smoothly. Testing your new permalinks is crucial for ensuring both functionality and that your users won’t run into broken links or navigation issues. Here’s how you can effectively conduct your tests.
First off, start by visiting your website’s front end. Navigate to the category for which you’ve changed the permalink structure and click through the posts to see if the new links are functioning as expected. Here’s a simple checklist to guide you:
- Check Accessibility: Ensure all new permalinks are accessible and lead to the correct pages.
- Look for 404 Errors: If any page returns a 404 error, it means there’s a broken link that needs fixing.
- Browser Test: Sometimes the browser cache can cause issues, so be sure to test in an incognito window or a different browser.
- Link Age: If you had another structure prior to switching, consider redirecting old URLs to their new counterparts.
To streamline the checking process further, you might want to use tools like Google Search Console or plugins to keep track of potential crawl errors. You can also get a deeper insight by analyzing your site’s performance post-changes.
Ultimately, ensuring that your permalinks work seamlessly will provide a better experience for your users and can improve your site’s SEO rankings. After all, a smooth experience keeps readers coming back!
SEO Considerations for Changing Permalinks
Changing permalinks can be a powerful way to enhance your website’s search engine optimization (SEO) strategy, especially when it comes to a specific category. However, it’s essential to tread carefully. Here’s what you should consider:
- Impact on Existing Rankings: Changing your permalinks can lead to temporary fluctuations in your search engine rankings. Google excels at crawling the internet, but if you alter your URLs without the proper redirects, you could lose valuable traffic.
- Redirects: Always set up a 301 redirect from the old permalink to the new one. This tells search engines that your content has permanently moved and helps retain your SEO rankings. Use plugins like Redirection to make this process seamless.
- Consistency is Key: If you’re revamping how you structure permalinks for a particular category, ensure consistency across all posts within that category. Discrepancies can confuse both users and search engines.
- Keyword Optimization: Utilize keywords in your new permalinks to enhance relevancy. Search engines give more weight to keywords found in URLs, so be thoughtful about what terms you use.
- Monitor Performance: After making changes to your permalinks, keep an eye on your site’s performance metrics. Tools like Google Analytics can help you track changes in traffic, bounce rates, and overall engagement.
By considering these SEO factors, you can ensure that the changes you make to your permalinks positively impact your site’s visibility and ranking in the long run.
Common Issues and Troubleshooting
Changing permalinks is usually a straightforward task, but there can be occasional hiccups along the way. Here are some common issues and how to troubleshoot them:
| Issue | Solution |
|---|---|
| No access to old URLs | Set up 301 redirects to guide users from the old URL to the new one. Use a redirection plugin if necessary. |
| Error messages (404 Not Found) | Double-check your new permalink settings in WordPress. Ensure there are no typos or mistakes in the structure. |
| Broken links | Run a broken link checker on your site to identify any problematic links. Update or redirect them as needed. |
| Search engines still indexing old URLs | Allow some time for search engines to crawl your site again. You can speed up the process by submitting your new sitemap to Google Search Console. |
| Lost SEO rankings | Ensure you’ve set up redirects properly. Re-evaluate your permalink structure to make sure it’s optimized for search engines. |
If you encounter any of these issues, don’t panic! Many of them can be resolved relatively easily with a little guidance and by double-checking your settings.
Conclusion
Changing permalinks for a single category in WordPress allows you to enhance the URL structure for better SEO and user experience. By customizing permalinks, you can create cleaner, more descriptive URLs that can drive more traffic to your site. Here’s a recap of the essential points to consider:
- Understand the Importance: Well-structured permalinks improve search engine rankings and make your links more shareable.
- Use Plugins Wisely: Plugins such as Yoast SEO or Custom Permalinks can simplify the process of changing permalinks for specific categories.
- Modify .htaccess File: Editing the .htaccess file is an option for advanced users who want to manually customize permalink structures.
- Test Changes: After making modifications, always test your URLs to ensure that they are working correctly and do not lead to 404 errors.
- Redirects Are Essential: If you change existing permalinks, set up 301 redirects to avoid losing traffic from old URLs.
By following best practices, you can effectively change permalinks for a single category in WordPress, ultimately leading to an improved user experience and enhanced SEO performance.

