In the world of web design, Elementor stands out as a powerful page builder for WordPress. It’s user-friendly, intuitive, and packed with features that allow both novices and professionals to create stunning websites. One crucial element many designers include is the portfolio section, which showcases their work effectively. Whether you’re a photographer, designer, or freelancer, having a dedicated space for your projects can make all the difference in capturing potential clients’ attention.
Why a Portfolio Section is Essential for Your Website
Having a portfolio section on your website isn’t just a nice touch; it’s an absolute necessity. Let’s explore several reasons why it plays a vital role in showcasing your work and enhancing your online presence.
- First Impressions Matter: Your portfolio is often the first thing visitors see. This is your chance to make a lasting impression, so it needs to be polished and professional.
- Showcase Your Skills: A dedicated portfolio section allows you to display your best work. This is more than just a collection of images; it’s a narrative of your skills, creativity, and expertise.
- Build Trust and Credibility: When potential clients see your portfolio, they gain insight into your previous projects. This boosts your credibility and helps build trust, making them more likely to hire you.
- SEO Benefits: A well-optimized portfolio can enhance your site’s SEO. By strategically using keywords, you can attract more traffic to your site.
- Differentiate Yourself from Competitors: In a crowded market, your portfolio can help you stand out. Showcase unique projects or specific styles that highlight what makes you different.
In summary, a well-crafted portfolio section is a powerful tool that not only highlights your work but also brings potential clients one step closer to choosing you for their next project.
Getting Started: Setting Up Elementor
If you’re just diving into the world of Elementor, you’re in for a treat! This powerful page builder makes creating stunning websites a breeze. To get started, follow these simple steps:
- Installation: First, ensure you have a WordPress site up and running. Head to your WordPress dashboard, click on “Plugins,” then “Add New.” Search for Elementor, install and activate it.
- Elementor Settings: Once installed, navigate to the Elementor settings to configure basic options. You can access settings by clicking on “Elementor” in your dashboard and toggling on necessary features.
- Choosing a Theme: While Elementor works excellently with just about any theme, for best results, look for one that’s compatible with Elementor. Themes like Astra, Hello Elementor, or OceanWP are popular choices for their lightweight design and compatibility.
- Create a New Page: To start building your portfolio, create a new page. Head back to your dashboard, click “Pages” and then “Add New.” Give it a catchy title like “My Portfolio” and publish it.
- Launch Elementor: After publishing your page, you’ll see an “Edit with Elementor” button. Click it to open the Elementor editor. A whole new world of possibilities will unveil before your eyes!
Now you’re ready to unleash your creativity! Explore the left-hand panel filled with widgets and templates, and get comfortable with dragging and dropping elements onto your canvas. Before you know it, you’ll have a fantastic portfolio section ready to impress!
Choosing the Right Portfolio Layout
When it comes to showcasing your work, the layout is crucial. A well-designed portfolio layout not only looks good but also enhances user experience. So, how do you choose the right one? Here are some tips to consider:
- Understand Your Work: Before diving into designs, reflect on the type of projects you’ll be displaying. Is your work image-heavy, like photography or graphic design, or is it more textual, like writing or programming? Your layout should mirror the nature of your projects.
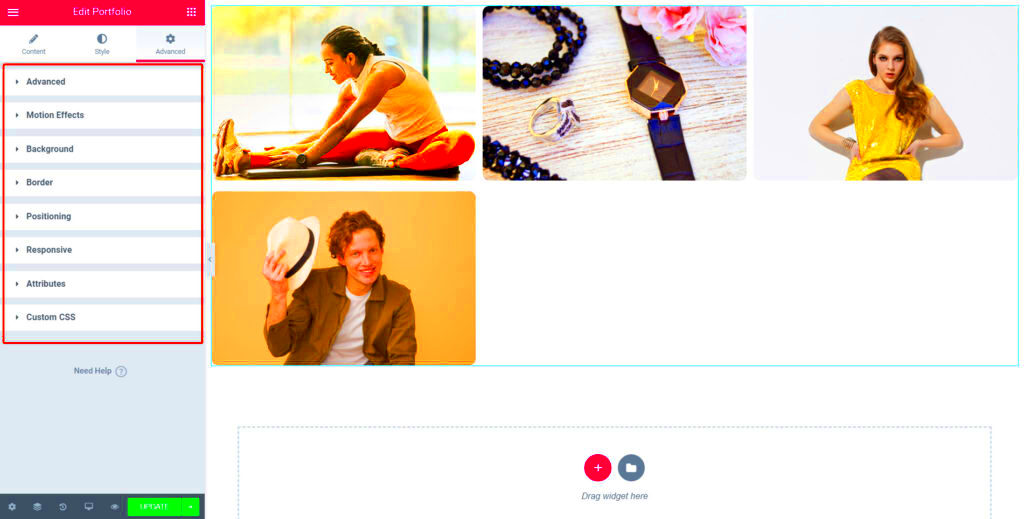
- Grid vs. Masonry: A grid layout is straightforward and aligns items in perfect rows. It’s clean and minimal, allowing each project to shine. Conversely, a masonry layout adds a dynamic touch with items stacked in various heights, which can make a visually intriguing presentation.
- Single-Project View: Decide if you want to display projects in detail on their own pages. This can be ideal for showcasing the story behind a project, including images, descriptions, and your thought process.
- Responsive Design: No matter your choice, ensure the layout is responsive. A portfolio should look stunning on all devices, from mobiles to desktops. You can test responsiveness right within the Elementor editor!
- Use Templates: Utilize Elementor’s pre-designed templates if you’re struggling with layout ideas. They provide a solid foundation and can be customized to fit your brand.
By carefully considering these elements, you’ll be well on your way to crafting a portfolio layout that not only showcases your work effectively but also captivates your visitors. Happy designing!
Step-by-Step Guide to Creating a Portfolio Section
Creating a portfolio section in Elementor is a straightforward process that allows you to showcase your work effectively. Let’s break it down step by step, so you can have your stunning portfolio up and running in no time! Just follow these simple steps:
- Open Elementor: Start by editing the page where you want to add your portfolio. Click on “Edit with Elementor” to open the Elementor interface.
- Add a New Section: Click the “+” icon to add a new section. Choose a single-column layout so that your portfolio items are easily viewable.
- Search for Portfolio Widget: In the Elementor panel on the left, type “Portfolio” in the search bar. You’ll find the Portfolio widget. Drag and drop it into your newly created section.
- Choose Your Layout Style: Once the widget is in place, you’ll see options for layout styles like Grid, Masonry, or Justified. Pick one that best showcases your work!
- Select the Source: You’ll need to decide where your portfolio items are pulling from. You can use your Media Library or Manually add items.
- Set Your Filters and Categories: If your work spans multiple genres, consider adding filters. This helps visitors find what they’re interested in!
- Style it Up: Don’t forget the aesthetics! Under the Style tab, you can customize spacing, alignment, fonts, and colors to match your brand’s look and feel.
- Preview & Publish: Always preview your draft to ensure everything looks perfect. Once you’re satisfied with the outcome, click “Publish” to make your portfolio live!
Following these steps will put you on the path to a beautifully crafted portfolio that showcases your work effectively and stylishly.
Customizing Your Portfolio Items
Now that you’ve set up the basic structure of your portfolio, let’s dive into customizing your portfolio items to make them truly unique and representative of your personal or brand style.
- Editing Portfolio Items: Click on the individual portfolio items to edit them. You can change titles, descriptions, images, and even URLs that lead to project pages.
- Adding Dynamic Content: If you’re using WordPress custom post types, you can pull in dynamic content to make updating your portfolio seamless. Dynamic tags let you display titles, dates, or any other post meta effortlessly!
- Showcase Featured Images: The featured image is often the first impression. Make sure to choose eye-catching images that represent your best work. High quality is key!
- Adjust Item Layout: You can change the layout for each item individually. Whether you want one larger image with a description or several small images in a grid, it’s all in your hands!
- Use Custom CSS: For those feeling a bit adventurous, you can span into custom CSS for niche tweaks. Want unique hover effects? Or a different color scheme on hover? Custom code could be the answer!
- Optimize for Mobile: Don’t forget that many viewers will visit your portfolio on mobile devices. Check how your items look on different screen sizes and make necessary adjustments in the device settings section.
- Including Calls to Action: After presenting your work, you may want to encourage visitors to reach out. Adding a contact button underneath your portfolio items can improve engagement!
Customizing your portfolio items not only enhances the overall look but also helps convey your unique style and professionalism. Remember, the goal is to reflect who you are and what you stand for with each project you present.
7. Adding Filters and Categories to Enhance User Experience
When it comes to creating a stunning portfolio in Elementor, one of the most effective ways to improve user experience is by incorporating filters and categories. This feature allows visitors to easily navigate through your projects, making it simpler for them to find what they are looking for. Here’s how you can do that:
- Create Categories: Start by organizing your portfolio items into relevant categories. This could be anything like ‘Web Design’, ‘Graphic Design’, ‘Photography’, or more specific labels that reflect your work.
- Use Elementor’s Portfolio Widget: Elementor offers a dedicated portfolio widget that allows for easy integration of categories and filters. Within this widget, you’ll find options to display items based on the categories you’ve defined.
- Add Filter Buttons: By activating filter buttons, you can enable visitors to select specific categories they want to view. For instance, a ‘View All’ button can be combined with category-specific buttons, prompting an interactive experience.
- Customize the Layout: Use Elementor’s customization options to adjust how your filters appear. From placement to the style of the buttons, ensure they are cohesive with your overall design.
- Responsive Design: Ensure that the filters look good on all devices. Test the layout on mobile and tablet versions to ensure flexibility.
These features not only streamline navigation but also give a professional touch to your portfolio. Users are likely to spend more time on your site, discovering your skills and offerings when they have easy access to filtered content.
8. Integrating Lightbox Features for Images
Now that you’ve successfully categorized your portfolio, let’s talk about enhancing the visual experience by integrating lightbox features for images. A lightbox is a great way to present images in a stylish overlay, allowing users to focus on the content without distractions. Here’s how to implement this feature:
- Select Your Images: Start by choosing the images you want to showcase in a lightbox. High-quality images will enhance the overall experience and keep your portfolio looking professional.
- Utilize the Gallery Widget: Elementor’s Gallery widget allows you to create beautiful image galleries. When setting this up, ensure that the lightbox option is enabled. This will allow the images to open in an overlay when clicked.
- Customize Lightbox Settings: Elementor gives you the ability to customize various aspects of the lightbox feature. Adjust settings for navigation arrows, image captions, or even transition effects to add a personal touch.
- Test Functionality: Once you’ve set up the lightbox, test it to ensure smooth functionality. Make sure the images load quickly and that navigation through them is fluid.
- Mobile Optimization: Just as with categories, make sure that the lightbox feature works flawlessly on mobile devices. A responsive design should ensure a consistent experience for users, no matter where they’re viewing your portfolio.
By integrating lightbox features into your Elementor portfolio, you create a refined visual experience that keeps your audience engaged, allowing them to appreciate the details of your work without unnecessary distractions.
9. Mobile Responsiveness: Ensuring Your Portfolio Looks Great on All Devices
In today’s digital age, ensuring that your portfolio looks fantastic on every device is more important than ever. With so many people browsing the web on mobile phones and tablets, your portfolio must be adaptable. Thankfully, when you use Elementor, mobile responsiveness is a breeze. Here’s how you can make sure your portfolio shines on all screens:
- Responsive Design Settings: Elementor allows you to customize how each element appears on different devices. You can easily switch between desktop, tablet, and mobile views by clicking the corresponding icons in the bottom left corner of the editor.
- Adjusting Layouts: You might want a two-column layout on desktop but a single column on mobile. With Elementor, you can adjust these settings to ensure everything is clear and visually appealing, regardless of screen size.
- Font and Image Sizes: Don’t forget about your typography and images! Ensure that fonts are large enough to read on smaller screens and that images resize properly. Use the ‘px’, ‘%’ or ‘vw’ units for better flexibility.
- Preview Your Changes: Always preview your updates! Elementor has a live view that lets you see how your portfolio looks on various devices. Just hit “Preview” and check each layout.
- Test Functionality: Beyond aesthetics, check that all functionalities work smoothly on mobile. Can users navigate easily? Are buttons tappable? Test on real devices when possible.
By prioritizing mobile responsiveness, you’re not just improving aesthetics; you’re enhancing user experience. Remember, a visually gratifying and functional portfolio can make all the difference in attracting potential clients and showcasing your work effectively.
10. SEO Best Practices for Portfolio Sections
Your portfolio isn’t just a showcase; it’s also a powerful tool for SEO. When your portfolio is optimized for search engines, you’re not only making it easier for potential clients to find your work, but you’re also increasing your visibility in the crowded online space. Here are some SEO best practices to keep in mind when building your portfolio section in Elementor:
| SEO Practice | Description |
|---|---|
| Use Descriptive Alt Text | Always add alt text to your images. This helps search engines understand what your images depict, which can improve indexing and visibility on image search results. |
| Create Unique Titles and Descriptions | Each portfolio item should have a unique title and meta description. Use relevant keywords and phrases that describe the work and what makes it different. |
| Optimize Page Load Speed | Fast-loading pages enhance user experience and impact SEO. Use optimized images and reduce animations to keep your portfolio’s load time in check. |
| Use Structured Data | Implement schema markup to help search engines understand the context of your portfolio items. This can lead to rich snippets in search results, increasing click-through rates. |
| Include Internal Links | Link to relevant projects or other parts of your website. This not only keeps users on your site longer but also helps search engines crawl your site more effectively. |
By applying these SEO strategies, your portfolio can not only showcase your best work but also work as a magnet for new business opportunities. Your potential clients are just a search away, so make sure they can find you easily!
Building a Portfolio Section in Elementor
Creating a portfolio section in Elementor allows you to showcase your work, skills, and creativity in an engaging way. Elementor, a popular WordPress page builder, makes it easy to design a professional-looking portfolio without any coding knowledge. Follow these steps to build a stunning portfolio section that effectively highlights your projects.
1. Choose the Right Widget
Elementor offers a variety of widgets that are perfect for portfolios. Popular options include:
- Portfolio Widget: Displays your projects in a grid or masonry layout.
- Image Gallery: Showcases images of your work with lightbox effects.
- Image Box: Allows you to add images with a title and description.
2. Customize the Layout
To create a visually appealing portfolio, consider the following layout options:
| Layout Type | Description |
|---|---|
| Grid Layout | Organizes projects in a grid format, making them easy to browse. |
| Masonry Layout | Creates an asymmetrical layout that adapts to different screen sizes. |
| Slider Layout | Displays your best projects in a rotating slider format. |
3. Add Project Details
For each project in your portfolio, include:
- Project Title
- Brief Description
- Skills Used
- Link to Project
By utilizing these tools and options in Elementor, you can build a compelling portfolio section that effectively showcases your work and attracts potential clients.
Conclusion: Showcasing Your Work Effectively
Building a portfolio section in Elementor enhances your website’s professionalism and appeal. By choosing the right widgets, customizing your layout, and detailing your projects effectively, you can create a stunning showcase that captivates your audience and represents your best work.


