WordPress is an incredibly versatile platform, making it a favorite for bloggers, businesses, and developers alike. One of the standout features of WordPress is its customization capabilities, allowing users to craft a unique online presence that reflects their brand or personal style. Whether you’re a tech-savvy developer or a newbie just getting started, exploring how to personalize your WordPress site can be both fun and rewarding. In this post, we’ll delve into some awesome ways to customize your WordPress website and help you stand out from the crowd!
Choosing the Right Theme

The first step in customizing your WordPress site is selecting the right theme. Your theme sets the tone for your website’s design and functionality, so it’s crucial to choose wisely. Here are some tips to help you navigate this essential step:
- Define Your Purpose: Identify the primary goal of your website. Are you launching a blog, an online store, or a portfolio? Your purpose will guide your theme selection.
- Consider Responsiveness: With so many users browsing on mobile devices, pick a theme that’s mobile-responsive to ensure optimal viewing across all devices.
- Customization Options: Look for themes that offer extensive customization options without needing to code. Features like drag-and-drop builders can make a huge difference.
- Check Reviews and Ratings: Always read user reviews and check ratings to gauge the reliability and quality of the theme.
- Support and Updates: Make sure the theme is regularly updated and has good support. An updated theme is essential for security and compatibility with the latest WordPress version.
Moreover, here’s a simple comparison table of popular theme sources:
| Theme Source | Price Range | Customization Level |
|---|---|---|
| WordPress.org | Free | Basic |
| ThemeForest | $20 – $75 | High |
| Elegant Themes | $89/year | Very High |
By following these tips, you can find a theme that not only looks good but also fits perfectly with your website’s goal. Happy customizing!
Utilizing Custom CSS

One of the most powerful and flexible ways to customize your WordPress site is by utilizing Custom CSS. Even if you’re not a coding expert, you can significantly change how your site looks with just a few tweaks to the CSS. Let’s break it down!
What is Custom CSS?
Cascading Style Sheets (CSS) is a language used to describe the presentation of a document written in HTML. In simpler terms, it controls how your website looks—the colors, fonts, layout, and overall style. By using Custom CSS, you can override the default styles set by your WordPress theme and implement your desired aesthetic.
How to Add Custom CSS in WordPress:
- Log into your WordPress Admin Dashboard.
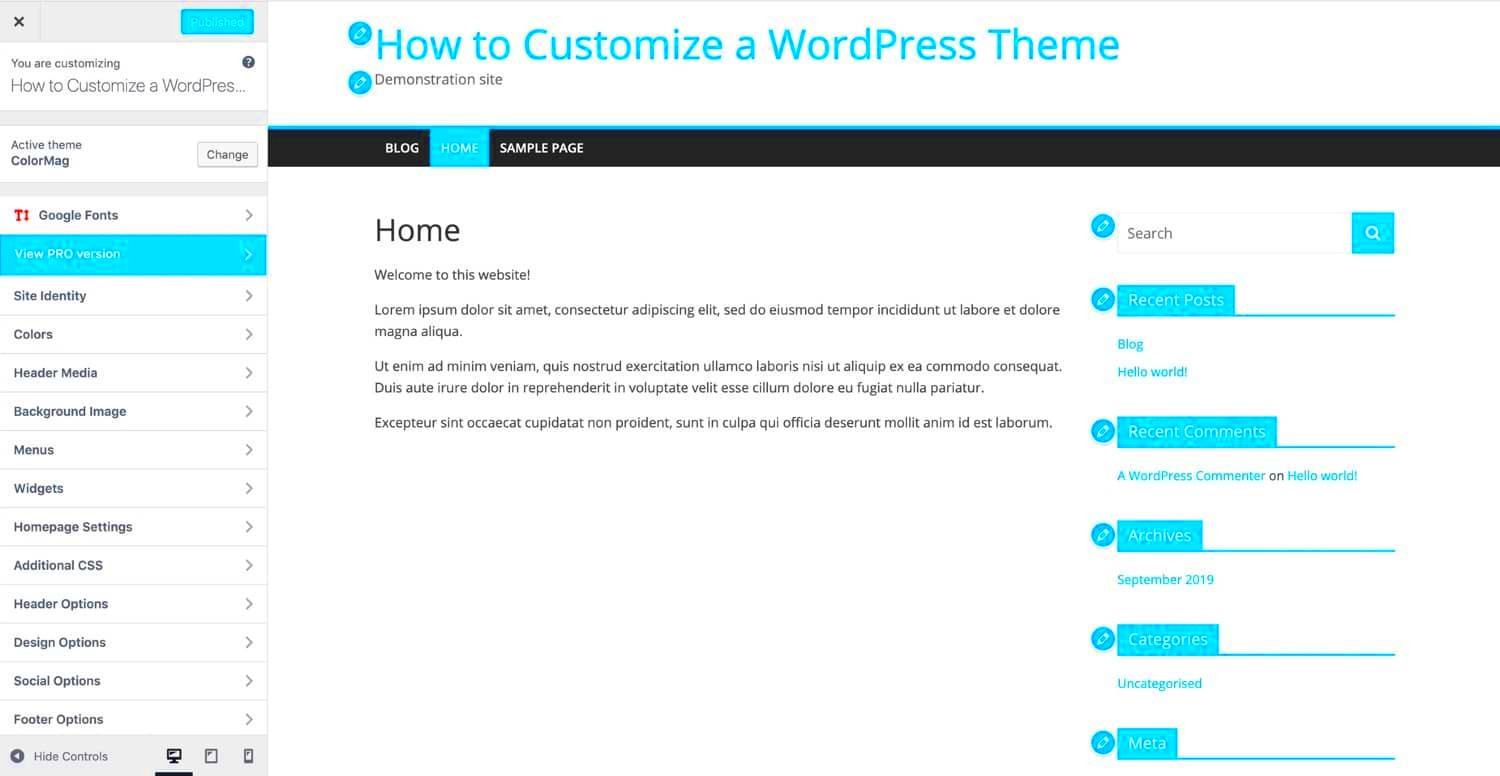
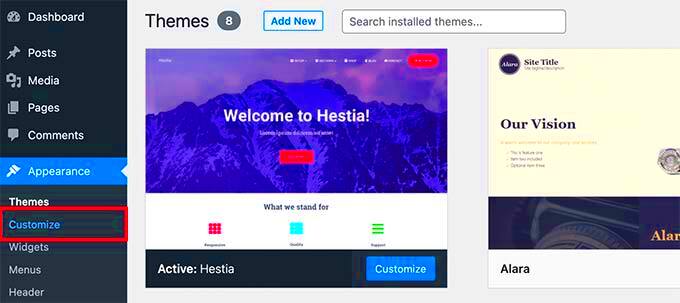
- Navigate to Appearance and click on Customize.
- Look for the Additional CSS option in the WordPress Customizer.
- Start typing or paste your CSS code in the provided box.
- Once satisfied, click on Publish to save your changes.
Common CSS Customizations:
- Changing Colors: Want a different shade for your links? Try
color: #ff0000;for red. - Modifying Fonts: Adjust font size, style, or weight. For instance,
font-size: 20px;can make your text larger. - Altering Layouts: Change margins, padding, or even the display properties of elements.
Knowing how to use Custom CSS opens a realm of possibilities for personalizing your site. So, don’t hesitate to explore and experiment with different styles!
Plugins for Enhanced Functionality
If you’re looking to extend the capabilities of your WordPress site, using plugins is one of the best ways to achieve that. WordPress has a vast repository of plugins available that cater to almost every need. Let’s dive into how you can leverage them.
What Are Plugins?
Plugins are essentially pieces of software that add specific features or functionalities to your WordPress site. They can help you enhance your website’s SEO, improve security, speed up performance, integrate social media, and much more. The best part? You can find thousands of free and premium plugins tailored to various needs.
Finding and Installing Plugins:
- Access your WordPress Admin Dashboard.
- Go to Plugins in the sidebar menu and select Add New.
- Use the search bar to explore plugins by keywords.
- Once you find a plugin you like, click Install Now, followed by Activate.
Popular Plugin Categories:
| Category | Examples |
|---|---|
| SEO | Yoast SEO, All in One SEO Pack |
| Performance | WP Rocket, W3 Total Cache |
| Security | Wordfence, Sucuri |
| Social Media | Social Snap, Revive Old Posts |
When selecting plugins, always check user reviews, ratings, and recent updates to ensure they are reliable. Remember that while plugins are amazing for enhanced functionality, having too many can slow down your site, so choose wisely!
5. Creating Custom Menus
Ah, the menu! The little navigation bar that helps visitors find their way around your WordPress site. Customizing it might sound daunting at first, but it’s easier than you think! Creating custom menus is a fantastic way to enhance user experience and organize your content effectively.
First, let’s dive into the basics. In WordPress, you can create custom menus by following these simple steps:
- Go to Appearance and then click on Menus.
- Here, you can create a new menu by clicking on Create a new menu. Give it a catchy name so you can identify it later!
- Now, add items to your menu. You can include Pages, Posts, Custom Links, and even Categories.
- Once you’ve added all the items you want, drag and drop them to rearrange their order.
- Don’t forget to check the box to designate this menu as your Primary Menu, or assign it to wherever you want on your site.
But wait, there’s more! You can also create sub-menus by indenting items underneath a main menu item. This gives you a cleaner and more organized structure. Plus, if you have certain content you want to highlight or promote, just add those links to your custom menu and place them prominently!
Remember, the customization options are virtually limitless. So, take some time to explore and create a menu that perfectly represents your brand and helps your visitors navigate like pros!
6. Widgets and Sidebars: Tailoring Your Layout
Let’s talk widgets and sidebars! If you want to take your WordPress site’s customization to the next level, these little gems are your best friends. Widgets allow you to add specific content and features to your website without any coding knowledge. They can be added to sidebars, footers, and any widget-ready area of your theme.
Here’s how to make the most out of widgets and sidebars:
- Navigate to the Appearance tab and then click on Widgets.
- You’ll see a list of available widgets on one side and your active widget areas on the other. Drag and drop your desired widgets into any of the locations.
- Configure the settings for each widget. For example, if you’re adding a Recent Posts widget, you can usually choose how many posts to display.
Here are some popular widgets you might want to consider:
- Search Bar: Helps visitors find content quickly.
- Social Media Links: Connects your audience to your social platforms.
- Categories: Enables easy navigation through different topics on your site.
- Text Widget: Perfect for adding custom HTML or plain text.
Sidebars are where you can introduce additional functionality or personality into your site. By strategically placing widgets, you can direct user behavior and offer valuable information alongside your main content. Remember, however, that less is sometimes more—too many widgets can clutter your layout. Aim for a balance!
Incorporating widgets and customizing your sidebars can transform the look and feel of your WordPress site into something uniquely yours. So go ahead, unleash your creativity!
7. Adding Custom Post Types
When it comes to customizing your WordPress site, one of the most powerful features at your disposal is the ability to create Custom Post Types. This allows you to extend the basic functionality of WordPress beyond just posts and pages, tailoring it to fit your specific content needs.
So, why should you consider adding custom post types? Here are a few compelling reasons:
- Organized Content: Custom post types allow you to categorize and manage different types of content more effectively. For example, if you run a recipe blog, you could create a custom post type specifically for recipes.
- Improve User Experience: Tailoring your website’s content type can make it easier for your visitors to navigate and find the information or products they are looking for.
- Enhanced Functionality: By using custom fields and custom taxonomies with your post types, you can further enrich the user experience with finely tuned content.
Creating a custom post type is quite simple! You can either code it by adding a function in your theme’s functions.php file or breeze through it using a plugin like Custom Post Type UI. Here’s a quick start guide:
function create_post_type() { register_post_type('custom_type', array( 'labels' => array( 'name' => __('Custom Types'), 'singular_name' => __('Custom Type') ), 'public' => true, 'has_archive' => true, 'supports' => array('title', 'editor', 'thumbnail'), ) );}add_action('init', 'create_post_type');Once you have your custom post type set up, you can easily begin adding relevant content that enhances your site’s overall appeal and functionality.
8. Utilizing Page Builders for Unique Designs
If you’re looking to truly customize your WordPress site without needing to delve too deeply into coding, utilizing a Page Builder can be a game-changer. Page builders are intuitive, drag-and-drop interfaces that enable you to arrange content visually. It’s like having a toolbox filled with widgets you can simply drag into place!
But why should you consider using a page builder? Here are some advantages:
- User-Friendly: With a visual interface, page builders make it easy for anyone, regardless of technical expertise, to design stunning pages.
- Flexible Layouts: You can create unique layouts without needing to customize the theme’s CSS, giving you the freedom to build the design of your dreams.
- Pre-designed Templates: Most page builders come equipped with templates that you can use as bases, speeding up your design process and eliminating guesswork.
Some of the most popular page builders include:
| Page Builder | Key Features |
|---|---|
| Elementor | Real-time editing, responsive design capabilities, theme builder. |
| Beaver Builder | User-friendly interface, extensive module support, templates. |
| Divi Builder | Comprehensive design options, split testing features, visual builder. |
To get started with a page builder, simply install your preferred builder plugin, activate it, and begin crafting unique pages that represent your brand’s identity. This will definitely enhance the overall aesthetic and functionality of your site!
Customizing WordPress Header and Footer
Your WordPress site’s header and footer are like the cover and back of a book—they’re the first and last things visitors encounter. Customizing these elements can significantly enhance your site’s aesthetics and functionality. So, how can you do it?
- Utilize Built-In Options: Many WordPress themes come with built-in options for customizing the header and footer. You can usually find these settings under Appearance > Customize. Here, you can upload logos, tweak menus, and even change layout options.
- Add Widgets: The footer area is a great place to add widgets. Go to Appearance > Widgets, and you can drag and drop useful elements like recent posts, social media links, or even a custom text block.
- Custom Menus: Consider creating custom navigation menus that provide a better structure. You can set these up in Appearance > Menus and easily place them in the header or footer.
- CSS Customization: If you’re comfortable with a bit of code, adding custom CSS in the Customizer can change fonts, colors, and spacing in the header and footer.
- Plugins: You can also utilize plugins specifically designed to enhance your header and footer. Plugins like Insert Headers and Footers allow you to add scripts or codes easily without delving into files.
In conclusion, customizing your WordPress header and footer doesn’t require any technical expertise; even small tweaks can make a big difference in your site’s overall appearance and user experience. Get creative and make sure your site leaves a remarkable first and lasting impression!
Using Child Themes for Advanced Customization
If you’re looking to dive deeper into WordPress customization, learning about child themes is essential! A child theme allows you to make extensive modifications without affecting the original theme’s code, which is a lifesaver when it comes to updates. Let’s break down why you’d want to use one and how to do it!
- What is a Child Theme? A child theme is a sub-theme that inherits all the functionalities and styling of its parent theme. This means you can make changes without worrying about losing them when the parent theme gets updated.
- Easy Setup: Setting up a child theme is simple. Just create a new folder in your themes directory, and add a few essential files, like style.css and functions.php. Here’s a quick structure:
File Description style.css This is where you define the child theme’s name and import the parent theme’s styles. functions.php Place your custom PHP code here to modify functionality. - Advanced Customization: With a child theme, you can override any template file from the parent theme. Simply copy it to your child theme’s folder and make your changes. For example, if you want to customize the header layout, copy header.php to your child theme.
- Safer Updates: One of the best reasons to use a child theme is that you can safely update the parent theme without losing any of your customizations. Your changes remain intact in the child theme.
In summary, using child themes in WordPress is a game-changer for anyone looking to personalize their website while ensuring long-term stability. With a little effort, you can create a site that perfectly reflects your vision without the constant worry of losing your work during updates.
Optimizing Your Site for Performance
When it comes to WordPress, speed is everything. A well-optimized site not only enhances user experience but also boosts your search engine ranking. So, let’s dive into some awesome strategies to optimize your WordPress performance!
1. Choose a Reliable Hosting Provider: Your hosting provider plays a crucial role in your site’s speed and reliability. Look for options that specialize in WordPress hosting, as they often provide faster load times and optimized server environments.
2. Use a Lightweight Theme: While it might be tempting to go for a flashy theme with all the bells and whistles, a lightweight theme is often the best choice for speed. Look for themes that are efficient and straightforward.
3. Optimize Images: Large images can slow down your site significantly. Use tools like TinyPNG or plugins like Smush to compress images without losing quality. Always use the appropriate file formats (JPEG for photos, PNG for graphics) and consider the dimensions!
4. Implement Caching: Caching can dramatically speed up your WordPress site by storing a static version of your content. Plugins like W3 Total Cache or WP Super Cache can help set this up easily.
5. Minimize HTTP Requests: Each element on your page (like scripts, stylesheets, images) makes an HTTP request, which can slow things down. Combine files where possible, and eliminate any unnecessary plugins.
6. Optimize Your Database: Over time, your WordPress database can get bogged down with revisions, spam comments, and other bloat. Regular optimization using plugins like WP-Optimize can help maintain peak performance.
By incorporating these tactics, you’ll be paving the way to a speedy, efficient, and high-performing WordPress site. Remember, a fast site means happy visitors, and happy visitors lead to improved engagement!
Conclusion: Bringing Your Vision to Life
So there you have it! WordPress is a powerful platform that can truly bring your vision to life, provided you take the time to customize it in ways that suit your needs. Connecting with your audience, telling your story, and realizing your goals has never been easier with the right adjustments.
As you wrap up your customization journey, consider the following points:
- Be Creative: Your site should reflect your personality or brand. Don’t hesitate to experiment with themes, colors, and layouts until you find what feels right.
- Stay Up-to-Date: The WordPress ecosystem is ever-evolving. Always keep your themes, plugins, and WordPress core updated for the best performance and security.
- Engage Your Audience: Focus on creating content that resonates with your visitors. Use plugins and features that foster interaction, like comment sections, forums, or social media integrations.
- Monitor Performance: Utilize analytics tools to track how your visitors engage with your site. This data can guide you in making further enhancements.
Remember, WordPress is more than just a tool; it’s a canvas for your creativity. Embrace the possibilities and don’t hesitate to take bold steps forward. Your vision is waiting to be unleashed!


