When it comes to running a successful online store, the quality of your product images can make a world of difference. With WooCommerce, you have the power to showcase your products in high resolution, enticing your customers and giving them a better shopping experience. Not only do good images attract attention, but they can also improve your store’s SEO and conversion rates. In this post, we’ll dive into the importance of setting the right image dimensions and how you can adjust them to suit your needs.
Understanding Image Dimension Settings in WooCommerce

Getting the right image dimensions in WooCommerce is crucial for presenting your products effectively. Let’s break down the essential settings you’ll need to consider:
- Thumbnail Size: This is the small version of your product images used in the shop and category pages. A standard size could be around 300×300 pixels; however, feel free to customize based on your theme.
- Single Product Image Size: This refers to the main image seen on the product details page. A common size here is 600×600 pixels, but again, adapt it to fit your store’s layout.
- Product Gallery Image Size: These images accompany the main product image in a gallery format. Sizes of 600×800 pixels or larger often work well for quality display.
To adjust these dimensions, you can find the settings in the WooCommerce dashboard under:
| Path | Description |
|---|---|
| WooCommerce > Settings > Products > Display | Here, you can specify the dimensions for all your product images. |
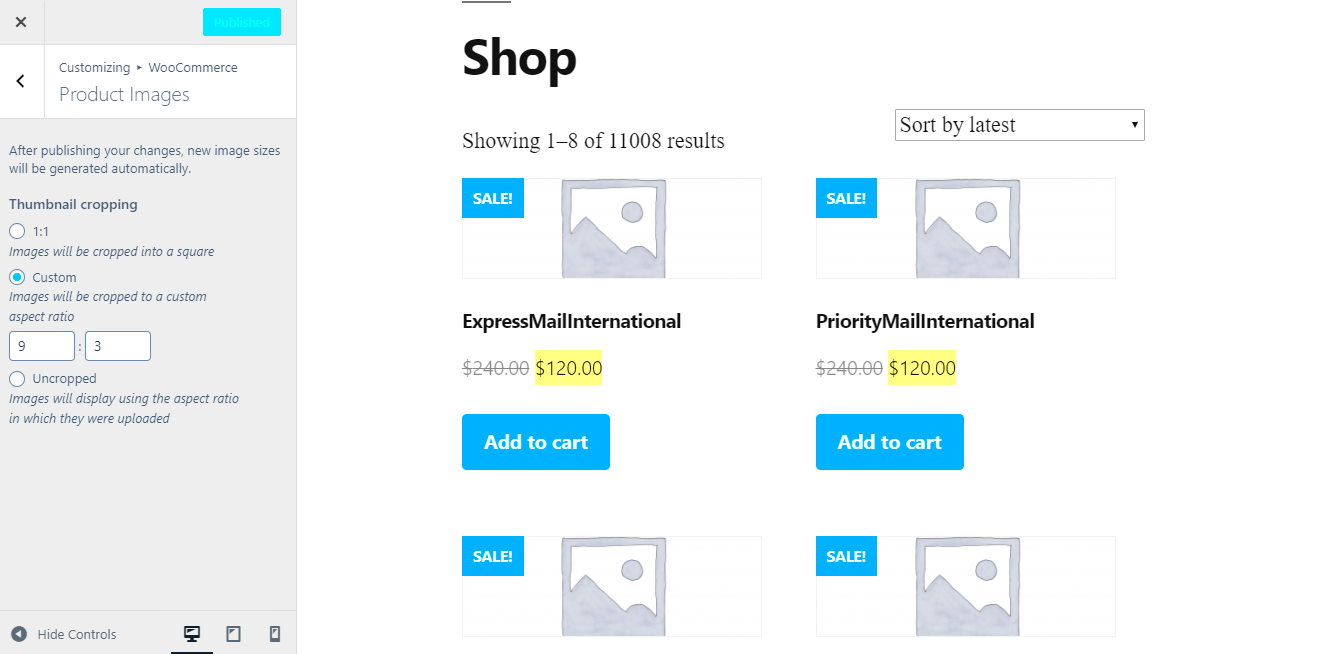
| Appearance > Customize > WooCommerce | Adjust image settings according to your theme’s requirements. |
By understanding and adjusting these image dimension settings, you can ensure that your product images look great on any device, leading to a more appealing online shopping experience for your customers!
Why Adjusting Image Dimensions is Important
Have you ever landed on an online store and felt frustrated because the product images were either too large or too small? You’re not alone! Image dimensions play a crucial role in user experience and can significantly impact your store’s performance. Here’s why adjusting image dimensions in WooCommerce is essential:
- Improved User Experience: When images load at the right dimensions, they create a seamless browsing experience. Visitors can see your products clearly without excessive scrolling or zooming in.
- Faster Load Times: Large images can slow down your website, leading to higher bounce rates. Optimizing size will not only speed up page loading but also improve overall site performance.
- Mobile Responsiveness: With an increasing number of users shopping on their mobile devices, having properly adjusted images ensures that they look great on any screen size.
- SEO Benefits: Properly sized images can enhance your search engine rankings. Search engines love fast-loading sites, and smaller image files contribute to that goal.
- Professional Appearance: Consistent image dimensions give your store a polished and professional look. This builds trust with customers and encourages them to make purchases.
In summary, paying attention to your product image dimensions isn’t just about aesthetics. It’s a vital strategy for ensuring a pleasant shopping experience, enhancing site speed, boosting SEO, and building customer trust. So, take the time today to evaluate your images—you won’t regret it!
How to Change Product Image Dimensions in WooCommerce
Ready to adjust those product image dimensions in WooCommerce? Great! It’s easier than you might think. Here’s a step-by-step guide to help you out:
- Log in to Your WordPress Admin Dashboard
- Navigate to WooCommerce Settings
- Select the Products Tab
- Go to the Display Settings
- Adjust Image Dimensions
- Save Changes
Start by signing into your WordPress account. Once you’re in, you’ll be taken to the dashboard where all the magic happens.
In the left-hand menu, find the “WooCommerce” option and click on it. Next, click on “Settings” under the WooCommerce tab.
Once in settings, look for the “Products” tab at the top. This section contains all your product preferences, including image settings.
In the Products tab, you’ll see options for “Display.” Click on it to access image options.
Here, you can specify the dimensions for your main product image, thumbnails, and catalog images. Make sure to enter your desired width and height in pixels.
After adjusting the settings, don’t forget to click the “Save Changes” button at the bottom of the page to implement your updates.
And voila! You’ve successfully changed the product image dimensions for your WooCommerce store. Remember, you may need to regenerate thumbnails using a plugin like “Regenerate Thumbnails” to apply the changes across your existing products. So go ahead and give your store that fresh new look!
Adjusting Thumbnail Sizes for Better Display
Adjusting the thumbnail sizes of your WooCommerce product images is crucial for creating a visually appealing storefront. When your images are the right size, they can significantly improve user experience. Think about it: if customers can’t see your products clearly, they might hesitate to buy. Let’s dive into how you can adjust these thumbnail sizes!
First, you can set the thumbnail size in the WooCommerce settings. Here’s how:
- Go to your WordPress dashboard.
- Navigate to WooCommerce > Settings.
- Click on the Products tab.
- Select Display, then look for the Product Images section.
- Here, you can set the dimensions for your thumbnail images, single product images, and the catalog images.
But how does this affect the display? Well, the right dimensions ensure that images are not too large (which can slow down your site) or too small (which can make them hard to see). The most common settings are:
| Image Type | Recommended Size (pixels) |
|---|---|
| Thumbnail | 150 x 150 |
| Single Product | 600 x 600 |
| Catalog Images | 300 x 300 |
After you adjust the sizes, make sure to regenerate the thumbnails to apply the new settings. You can do this using a plugin like Regenerate Thumbnails. This process will ensure that every image on your site is displayed in the correct dimensions, offering your customers a seamless shopping experience!
Using Custom CSS for Further Modifications
Sometimes, the adjustments you make in the WooCommerce settings aren’t enough to achieve your desired look. That’s where custom CSS comes in. With custom CSS, you can fine-tune your product images, give them unique styles, or adapt the layout to better fit your overall store design.
Here’s how you can get started with custom CSS:
- Navigate to your WordPress dashboard.
- Go to Appearance > Customize.
- Select Additional CSS.
- Now, you can enter your CSS code!
Here are some useful CSS snippets you might want to try:
/* Change thumbnail image border */.woocommerce ul.products li.product a { border: 2px solid #f00; /* Red border */}/* Set a maximum width for product images */.woocommerce ul.products li.product img { max-width: 100%; /* Ensures the image fits within its container */}/* Add a hover effect */.woocommerce ul.products li.product:hover img { opacity: 0.8; /* Makes the image slightly transparent on hover */}Using custom CSS allows you to personalize your WooCommerce store beyond the default settings. It’s a fun way to express your brand’s identity while ensuring that the product images look sharp and engaging. Just remember to always preview changes before publishing them to avoid breaking any design elements of your site!
Testing and Optimizing Your Product Images
When it comes to e-commerce, the first impression often counts the most, and that’s why your product images need to be just right. After you’ve adjusted the dimensions of your WooCommerce product images, it’s time to test and optimize them to ensure they look great on all devices and enhance the user experience.
Here’s how you can get started:
- Check Appearance on Different Devices: Make sure to view your product images on various devices. Use smartphones, tablets, and desktops to ensure they display properly and maintain quality.
- Optimize Load Speed: Large images can slow down your site. Use tools like TinyPNG or Image Compressor to compress your images without losing quality.
- Test Different Sizes: Play around with the dimensions to see which ones work best. Compare how different images drive conversions. Sometimes smaller images can enhance load speeds without sacrificing quality.
- Ask for Feedback: Gather friends, family, or loyal customers to give their honest opinions on the new images. Their perspectives can offer valuable insights.
- Monitor Analytics: After updates, check your site analytics. Look for changes in bounce rates or conversion rates; these can indicate if your image adjustments are making a positive impact.
Remember, optimizing your product images isn’t a one-time task; it’s an ongoing process. Regularly revisit your images to ensure they align with your site’s goals!
Common Issues and Troubleshooting Tips
Despite your best efforts, you may run into a few hiccups while adjusting product image dimensions in WooCommerce. Don’t sweat it; many users have experienced similar issues. Here are some common problems along with practical troubleshooting tips to help you out:
| Issue | Possible Solution |
|---|---|
| Images are Blurry | Ensure you’re using high-resolution images and opt for the correct dimensions set in WooCommerce settings. |
| Cropped Images | Check your image cropping settings in WooCommerce and adjust them to fit your needs. Sometimes using a square aspect ratio can work well. |
| Images Not Displaying | This could be a caching issue. Clear your website cache and refresh your browser. If that doesn’t work, double-check your image URLs. |
| Slow Loading Times | Compress images as mentioned previously. You can also use a content delivery network (CDN) for faster load times. |
| Responsive Issues | Use responsive design techniques. Ensure your images resize appropriately for all devices. CSS can help adjust image sizes. |
By keeping an eye out for these issues and utilizing the mentioned solutions, you can ensure that your WooCommerce product images remain top-notch and functional for an optimal shopping experience!
Adjusting WooCommerce Product Image Dimensions
In e-commerce, product images play a crucial role in influencing customer decisions. For WooCommerce users, adjusting product image dimensions can significantly enhance the aesthetic appeal and functionality of online stores. Here’s a comprehensive guide to help you effectively adjust your product images.
For optimal results, it’s important to consider the following dimensions:
| Image Type | Recommended Dimensions | Aspect Ratio |
|---|---|---|
| Thumbnail Image | 150 x 150 pixels | 1:1 |
| Main Image | 300 x 300 pixels (up to 700 x 700 pixels) | 1:1 |
| Gallery Images | 800 x 800 pixels or higher | 1:1 or 4:3 |
To adjust image dimensions effectively, follow these steps:
- Navigate to WooCommerce settings under Appearance > Customize.
- Select WooCommerce > Product Images.
- Change the dimensions for each image type as needed.
- Regenerate thumbnails using a plugin like Regenerate Thumbnails.
- Optimize images for faster loading times using tools such as Smush or Imagify.
By effectively adjusting and optimizing your product images, you can improve user experience, increase engagement, and ultimately drive more sales for your WooCommerce store.
Conclusion: Best Practices for WooCommerce Product Images include maintaining consistent dimensions, using high-quality images, optimizing for speed, and ensuring mobile responsiveness, all of which contribute to better customer satisfaction and sales performance.


