Anchor text might sound technical, but it’s really just a simple concept that can make your website much more user-friendly and SEO friendly. In essence, anchor text is the clickable part of a hyperlink that guides users to another page or website. For instance, if you see the phrase “click here,” highlighted for clicking, then that’s anchor text in action! Understanding anchor text is important for both website navigation and search engine optimization, so let’s dive into the details.
Why Use Anchor Text in Your Content?

Incorporating anchor text into your website content is not just about making it look pretty. It serves multiple purposes that enhance user experience, engagement, and even your site’s ranking on search engines. Here are some compelling reasons to use anchor text:
- Improved Navigation: Anchor text acts as a roadmap, leading readers to more relevant content. This makes it easier for your audience to find what they’re looking for.
- SEO Benefits: Search engines evaluate anchor text to understand the context of the linked content. Using relevant keywords can help boost your SEO efforts.
- Increased Engagement: Well-placed links can encourage readers to explore more of your content, thus keeping them on your site longer.
- Enhances Credibility: Linking to authoritative sources can build trust with your audience, showing them that you’re informed and resourceful.
- Contextual Relevance: Tailoring your anchor text to fit the content it leads to ensures that users have a seamless experience, making your content more understandable.
In summary, anchor text is more than just a hyperlink; it’s a strategic tool that enhances both user experience and SEO. By using it wisely, you not only guide your readers but also boost your site’s visibility in the vast ocean of the internet.
Preparing Your WordPress Environment
Before we dive into the process of adding anchor text in WordPress, it’s crucial to prep your WordPress environment. This ensures everything runs smoothly and that you can easily follow along with the steps ahead. Here’s a little roadmap of what you need to do:
- Ensure WordPress is Updated: Always check that your WordPress version is the latest. An outdated version can lead to compatibility issues. You can easily update via your dashboard under Updates.
- Check Your Theme: Make sure your current theme is suitable. Some themes have custom settings that may affect how anchors work. You can find theme settings in the Appearance section.
- Backup Your Site: Always take a backup before making significant changes. You can use plugins like UpdraftPlus or BackupBuddy to ensure your content is secure.
- Enable a Gutenberg Editor: If you’re using the classic WordPress editor, consider switching to the Gutenberg editor. It offers more flexibility for adding media and anchor texts.
By preparing your WordPress environment, you set yourself up for success. Once you’re all set, it’ll make the entire process of adding anchor text not just easier, but also more efficient.
Step 1: Log into Your WordPress Dashboard
Logging into your WordPress dashboard is the first and most crucial step to get things rolling. Here’s how to do it, step by step:
- Open your preferred web browser.
- Type in your website’s URL followed by /wp-admin (e.g., www.yourwebsite.com/wp-admin).
- You’ll be prompted to enter your username and password. Make sure you enter the credentials linked to your WordPress account.
- Once logged in, you’ll be directed to the dashboard. This is where all the magic happens!
Pro tip: If you happen to forget your password, you can easily reset it by clicking on the ‘Lost your password?’ link. Follow the prompts, and you should be back in your dashboard in no time!
That’s it! Now that you’re inside the dashboard, you’re ready to start adding anchor texts to your content effectively. Just remember, this is your hub for managing everything related to your WordPress site.
Step 2: Navigate to Your Post or Page
Alright, let’s dive right in! The first part of adding anchor text in WordPress is to get to the post or page where you’d like to make those changes. Sounds simple enough, right? Here’s how you can do it:
- Log In to Your WordPress Dashboard: Start by logging into your WordPress account. Once you’re in, you’ll be greeted by the dashboard—your control center for everything on your site.
- Select ‘Posts’ or ‘Pages’: Depending on where you want to add your anchor text, click on either ‘Posts’ or ‘Pages’ from the left-hand menu. If you want to edit a blog post, head to ‘Posts.’ For a static page, go to ‘Pages.’
- Find Your Post or Page: You’ll now see a list of all your existing posts or pages. Scroll through the list or use the search feature at the top-right corner to locate the one you want to edit.
- Edit the Selected Item: Once you’ve found the post or page, simply click on its title or the ‘Edit’ link underneath. This takes you to the editor where all the magic happens!
And just like that, you’re ready to start adding anchor text to guide your readers wherever they need to go! Make sure you’ve got the content handy that you want to link to for the final step.
Step 3: Highlight the Text for Anchor
Now that you’ve successfully navigated to the post or page you want to edit, it’s time for the fun part: highlighting the text for your anchor! This step is all about making it easy for your readers to click through.
Here’s how you can do this:
- Locate the Text: Find the specific piece of text that you want to convert into an anchor link. This could be a word, phrase, or even a sentence. Think of a text that nicely sums up what the link will lead to.
- Highlight the Text: Using your mouse, click and drag over the text you want to make clickable. Alternatively, you can double-click on a word to highlight it quickly.
- Formatting Check: Before moving forward, double-check that you’ve highlighted the right text. If you want to change it, just click elsewhere and highlight again.
Once you’ve highlighted the text, you’re just a couple of clicks away from inserting your link! Take a moment to think about where you want this text to lead—this makes your website more user-friendly and interconnected.
7. Step 4: Insert the Link
Now that you’ve identified the text that you want to turn into an anchor link, it’s time to go ahead and insert the actual link. This step is not just about making it clickable; it’s about enhancing your content and providing value to your readers. Here’s how to do it:
First, highlight the text you want to link. Whether it’s a phrase or a single word, just click and drag your mouse over it. Once the text is highlighted, look for the link icon in your toolbar—this usually looks like a chain link.
Clicking that will prompt a small dialog box where you can input the URL. Here’s a quick list of what to do next:
- Paste the URL: If you have the link copied, simply paste it into the box. If not, type it manually.
- Check the URL: Make sure there are no typos. A broken link can frustrate your readers.
- Save Your Changes: Click on the ‘Apply’ button or ‘OK’ to insert your link.
And voilà! Your selected text is now an anchor link that directs readers to the destination you’ve chosen. The beauty of this step is that it keeps your readers engaged and can lead them to additional valuable information.
8. Step 5: Edit the Link Settings
Congratulations, you’ve successfully inserted your link! But wait, there’s more! Editing the link settings is crucial for ensuring that the link behaves exactly how you want it to. It can be the difference between a smooth user experience and a bumpy ride for your readers.
To edit your link settings, click on the linked text again. A small toolbar will appear that gives you a few options— let’s dive into them:
| Setting | Description |
|---|---|
| Edit Link | Click this if you want to change the URL or anchor text. |
| Open in New Tab | This option lets you choose whether the link opens in a new tab. It’s great for keeping readers on your page. |
| Add NoFollow | Use this to tell search engines not to follow the link. It can be useful for affiliate links. |
| Remove Link | If you decide the link is no longer necessary, use this option to strip it away. |
Once you’ve made your choices, make sure to click ‘Update’ or ‘Save.’ This will ensure your link settings are applied properly. Editing link settings not only helps in SEO but also improves user experience, which can lead to higher engagement and longer time spent on your blog! So, don’t rush through this step—take your time to do it right.
Step 6: Update or Publish Your Content
Now that you’ve meticulously added anchor text to your content, it’s time for the final step: updating or publishing your work! This is where everything you’ve done comes together, making your content interactive and enriching for your readers.
After you’ve reviewed your changes, look for the “Update” or “Publish” button on the right side of the editor. If you’re working on a new post, it will say “Publish.” If it’s an existing post, it will say “Update.” Regardless of your choice, this action will save all the modifications you’ve made, ensuring your anchor texts are now a part of the live content on your website.
But before you hit the button, consider the following:
- Preview: It’s always a good idea to preview your post. Click the “Preview” button to see how the anchor text looks in context. This way, you can ensure that everything appears as you intended.
- Check Links: Make sure to click on your anchor text links in the preview mode to ensure they lead to the correct destinations without any errors.
- SEO Considerations: If you’re using SEO tools like Yoast, check for any recommendations regarding your anchor text. They can provide insights into optimizing your links further.
Once satisfied, go ahead and click the button. Celebrate! You’ve just enhanced your blog with effective anchor text, making it more engaging and user-friendly for your audience.
Best Practices for Using Anchor Text
Utilizing anchor text effectively can make a significant difference in your content’s accessibility and SEO performance. Here are some best practices to keep in mind when selecting and incorporating anchor text:
- Be Descriptive: Use descriptive phrases that inform readers about the content they’ll find upon clicking. For example, instead of using “click here,” try “learn how to optimize images for SEO.” This provides clarity and improves the user experience.
- Avoid Exact Match Keywords: While it’s tempting to use exact match keywords as anchor text for SEO, it can appear spammy. Instead, opt for variations that still align with the content.
- Diversify Your Anchor Text: Mix up your anchor text to avoid repetition and improve relevance. Use branded anchors, generic ones, and long-tail keywords where applicable.
- Keep It Relevant: Ensure that the anchor text is related to the linked content. Mismatched links can confuse readers and may lead to higher bounce rates.
- Limit the Number of Links: Too many anchor texts can distract readers. Stick to a few well-placed links that enhance your content. Consider a ratio of about 1 link per 100 words.
By following these best practices, you’ll not only boost your SEO efforts but also provide your readers with a seamless reading experience. After all, good anchor text is all about making navigation through your website a breeze!
Troubleshooting Common Issues
Adding anchor text in WordPress is usually a straightforward process, but like any tech-related task, you might run into a few bumps along the way. If you find yourself facing challenges, don’t sweat it! Here are some common issues and their solutions.
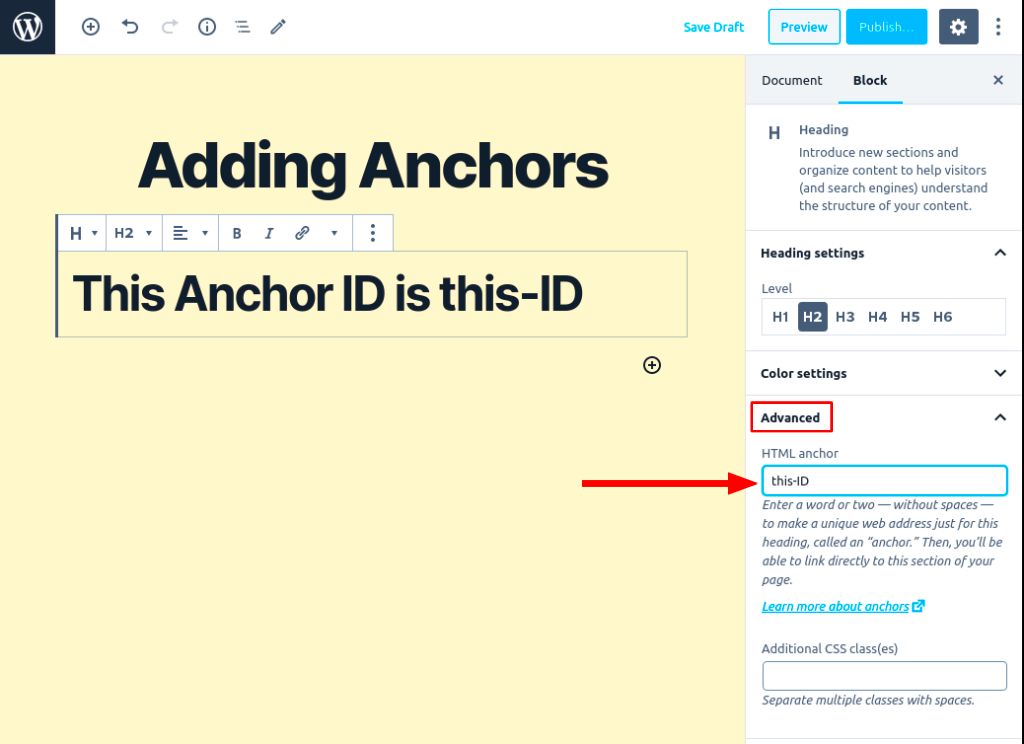
- Link Not Working: If clicking on your anchor text doesn’t lead to the intended section, double-check the anchor URL. It should follow the format #your-anchor-name. Make sure that your anchor name exactly matches the ID of the target section.
- Anchor Text Not Highlighted: Sometimes your anchor text may blend in with the rest of your content. To fix this, you can change the styling using CSS. To highlight anchor text, go to your WordPress Dashboard, navigate to Appearance > Customize > Additional CSS, and add custom styles like:
- Anchor Not Visible on Mobile: If the anchor text isn’t appearing on mobile devices, ensure that your WordPress theme is responsive. You may need to adjust the settings in your theme or consider reaching out to your theme’s support team.
- Too Many Anchors: Having too many anchors can overwhelm your readers and create a cluttered experience. Aim for a balance—only include as many anchors as necessary to improve navigation.
| CSS Property | Value |
|---|---|
| color | #FF5733 |
| font-weight | bold |
| text-decoration | underline |
By keeping these troubleshooting tips in mind, you can easily navigate any hiccups in adding anchor text to your WordPress site!
Conclusion
Adding anchor text to your WordPress site is a powerful way to enhance your content’s navigability and provide a better user experience. Not only does it allow for quick access to relevant sections within your posts or pages, but it also helps with search engine optimization (SEO) when done correctly.
So, what have we learned? Firstly, the process is straightforward. You can do it through the classic editor or the block editor, and you’ve got options for styling your anchor text to make it pop. Secondly, while it’s simple, being aware of common issues can save you time in the long run. After troubleshooting, you can significantly improve the usability of your content.
As you wrap up your anchor text journey, remember to periodically revisit and refine your links as your content evolves. Quality matters, so ensure that every anchor serves a purpose and adds genuine value for your readers. Thanks to your newfound skills, you’ll not only provide better navigation but also create a more engaging experience for your audience. Happy blogging!


