Hey there! If you’re diving into the world of multilingual websites, you might have heard about Elementor‘s impressive page-building capabilities. While it’s fantastic for creating beautiful designs, you might be wondering about the best ways to enhance your site’s usability. One important feature is a language selector. In this post, we’ll explore how you can add a language selector to your Elementor site without relying on any plugins. Let’s get started!
Understanding the Need for a Language Selector

So, why on earth do you need a language selector for your website? Well, if you’re aiming to reach a broader audience, catering to different languages is crucial. Here are a few reasons why implementing a language selector can be a game-changer:
- Improved User Experience: Visitors are more likely to stay and engage with your content if they can read it in their native language. A language selector ensures they have that option at their fingertips.
- Broader Reach: Expanding your reach to a multilingual audience can significantly increase site traffic. With more people able to understand your content, your visitor numbers are likely to skyrocket!
- Staying Competitive: If your competitors are already operating in multiple languages, you risk losing potential customers to them. A language selector puts you back in the game.
- SEO Benefits: Google loves websites that provide valuable content in various languages. A well-implemented language selector can enhance your SEO strategy, making it easier for users to find you across different languages.
To summarize, a language selector isn’t just a nifty tool. It’s a strategic element that can boost your website’s effectiveness and reach. Ready to learn how to add one in Elementor without a plugin? Let’s go!
Preparing Your Elementor Site for Multilingual Support

Before diving into the actual process of adding a language selector to your Elementor site, it’s crucial to prepare your website for multilingual support. This involves a couple of essential steps that will set the stage for a smooth bilingual experience.
First and foremost, ensure that your website content is ready to be translated. This means you should:
- Audit Your Existing Content: Review your current pages and posts. Identify which content will need translation.
- Choose Your Languages: Decide on the languages you want to offer. Popular choices often include English, Spanish, French, and German, but you can tailor your selections based on your target audience.
- Set Up a Translation Workflow: If you’re working with a team, create a workflow for translating content. This may involve using tools like Google Translate for initial drafts or hiring professional translators for quality assurance.
Next, think about the structure of your site. Keep these factors in mind:
- Subdirectories or Subdomains: Decide if you want your translations to exist in subdirectories (e.g., example.com/es/) or subdomains (e.g., es.example.com/). Each has its pros and cons regarding SEO.
- URL Translation: Consider aligning your URLs to reflect language changes. Using a keyword for each language in the URL can help with search engine indexing.
Finally, ensure your theme and plugins are compatible with multilingual support. Most modern themes, including those optimized for Elementor, should handle this without issues. However, it’s always good to double-check. Once you’ve made these preparations, you’re all set to create that custom language selector!
Creating a Custom Language Selector

Now that your Elementor site is well-prepared for multilingual support, let’s jump into the exciting part: creating a custom language selector. This is a fun way to enhance user experience by allowing visitors to switch languages effortlessly.
Here’s how you can build your language selector from scratch:
- Create Language Switcher Choices: Start by determining how you want users to select their preferred language. You can use text links, flag icons, or even a dropdown menu. Whichever you choose, keep it simple and visually appealing.
- Add Custom HTML Widget: In Elementor, drag and drop the HTML widget where you want the language selector to appear. This widget allows you to input custom code, which we’ll be using for the language switcher. Here’s a simple example in HTML:
<div class="language-selector"> <a href="?lang=en">English</a> | <a href="?lang=es">Español</a> | <a href="?lang=fr">Français</a> </div> - Style Your Language Selector: Use the Elementor styling options to give your language switcher a unique look. Play around with typography, colors, and spacing to make sure it fits seamlessly into your site’s design.
- Implementing the Language Logic: You will need some JavaScript or PHP to handle language changes effectively. This logic will determine how your site loads different language versions based on user selection. If you’re not a developer, you can find many snippets online or ask for help in forums!
- Test Your Selector: Finally, after implementing the language selector, make sure to test it thoroughly. Check that clicking each option correctly loads the corresponding language version of your content.
And there you have it! With these steps, you’ve created a custom language selector without the need for any plugins. Just remember, regular maintenance will keep everything running smoothly as you update your site. Happy multilingual blogging!
Adding the Language Selector to Your Elementor Layout
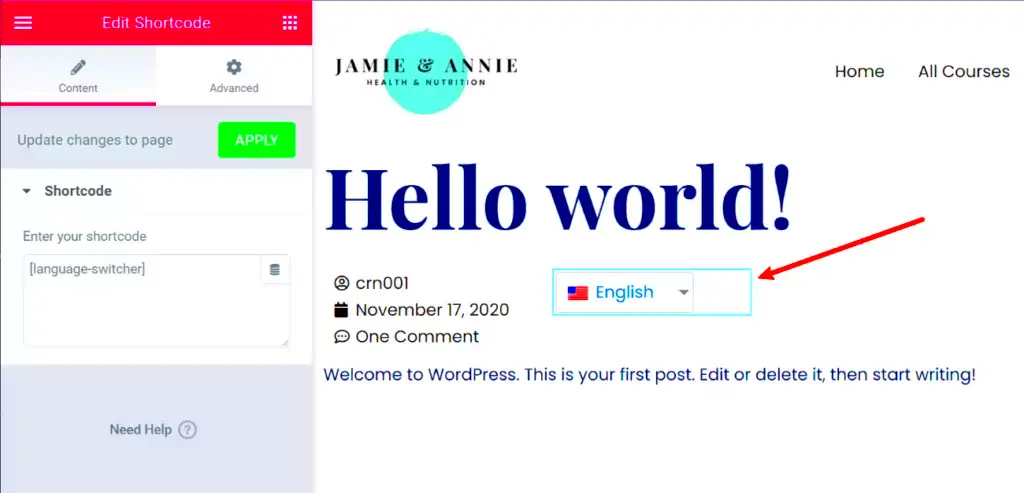
Now that you’ve prepared your language switcher, it’s time to integrate it into your Elementor layout! This process is fairly straightforward, but you want to make sure you’re positioning your selector effectively to enhance your user experience.
First, navigate to the page where you want to add the language selector. Once you’ve opened the Elementor editor, you can follow these steps:
- Add a New Section: Click the ‘+’ icon to insert a new section. You can choose from various layouts according to your design preference.
- Drag and Drop an HTML Widget: From the Elementor panel on the left, locate the HTML element. Drag it into the new section where you want the language selector to appear.
- Insert Your Language Selector Code: In the HTML widget, paste the code you’ve created for your language selector. Make sure this code includes your language options, and feel free to adjust the list as necessary.
- Preview Your Changes: Hit the ‘Update’ button and then click on the ‘Preview’ option to see how the selector looks on the frontend of your website.
Once you’ve added the selector, it’s essential to ensure that it naturally blends with your overall website design. Don’t hesitate to tweak its position or size until it feels just right. After all, your aim is to create a seamless language-switching experience for your visitors!
Styling Your Language Selector with CSS
After you’ve added the language selector to your Elementor layout, it’s time to give it a little visual flair! Styling your language selector with CSS can make a world of difference in how it complements your page.
To begin styling, you can use the same HTML widget where you added your language selector. Follow these simple steps:
- Open the HTML Widget: Return to the Elementor editor and click on your HTML widget containing the language selector code.
- Add Inline CSS: Right above the selector code, you can add a style block. Start with
<style>and end with</style>to incorporate your CSS rules.
Here’s a simple example of CSS you can use:
.language-selector { display: inline-block; margin: 10px;}.language-item { padding: 5px 10px; border: 1px solid #ccc; border-radius: 5px; cursor: pointer;}.language-item:hover { background-color: #f2f2f2;}In this example, we’ve created a basic style for your language selector. You can customize colors, spacing, borders, and more according to your site’s theme.
As you style, keep in mind the overall aesthetics of your website. Aim for a look that’s visually appealing but also easy to use. Make sure elements are large enough to clickable, and consider contrasting colors to enhance visibility!
Once you’re satisfied with the styling, don’t forget to hit ‘Update’ and preview your changes on the frontend to see how your language selector now fits into the overall design. Happy styling!
7. Testing the Language Selector Functionality
Once you’ve added your language selector using Elementor, it’s crucial to test its functionality. This ensures that your multilingual site works smoothly and that visitors can effortlessly switch between languages. Here’s how you can effectively test your language selector:
- Switch Languages: Start by clicking on the language selector you integrated. Make sure that clicking different options changes the website’s language immediately.
- Check Content: After switching languages, carefully check various pages on your site. Confirm that the content updates accurately according to the selected language without missing any translations.
- Responsive Design: Don’t forget to test your language selector on different devices. Whether it’s a smartphone, tablet, or desktop, verify the selector looks good and functions properly across all screens.
- SEO Considerations: Ensure that your language switching doesn’t lead to duplicate content issues. Test that your URLs reflect the language changes, and use Google Search Console to check for any indexing problems.
Remember, the user experience is vital! Engage with some native speakers of the languages you’ve included and ask for their feedback. Do they find the language switcher easy to use? Are translations accurate and culturally appropriate?
In conclusion, testing is a necessary step to guarantee that your language selector enhances your website rather than complicates it. By following these steps, you’ll ensure a seamless experience for your multilingual visitors.
8. Conclusion
Adding a language selector to your Elementor website without relying on a plugin can seem daunting at first, but it’s an invaluable capability that broadens your audience reach. By following the steps outlined, you’ve empowered your site to cater to diverse linguistic needs — a worthy investment for any online presence.
To wrap things up:
- Flexibility: You now have a custom language selector that doesn’t bog down your site with extra plugins, resulting in better performance.
- Enhanced User Experience: Multilingual support can significantly improve user engagement and satisfaction, making visitors feel more at home on your site.
- Independence: Without plugins, you have more control over your website’s functionality, meaning you can customize it to your liking without external dependencies.
As you continue growing your multilingual site, remember to keep your content regularly updated and culturally relevant. Don’t hesitate to revisit your language selector to fine-tune it as your site evolves.
So go ahead! Take pride in creating a welcoming environment for a global audience and watch as your community expands with each new language you embrace.


