Thinking about turning your photography hobby into a source of income? Shutterstock is one of the biggest platforms out there where photographers like you can showcase and sell your images. Uploading your photos might seem straightforward, but there are some best practices to ensure your images stand out and get approved quickly. In this guide, we’ll walk you through the process step-by-step, sharing tips to boost your chances of increasing your earnings. Whether you’re a beginner or looking to refine your approach, understanding how to upload effectively can make all the difference in your stock photography journey.
Preparing Your Photos for Submission

Before you even think about clicking the upload button, it’s crucial to prepare your photos properly. Quality and compliance are key to getting your images accepted and noticed. Here’s a checklist to help you get your photos ready:
- Choose High-Resolution Images: Shutterstock recommends images at least 4 megapixels, but higher resolution files tend to perform better. Aim for sharp, clear images with good detail.
- Correct Color and Exposure: Make sure your photos are well-lit, with accurate colors and minimal noise. Use editing software if needed to enhance brightness, contrast, and color balance.
- Focus on Composition: Well-composed images with a clear subject tend to attract more buyers. Avoid clutter and ensure your main subject is sharp and prominent.
- Remove Watermarks and Logos: Only upload images you own outright and that are free of watermarks or branding. Shutterstock requires original, unbranded photos.
- Check for Model and Property Releases: If your photo features recognizable people or private property, ensure you have the necessary legal releases. This is crucial for acceptance and legal safety.
- Metadata and Keywords: Prepare relevant keywords and a descriptive title for each photo. Good metadata helps buyers find your images easily, increasing your chances of sales.
Once your photos meet these criteria, you’re ready to upload. Remember, quality and compliance not only help get your images accepted faster but also improve their visibility in search results, ultimately boosting your earning potential on Shutterstock.
Step-by-Step Guide to Upload Photos on Shutterstock
Ready to get your photos out into the world and start earning? Uploading your images to Shutterstock is pretty straightforward, but it’s good to know each step to make the process smooth and hassle-free. Let’s walk through it together!
Step 1: Sign In or Create an Account
If you haven’t already, head over to the Shutterstock contributor website and sign up for a contributor account. It’s free and quick. Once you’re signed in, you’ll see your dashboard, which is your control center for uploads, earnings, and stats.
Step 2: Prepare Your Photos
Before uploading, make sure your images meet Shutterstock’s requirements:
- File Format: JPEG only
- Resolution: Minimum 4MP (e.g., 2400 x 1600 pixels)
- Color Mode: RGB
- File Size: Up to 50MB per image
Also, review your photos for quality, focus, and lighting. Clear, sharp images tend to perform better.
Step 3: Click “Upload Images”
On your dashboard, look for the “Upload” button. Shutterstock offers a straightforward upload interface. You can upload multiple images at once, which saves time.
Step 4: Add Metadata
Once your images are uploaded, it’s time to add details:
- Title: Describe your photo briefly and accurately.
- Keywords: Add relevant keywords that help people find your image. Think about what someone might search for.
- Description: Provide a more detailed explanation if needed.
This step is crucial because good metadata improves your image’s visibility in search results.
Step 5: Choose Categories and Settings
Assign your photo to appropriate categories like “Nature,” “People,” or “Technology.” This helps in organizing your portfolio and enhancing discoverability.
Review your settings, including licensing options—standard or enhanced—and pricing if you have preferences.
Step 6: Submit for Review
Once everything looks good, hit the “Submit” button. Your photo will go into Shutterstock’s review queue. Reviewers typically evaluate images within a few days. If approved, your photo will be live and available for purchase!
Tips for a Smooth Upload Process
- Keep your images organized in folders before uploading.
- Use high-quality previews for reference when adding metadata.
- Double-check your keywords and descriptions for accuracy and relevance.
And that’s it! Uploading on Shutterstock is simple once you get the hang of it. Now, let’s move on to how you can make your photos stand out even more.
Tips for Optimizing Your Photos for Better Visibility
Getting your photos uploaded is just the first step. To truly boost your earnings, you need to optimize your images so they’re easy to find and appealing to buyers. Here are some practical tips to maximize your photos’ visibility on Shutterstock:
1. Use Relevant and Specific Keywords
Keywords are your photos’ lifeline to potential buyers. Be thorough and specific. Think about:
- What’s in the photo (e.g., “sunset over mountains” vs. just “sunset”)
- People’s emotions or actions (e.g., “happy child playing in park”)
- Contextual details (e.g., “office workspace with laptop and coffee”)
Use a mix of broad and niche keywords to cover different search queries. Avoid keyword stuffing—keep it relevant!
2. Write Clear, Concise Titles and Descriptions
Your titles and descriptions should complement your keywords. Be honest and accurate—misleading descriptions hurt your reputation and visibility. For example:
- Title: “Morning coffee with a laptop on a wooden table”
- Description: “A close-up shot of a steaming cup of coffee next to a silver laptop on a rustic wooden table, perfect for blogs or articles about remote work.”
3. Choose the Right Categories
Select the most appropriate categories for your images. This helps Shutterstock’s algorithms recommend your photos to the right buyers and ensures they appear in the correct search filters.
4. Maintain Consistent Quality and Style
Building a recognizable style or niche can help attract repeat buyers. Whether it’s vibrant landscapes, professional portraits, or minimalistic product shots, consistency makes your portfolio more appealing.
5. Keep Up with Trends and Seasonal Topics
Photos related to current events, holidays, or trending topics tend to get more visibility. For example, during the holiday season, images of festive setups or winter landscapes often see high demand.
6. Regularly Upload Fresh Content
The more high-quality images you upload, the more chances you have to appear in searches. Keep your portfolio active and updated with new content that aligns with popular themes.
7. Monitor Your Performance and Adjust
Use Shutterstock’s analytics tools to see which images sell best. If certain keywords or styles perform well, focus on creating more similar content.
By following these tips, you’re setting yourself up for better visibility, more downloads, and ultimately, higher earnings. Remember, the key is consistency, quality, and understanding what your buyers are looking for. Happy uploading!
Understanding Shutterstock’s Quality and Content Guidelines
Before you start uploading your photos, it’s super important to get a solid grasp of Shutterstock’s quality and content guidelines. Think of it as making sure your photos are playing by the rules so they can be approved and showcased to potential buyers.
Shutterstock is known for its high standards, which means your images need to be professional, sharp, and relevant. Here are some key points to keep in mind:
- Technical quality: Your photos should be in focus, well-exposed, and free from noise or compression artifacts. Use good lighting and avoid overly dark or bright images.
- Composition: Frame your shots thoughtfully. Avoid clutter and make sure the main subject is clear and prominent.
- Model and property releases: If your photo features people or private property, you need the appropriate releases to avoid legal issues.
- Content restrictions: Shutterstock doesn’t accept images with illegal activities, hate symbols, or explicit content. Keep it professional and respectful.
- Authenticity and originality: Your photos should be original and not heavily edited or manipulated in a way that misleads viewers.
It’s a good idea to review Shutterstock’s content guidelines regularly because they can update their standards. Remember, high-quality, compliant images have a much better chance of getting accepted and earning you money.
Another tip: when editing your photos, aim for natural colors and avoid excessive filters. Shutterstock prefers images that look natural and true to life, which makes them more appealing to buyers.
In short, understanding and adhering to Shutterstock’s quality and content guidelines isn’t just about getting approved—it’s about making your images stand out in a competitive marketplace and ensuring you earn the most possible from your work.
Best Practices for Tagging and Categorizing Your Photos
Once your photos are ready and meet Shutterstock’s standards, the next step is making sure they’re easy for buyers to find. That’s where tagging and categorizing come into play. Think of it as giving your images a clear, descriptive label so they pop up when someone searches for exactly what they need.
Here’s what you should keep in mind for effective tagging and categorization:
- Use relevant keywords: Be specific and accurate. For example, instead of just “dog,” use “golden retriever puppy playing in the park.” The more precise, the better.
- Include synonyms and related terms: If your photo depicts a “cafe,” also add tags like “coffee shop,” “coffee,” or “breakfast.” This increases visibility across different search queries.
- Think about audience and use cases: Consider how buyers might search for your image. Are they looking for “business meeting” or “teamwork”? Use those kinds of descriptive tags.
- Tag accurately, not excessively: While it’s tempting to add a long list of keywords, focus on the most relevant ones. Shutterstock recommends about 15-25 tags per image.
- Choose the right categories: Shutterstock allows you to add your images to specific categories. Pick the most appropriate ones—like “People,” “Travel,” or “Food”—to help your image appear in relevant collections.
To make tagging easier, consider doing a quick search on Shutterstock first. See how similar images are tagged and use those as inspiration. Also, avoid using misleading tags—accuracy is key. If your photo is about “mountains,” don’t tag it as “beach” just to get more views.
Finally, keep in mind that good tagging not only helps your images get discovered but can also lead to higher sales because your photos are reaching the right audience. Take your time to craft thoughtful, descriptive tags, and your earnings on Shutterstock will thank you!
Strategies to Maximize Your Earnings from Photo Uploads
Thinking about boosting your income from Shutterstock? Great! The good news is, with a few smart strategies, you can significantly increase your earnings and make the most out of your photography efforts. Let’s dive into some practical tips that can help you maximize your earning potential.
Focus on Popular and Trending Topics
One of the easiest ways to increase sales is to upload images that are in high demand. Keep an eye on current trends, seasonal themes, and popular search keywords. For example, during holidays, images related to celebrations, decorations, or specific themes tend to perform well. Use Shutterstock’s keyword insights or tools like Google Trends to identify what buyers are searching for.
Maintain High Quality and Consistency
High-resolution, well-composed, and visually appealing images attract more buyers. Consistency is key—regularly uploading quality content helps build your portfolio and increases your chances of being featured or appearing in search results. Remember, quality always beats quantity!
Use Effective Keywords and Descriptions
Keywords are your bridge to making your images discoverable. Use relevant, specific, and varied keywords to describe your photos accurately. Avoid keyword stuffing, but make sure to include all pertinent terms. Well-optimized descriptions and tags help your images rank higher, leading to more downloads and earnings.
Upload a Diverse Portfolio
Don’t put all your eggs in one basket. Cover different themes, styles, and subjects to attract a broader audience. This diversity can open up more opportunities for sales across various categories, increasing your overall income.
Engage with the Shutterstock Community
Participate in forums, read other photographers’ tips, and stay updated on platform news. Building a community presence can give you insights into what buyers want and how to adapt your uploads accordingly. Plus, engaging actively might lead to more exposure for your portfolio.
Analyze Your Performance
Regularly review your sales data and see which images perform best. Use this information to guide your future uploads—focus on subjects and styles that generate the most income. Over time, this data-driven approach can help you refine your portfolio for maximum earnings.
Common Mistakes to Avoid When Uploading Photos
While uploading photos might seem straightforward, there are some pitfalls that can hold you back from earning more or even get your images rejected. Let’s go over the common mistakes to watch out for so you can keep your uploads on track and maximize your success.
Ignoring Quality and Technical Standards
Uploading blurry, poorly lit, or low-resolution images is a surefire way to get rejected or earn fewer sales. Always check that your photos are sharp, properly exposed, and meet Shutterstock’s minimum quality requirements. Remember, buyers prefer professional-looking images.
Using Irrelevant or Overused Keywords
Keyword stuffing or mislabeling images can hurt your visibility and credibility. Avoid generic tags like “photo” or “image”—be specific and relevant. Also, don’t use misleading keywords just to attract clicks; this can lead to rejections and frustrate buyers.
Uploading Low-Resolution or Cropped Images
Ensure your images are high-resolution and properly cropped. Avoid images that are pixelated or have unintended borders or watermarks. Buyers want versatility and clarity, so provide images that look good at various sizes.
Neglecting Model and Property Releases
If your photos feature recognizable people or private property, you need the appropriate releases. Failing to obtain or upload these can lead to copyright issues or rejection. Always verify if your images require releases and include them when necessary.
Uploading Too Similar or Duplicate Content
Repetitive images or slight variations of the same shot can lead to rejection and clutter your portfolio. Focus on unique, original photos that add value. Variety keeps your portfolio fresh and appealing to buyers.
Not Keeping Up with Trends and Platform Guidelines
Staying informed about Shutterstock’s latest requirements, content policies, and market trends is crucial. Ignoring updates can result in rejected images or missed opportunities. Regularly review Shutterstock’s contributor resources to stay aligned with best practices.
By avoiding these common mistakes and implementing solid strategies, you’ll be well on your way to increasing your earnings and building a successful photography portfolio on Shutterstock. Happy uploading!
Monitoring Your Performance and Improving Your Portfolio
Once you’ve started uploading your photos to Shutterstock, the journey doesn’t end there. In fact, one of the most important parts of growing your earning potential is regularly keeping an eye on how your images are performing. Think of it as a feedback loop—by understanding what works and what doesn’t, you can fine-tune your portfolio for better results.
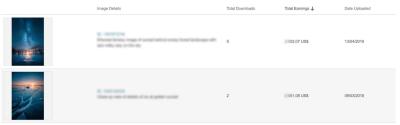
Shutterstock provides a handy dashboard where you can track various metrics like your total downloads, earnings, and the popularity of individual images. Take some time each week to review this data. Notice which photos are getting a lot of attention and which aren’t. If certain images consistently perform well, ask yourself what makes them appealing—maybe it’s the subject matter, composition, or the style. Use these insights to guide your future shoots and uploads.
Additionally, pay attention to the keywords and descriptions you use. Properly optimized metadata can make a huge difference in how easily customers find your images. If you notice some photos aren’t getting much traction, consider updating their titles, tags, or descriptions to better match what buyers might be searching for.
Another tip is to diversify your portfolio. If you tend to upload only one type of photo, you might be missing out on other lucrative niches. Experiment with different themes, styles, and subjects. Keep an eye on trending topics or seasonal needs—holidays, current events, or popular design trends—to stay relevant.
And don’t forget to learn from the community! Check out top contributors’ portfolios to see what kinds of images they’re uploading and how they’re presenting them. Engage with forums or social media groups for Shutterstock contributors. Sharing tips and experiences can provide valuable insights and motivate you to keep improving.
Remember, improving your portfolio is a continuous process. By regularly monitoring your performance, optimizing your metadata, diversifying content, and learning from others, you’ll be well on your way to increasing your earnings and making the most out of your Shutterstock journey.
Conclusion and Final Tips for Success on Shutterstock
Congratulations! You’ve now got a solid understanding of how to upload photos on Shutterstock and some key strategies to boost your earnings. But before you dive back into uploading, let’s wrap things up with some final tips to set you up for long-term success.
First, consistency is key. Regularly adding fresh content keeps your portfolio active and more attractive to buyers. Even if you can only upload a few images each week, staying consistent helps build your reputation and visibility on the platform.
Second, focus on quality over quantity. High-quality, well-composed images with clear subject matter tend to perform better than numerous mediocre ones. Invest time in editing your photos to ensure they’re crisp, vibrant, and professional-looking.
Third, optimize your metadata. Use relevant, specific keywords that accurately describe your images. Think about what potential buyers might search for and include these terms naturally in your titles, descriptions, and tags.
Fourth, keep an eye on trends and seasonal opportunities. For example, during holidays or major events, there’s usually increased demand for related imagery. Planning ahead for these periods can help you capitalize on the surge in buyer interest.
Fifth, stay engaged with the Shutterstock community and resources. Attend webinars, read articles, and participate in forums. Learning from others’ experiences and staying updated on platform changes can give you a competitive edge.
Lastly, don’t get discouraged by slow starts or initial rejections. Building a successful stock photography business takes time, patience, and persistence. Celebrate small wins along the way and keep refining your craft.
By following these tips—being consistent, prioritizing quality, optimizing metadata, staying trend-aware, and engaging with the community—you’ll be well on your way to increasing your earnings on Shutterstock. Remember, every great contributor started somewhere, and with dedication, your portfolio can grow into a rewarding source of income.