Getting your images approved on Shutterstock can be a game-changer for your photography career, but first, you need to understand their specific image requirements. Shutterstock has clear guidelines to ensure all images meet quality standards, including resolution, format, and content. Knowing these rules upfront saves you time and avoids rejection. Whether you’re a seasoned photographer or just starting out, familiarizing yourself with
Understanding the Importance of Proper Image Resizing
Resizing your images might seem like a small step, but it’s actually a crucial part of the submission process. Proper resizing ensures your photos meet Shutterstock’s resolution and dimension requirements, which directly affect their quality and appearance on the platform. If your images are too small, they might look pixelated or blurry; too large, and they could slow down the upload process or exceed file size limits. Additionally, correctly resized images help maintain visual integrity, enhance professionalism, and improve your chances of approval. Think of resizing as the foundation for a successful submission—getting it right can make all the difference in standing out among thousands of other contributors. So, understanding why and how to resize your images properly is essential for a smooth and efficient upload experience.
Tools and Software for Resizing Images

When it comes to resizing images for Shutterstock, choosing the right tools can make a big difference in both the quality of your images and how smoothly your workflow goes. Luckily, there’s a wide range of software options out there—some free, some paid—that cater to different levels of expertise and specific needs.
Let’s start with the basics. If you’re just dipping your toes into image resizing or want something straightforward, free tools like GIMP or Paint.NET are excellent options. They offer powerful features similar to professional software but with a gentler learning curve. Plus, they’re completely free!
If you’re looking for more advanced options, Adobe Photoshop is the industry standard. It gives you precise control over image dimensions, resolution, and quality. With Photoshop, you can also batch resize multiple images at once, which is a lifesaver if you have a large number of photos to prepare.
Other popular tools include:
- Adobe Lightroom – Great for photographers who want quick edits and resizing with minimal fuss.
- Canva – An online platform perfect for quick resizing and editing, especially if you prefer working in your browser.
- Pixlr – A free, web-based editor with resizing capabilities that’s simple to use.
- Image Resizer Apps – There are many dedicated apps for smartphones, like Photo & Picture Resizer for Android or Image Size for iOS, which can be handy for quick edits on the go.
Some tips when choosing your software:
- Ensure it allows you to set specific dimensions and resolution.
- Look for batch processing features if you have many images.
- Check if it preserves image quality after resizing.
Remember, the goal is to resize without losing important details or introducing unwanted artifacts. So, spend a little time experimenting with your chosen software to find what works best for you. Once you’re comfortable with your tools, preparing images for Shutterstock will become a much smoother process.
Preparing Your Image for Upload
Now that you’ve resized your images using your preferred software, it’s time to prepare them for upload to Shutterstock. This step is crucial because Shutterstock has specific guidelines to ensure your images meet their quality standards and are ready for licensing.
First things first: check the image resolution and dimensions. Shutterstock recommends a minimum resolution of 4 megapixels (for instance, 2000 x 2000 pixels). Higher resolutions are always better because they give more flexibility for buyers. Make sure your image dimensions match Shutterstock’s requirements or are at least above the minimum threshold.
Next, review your image for quality and clarity:
- Ensure there’s no pixelation or blurriness, especially if you’ve enlarged the image during resizing.
- Check for any compression artifacts—these can occur if you’ve saved your image with too much compression.
- Look for distracting elements or imperfections that might detract from the main subject.
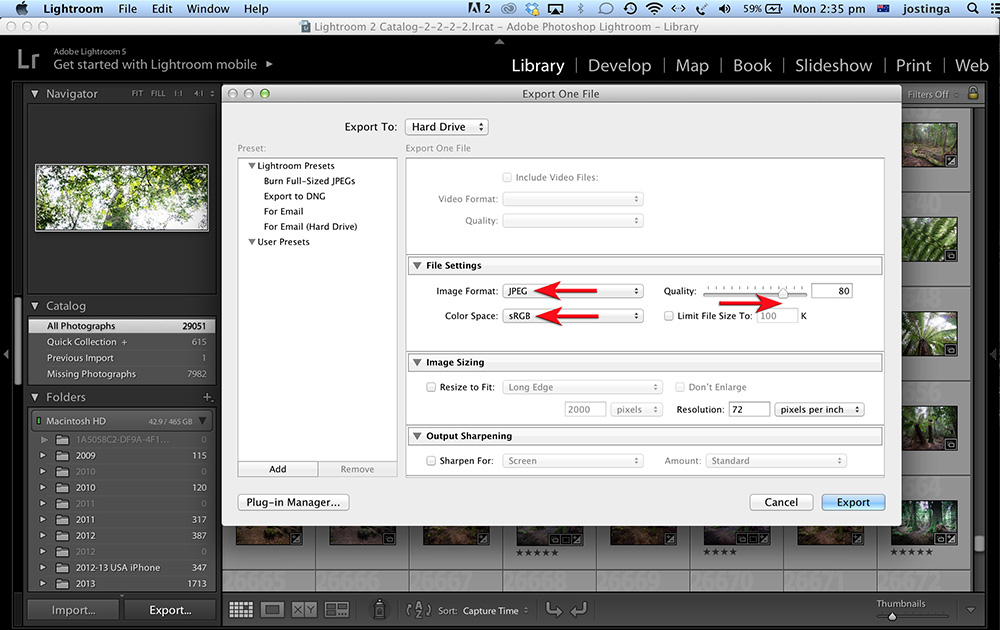
Another important step is to optimize your image’s format and color profile. Shutterstock prefers JPEG format with RGB color mode. Save your image in JPEG with a quality setting of around 80-90% to balance quality and file size.
Before uploading, it’s also a good idea to:
- Rename your file with a clear, descriptive filename that relates to the content (e.g., “sunset-over-mountains.jpg”).
- Crop or straighten the image if necessary to improve composition.
- Remove any watermarks or logos that aren’t part of your original image.
Lastly, double-check your image against Shutterstock’s content guidelines. Make sure it’s free of copyrighted elements, offensive content, or identifiable individuals unless you have model releases. Taking these steps helps ensure your submission is smooth and increases the chances of acceptance.
Once everything looks good—resolution, quality, format, and compliance—you’re ready to upload. Preparing your images carefully not only saves time but also helps you build a professional portfolio that sells well on Shutterstock. Happy uploading!
Step-by-Step Instructions for Resizing Images for Shutterstock
Ready to get your images Shutterstock-ready? Resizing images might sound technical, but I promise it’s straightforward once you follow these simple steps. Let’s walk through the process together to make sure your images meet the platform’s standards and look fantastic!
Step 1: Choose the Right Software
First things first, pick a good image editing tool. You can use free options like GIMP or Paint.NET, or go for paid programs like Adobe Photoshop. Whatever you choose, make sure it allows you to change image dimensions and resolution.
Step 2: Open Your Image
Launch your chosen software and open the image you want to resize. It’s always a good idea to work on a copy of the original, so your high-quality version stays safe.
Step 3: Check the Current Image Size and Resolution
Before resizing, review the current dimensions and resolution. For Shutterstock, images should typically be at least 4 megapixels, with a minimum size of 3872 x 2592 pixels. In Photoshop, you can check this by going to Image > Image Size.
Step 4: Resize the Image
- Enter the new width and height in pixels. Keep the aspect ratio consistent to avoid distortion.
- If your software offers constrain proportions or lock aspect ratio options, enable them.
- Make sure the resolution is set to 300 pixels per inch (ppi) for high-quality images. Shutterstock generally accepts images at 72 ppi, but 300 ppi ensures better quality and flexibility.
Step 5: Save Your Resized Image
Once resized, save your image in JPEG or TIFF format — Shutterstock prefers JPEGs with high quality. Use a descriptive filename that includes relevant keywords if possible. Also, avoid compressing the image too much to prevent quality loss.
Step 6: Review and Upload
Finally, review your resized image for any quality issues or distortions. Once satisfied, upload it to Shutterstock following their submission guidelines. And voilà — your image is now ready for consideration!
Tips for Ensuring Image Quality During Resizing
Resizing is more than just changing dimensions — it’s about maintaining the visual integrity of your image. Here are some handy tips to keep your images crisp, clear, and professional-looking when resizing for Shutterstock:
1. Start with a High-Resolution Original
If possible, always begin with the highest quality version of your image. Resizing from a low-resolution file can lead to pixelation and blurry results, no matter how carefully you resize.
2. Use Resampling Methods Wisely
Most editing programs let you choose how the image is resampled during resizing. For enlarging images, choose Preserve Details in Photoshop or similar options that minimize quality loss. For reducing size, Bicubic Sharper often provides sharper results.
3. Avoid Excessive Upscaling
While it might be tempting to enlarge images to meet size requirements, don’t go overboard. Upscaling too much can cause pixelation and softness. Instead, try to start with a larger original image whenever possible.
4. Sharpen After Resizing
Sometimes, resizing can soften details. Applying a subtle sharpening filter afterward can enhance clarity. Use tools like Unsharp Mask or Smart Sharpen — just be cautious not to over-sharpen, as it can introduce noise.
5. Check Color and Contrast
Resizing can sometimes affect color vibrancy and contrast. Make minor adjustments to ensure your image looks vibrant and true to life. This step helps your image stand out in Shutterstock’s marketplace.
6. Save Multiple Versions
Keep different versions of your resized image — a high-quality master and a ready-to-upload version. This way, you always have a backup and can make further tweaks if necessary.
Resizing images for Shutterstock doesn’t have to be intimidating. With the right tools and some mindful techniques, you’ll produce images that are not only compliant but also eye-catching. Happy editing!
Final Checks Before Submitting Your Image to Shutterstock
Before you hit that submit button, it’s super important to do a few final checks. Think of it as giving your image a quick once-over to make sure everything is perfect and ready for the world to see. After all, first impressions matter, especially when it comes to stock images!
Here are some key things to double-check:
- Resolution and Dimensions: Make sure your image meets Shutterstock’s minimum requirements—generally at least 4 MP (megapixels). Double-check the final pixel dimensions to ensure they’re within the accepted range.
- File Format and Size: Confirm your image is saved as JPEG or TIFF, with JPEG being the most common. Also, check that the file size doesn’t exceed Shutterstock’s limit (usually around 50 MB for JPEGs).
- Color Profile: Ensure your image uses the sRGB color profile. This helps keep colors consistent across different devices and screens.
- Image Quality: Zoom in and look for any unwanted spots, dust, or imperfections. Use editing tools to remove distractions or blemishes. Also, verify that the image is sharp and well-exposed.
- Metadata and Keywords: Properly tag your image with relevant keywords. Think about what someone searching for this image might type in. Include details like the subject, mood, colors, and context.
It’s also a good idea to have a fresh pair of eyes review your image. Sometimes, you miss small issues because you’ve looked at it so many times. A second opinion can catch things you might overlook.
Finally, trust your gut. If it feels polished and professional, it’s probably ready to submit. Taking these extra moments can make a big difference in how your image is received and whether it gets accepted on Shutterstock.
Conclusion and Additional Resources for Image Submission
Congratulations! You’ve gone through the entire process of resizing and preparing your images for Shutterstock. Remember, the key steps include understanding the submission requirements, resizing your images properly, and doing those final checks to ensure everything looks professional. The more you practice, the easier and faster this process becomes, and your portfolio will grow with high-quality, well-optimized images ready for sale.
If you’re looking to sharpen your skills further or explore more about stock photography, here are some helpful resources:
- Shutterstock Contributor Help Center – The official guide with tips and guidelines for contributors.
- Stock Photo Secrets – A community with tutorials, interviews, and advice for stock photographers.
- Photo Editing Software Options – Explore tools like Adobe Photoshop, Lightroom, or free alternatives like GIMP to enhance your images.
- How to Sell Stock Photos – A comprehensive article on maximizing your sales and understanding market trends.
Remember, successful stock photography is all about quality, consistency, and understanding what buyers are looking for. Keep practicing, stay inspired, and don’t be afraid to experiment with different styles and subjects. Happy uploading!