Creating eye-catching book covers for Shutterstock is both an art and a science. One of the most important parts of the process is making sure your images are sized correctly. Proper sizing not only ensures your cover looks professional but also helps you meet Shutterstock’s submission guidelines, avoiding rejections and saving you time. Whether you’re a seasoned designer or just starting out, understanding the basics of photo sizing is key to making your book covers stand out and look sharp across all devices and formats. Let’s dive into what you need to know to get your images just right!
The Importance of Correct Image Dimensions and Resolution

When it comes to designing a book cover for Shutterstock, correct image dimensions and resolution are absolutely vital. Think of it like building a house — if your foundation isn’t solid, everything else can fall apart. The same goes for your images. If your cover isn’t the right size or resolution, it can appear blurry, pixelated, or distorted, which not only looks unprofessional but also risks rejection from Shutterstock.
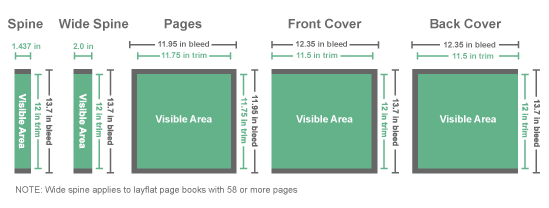
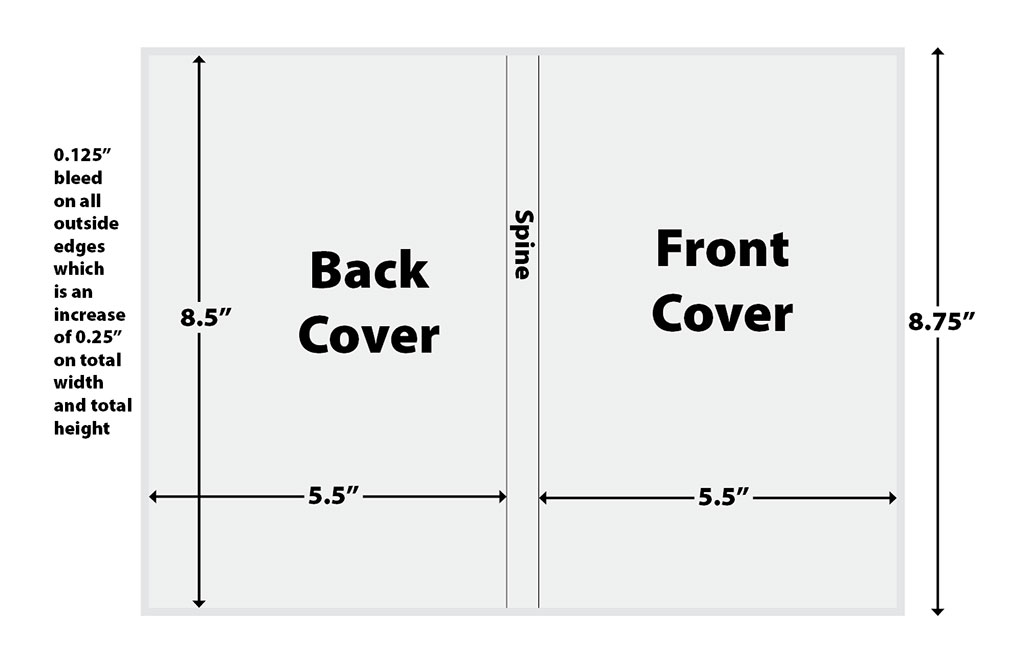
Why does size matter so much? Well, Shutterstock has specific guidelines for cover images, primarily to ensure consistency and quality across their platform. Most book covers are typically rectangular, with standard sizes depending on the genre or format. For example, a typical eBook cover might be 1600 pixels wide by 2560 pixels tall, but this can vary depending on the platform or print specifications.
Resolution is equally critical. Resolution refers to the amount of detail an image holds and is measured in pixels per inch (ppi). Shutterstock recommends a minimum resolution of 300 ppi for high-quality images suitable for print and digital use. Using a lower resolution can result in a blurry or pixelated cover, which diminishes your artwork’s impact and could lead to rejection.
To sum up, correct dimensions ensure your cover fits perfectly on various platforms, while high resolution guarantees it looks crisp and professional. Always double-check Shutterstock’s latest size and resolution requirements before submitting your work. Remember, taking the time to get these details right will pay off by making your book covers look stunning and ready for prime time!
Understanding Shutterstock’s Image Requirements for Book Covers

If you’re aiming to get your book cover images accepted on Shutterstock, it’s essential to understand their specific requirements. Shutterstock has clear guidelines to ensure that images are of high quality, properly formatted, and ready for commercial use. Ignoring these can lead to rejection or, worse, having your work taken down after upload.
First, let’s talk about the resolution. Shutterstock recommends a minimum of 300 dpi (dots per inch) for print-quality images. This is crucial because book covers are often printed in physical formats, and low-resolution images can look pixelated or blurry. For digital-only covers, a pixel dimension of at least 2400 x 3000 pixels is a good starting point, but always aim higher if possible.
Next, color mode matters. Shutterstock prefers images in the RGB color space. This format offers vibrant colors suitable for screens and digital displays. Avoid using CMYK, as it’s primarily for printing, and images in CMYK might not display correctly online or may be rejected.
Another important aspect is file format. The accepted formats are JPEG and TIFF, with JPEG being the most common due to its balance of quality and file size. When saving your image, choose a high-quality setting (such as 100% quality in JPEG) to prevent compression artifacts.
Additionally, Shutterstock has specific guidelines regarding content. Your cover should be free of watermarks, logos, or any copyrighted material that you don’t own. The image should be original, or you must have the rights to use all elements within it.
Finally, consider the composition and framing. Shutterstock prefers images that are well-composed, with enough space for cropping and text overlays if needed. Keep in mind that your cover will often need to fit into various dimensions, so avoid placing critical text or design elements too close to the edges.
In sum, understanding these core requirements—resolution, color mode, file format, and content—will set you up for success when preparing your book cover photos for Shutterstock. It’s always a good idea to review their latest contributor guidelines before uploading, as standards can evolve over time.
Step-by-Step Guide to Resizing Photos for Shutterstock Book Covers

Resizing your photos correctly is key to making sure they meet Shutterstock’s standards and look professional. Here’s a simple, step-by-step guide to help you resize your images effectively:
Step 1: Assess Your Original Image
- Check the current resolution—look at the pixel dimensions and dpi settings.
- Ensure the image is of high quality and free from pixelation or blurriness.
- Note the current aspect ratio to determine how it fits your target dimensions.
Step 2: Decide on Your Target Dimensions
For book covers, a common size is 2400 x 3000 pixels, which provides flexibility for cropping and ensures print quality. If your cover has specific size requirements, adjust accordingly, but always keep the resolution at 300 dpi.
Step 3: Choose Your Editing Software
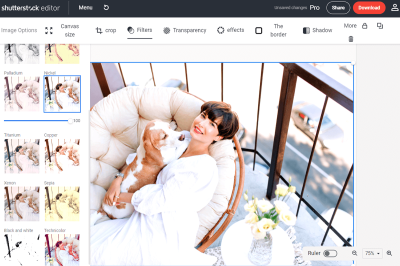
You can use tools like Adobe Photoshop, GIMP (free), or online editors such as Canva or Pixlr. Open your image in your preferred software.
Step 4: Set the Image Resolution
- In Photoshop: Go to Image > Image Size.
- Ensure Resample is checked to change pixel dimensions without affecting resolution.
- Set resolution to 300 dpi.
Step 5: Resize the Image
- Input your desired pixel dimensions, for example, 2400 x 3000 pixels.
- If maintaining aspect ratio, resize proportionally. If your image’s aspect ratio differs, decide whether to crop or add borders.
Step 6: Crop or Extend the Canvas as Needed
If your image isn’t the exact aspect ratio, you can crop parts of the image or extend the canvas to fit the desired dimensions:
- Cropping: Use the crop tool to select the area you want to keep, making sure to leave space for text or design elements.
- Extending canvas: Increase the canvas size and fill the new space with a matching background color or design element.
Step 7: Save Your Resized Image
- Export your image as a JPEG with the highest quality setting (100%).
- Double-check that the file size isn’t too large for upload limits but retains the quality you want.
Step 8: Final Review
Before uploading, review your resized image on different screens to ensure it looks sharp, colors are vibrant, and no important details are cropped out. Also, verify the resolution and dimensions one last time.
By following these steps, you’ll ensure your book cover images are perfectly sized for Shutterstock, increasing your chances of acceptance and making your work stand out. Remember, taking the time to resize properly pays off in the final quality of your published cover!
Tools and Software for Accurate Image Resizing
When it comes to resizing your book cover photos for Shutterstock, having the right tools can make all the difference. You want to ensure that your images are crisp, clear, and meet all the platform’s specifications without losing quality. Luckily, there are plenty of user-friendly options out there, whether you’re a beginner or a seasoned designer.
One popular choice is Adobe Photoshop. It offers precise control over image dimensions, resolution, and file formats. With Photoshop, you can easily set your exact pixel dimensions, DPI (dots per inch), and even preview how your cover will look at different sizes. It’s a professional-grade tool that’s worth the investment if you’re serious about your covers.
If you’re looking for free or more accessible options, consider Canva. It’s an intuitive online platform that allows you to resize images easily, with pre-set templates for book covers. While it might not offer as much control as Photoshop, Canva is perfect for quick adjustments and ensuring your cover fits Shutterstock’s guidelines.
Other helpful tools include:
- GIMP – A free, open-source alternative to Photoshop with robust resizing capabilities.
- Pixlr – A browser-based editor that offers quick resizing and editing features.
- ImageResizer.com – A simple online tool dedicated solely to resizing images with minimal fuss.
When resizing, always keep an eye on the resolution. Shutterstock recommends a minimum of 300 DPI for print quality, but for digital covers, 72 DPI is acceptable as long as the pixel dimensions are correct. Many tools let you set these parameters easily, ensuring your cover looks professional across all platforms.
Remember, saving your images in the correct format—usually JPEG or PNG—is just as important as resizing. Most tools will allow you to choose the right format and quality settings to keep your file size manageable without sacrificing quality.
Common Mistakes to Avoid When Sizing Book Cover Photos
Even experienced designers can make mistakes when resizing their book covers, which can lead to rejection or a less-than-stellar presentation on Shutterstock. Being aware of these pitfalls can save you time and frustration.
1. Ignoring Resolution Requirements: One of the biggest mistakes is neglecting the recommended resolution. Uploading a low-resolution image (like 72 DPI) that appears sharp on your screen might look blurry or pixelated once uploaded. Always aim for 300 DPI if printing or check Shutterstock’s specific guidelines for digital covers.
2. Not Considering Aspect Ratios: Resizing without maintaining the correct aspect ratio can distort your cover, making it look stretched or squished. Use the lock aspect ratio feature in your software to keep proportions consistent. For Shutterstock, common aspect ratios for covers are 1:1.5 or 1:2, so double-check their guidelines.
3. Over-Resizing or Shrinking Too Much: Enlarging small images can cause pixelation, while shrinking large images excessively can lose detail. Always start with the highest quality original image possible. If you need to resize, do so gradually and check the quality at each step.
4. Forgetting to Save in the Correct Format: Submitting in the wrong file format can lead to rejection. JPEG is usually preferred, but check Shutterstock’s current requirements. Also, ensure your image is saved with the right color profile (sRGB is standard for web).
5. Neglecting to Preview Your Cover: Before finalizing, preview your resized cover on different devices or at different sizes. Sometimes what looks fine on your screen might not translate well when viewed smaller or larger.
By avoiding these common mistakes and using the right tools, you’ll be well on your way to creating a polished, professional-looking book cover that meets Shutterstock’s standards. Remember, a great cover can make all the difference in catching a reader’s eye!
Tips for Ensuring Your Photos Meet Shutterstock Quality Standards
When it comes to submitting your book cover photos to Shutterstock, quality is king. Shutterstock has strict standards to ensure that all images on their platform are top-notch, so your work needs to stand out not just in creativity but also in technical excellence. Here are some practical tips to help you meet those standards:
- Use the Highest Resolution Possible: Shutterstock recommends a minimum of 4 MP (megapixels), but aiming for higher resolutions like 3000×4000 pixels or more gives your image flexibility and ensures it looks sharp on all devices.
- Maintain Proper Focus and Sharpness: Blurry or out-of-focus images are rejected. Always check your photos at 100% zoom to ensure they’re crisp and detailed.
- Use Natural Lighting and Correct Exposure: Good lighting makes a huge difference. Avoid harsh shadows or overly bright spots. Aim for even, natural lighting that highlights your subject without washing out details.
- Color Accuracy Matters: Make sure your colors are true to life. Use color calibration tools if possible, and avoid heavy filters or over-saturation that could distort the image’s natural look.
- Remove Noise and Artifacts: Digital noise or compression artifacts can lower your image’s quality. Use editing software to clean up any graininess or pixelation before uploading.
- Mind the Composition: Follow basic design principles—rule of thirds, balanced elements, and clear focus. A well-composed cover catches the eye and looks professional.
- Check for Proper Color Space: Shutterstock prefers images in RGB color mode, not CMYK or grayscale. This ensures your colors appear vibrant and accurate across screens.
Finally, always review Shutterstock’s latest quality guidelines before submitting. They can update their standards or preferred formats, so staying informed helps prevent rejections and increases your chances of acceptance.
Final Checks Before Uploadting Your Book Cover Photos
Before you hit that upload button, take a moment to do some final checks. It’s easy to overlook small details, but these can make all the difference in getting your cover approved and looking great on the platform:
- Verify Image Dimensions and Size: Double-check that your image meets Shutterstock’s size requirements. Remember, the ideal size is at least 4 MP, but larger is often better for quality and flexibility.
- Ensure Correct File Format: JPEG is the standard for Shutterstock. Make sure your file is saved as a high-quality JPEG with an sRGB color profile.
- Review for Watermarks or Logos: Remove any personal watermarks or branding that shouldn’t be part of the final image. Shutterstock doesn’t accept watermarked images.
- Inspect for Hidden Issues: Zoom in to check for any tiny spots, dust, or blemishes that might be visible in print or at larger sizes. Use tools like spot healing brushes to clean up imperfections.
- Check Metadata and Keywords: Properly tag your image with relevant keywords and categories. This helps your cover get discovered by the right audiences.
- Preview the Image: View your cover on different screens or devices if possible. Make sure it looks attractive and professional across various displays.
- Confirm No Excluded Content: Avoid including any copyrighted material, logos, or recognizable trademarks unless you have explicit rights. Shutterstock is strict about this.
Once everything is in order, it’s a good idea to do a final walk-through—perhaps even take a short break, then revisit your cover with fresh eyes. A quick review can help catch small issues you might have missed initially. When you’re confident everything looks perfect, you’re ready to upload and share your work with the world!
Conclusion and Additional Resources for Authors and Photographers
Properly sizing your photos for Shutterstock book covers is essential to ensure your images meet platform standards and look professional. Always remember to check Shutterstock’s specific requirements for resolution, aspect ratio, and file format before submitting your work. Using high-quality images with the correct dimensions not only increases your chances of acceptance but also enhances the visual appeal of your cover, making it more attractive to potential readers.
To recap, key points include:
- Start with a high-resolution image, ideally 300 DPI or higher.
- Use the recommended dimensions based on your cover design, typically around 1600 x 2400 pixels or larger.
- Maintain the correct aspect ratio to prevent distortion during resizing.
- Save your images in the appropriate format, such as JPEG or TIFF, as specified by Shutterstock.
For further guidance, authors and photographers can explore the following resources:
| Resource | Description |
|---|---|
| Shutterstock Contributor Help Center | Official guidelines on image requirements and submission tips. |
| Creating Professional Book Covers – Tuts+ | In-depth tutorials on book cover design and image sizing. |
| Creative Bloq – Book Cover Design Tips | Design advice and best practices for eye-catching covers. |
By investing time in proper image sizing and leveraging available resources, authors and photographers can significantly improve their chances of success on Shutterstock and create compelling book covers that stand out in the marketplace.


