Thinking of sharing your stunning photos with the world? Shutterstock is one of the biggest platforms where photographers and creators showcase their work and earn revenue. But uploading your images isn’t just about clicking the upload button—there’s a bit of prep and understanding involved to make sure your photos stand out and meet Shutterstock’s standards. Whether you’re a seasoned pro or just starting out, this guide will walk you through the essentials of successfully uploading your photos and increasing your chances of getting approved and earning. Let’s dive in and get those images online!
Preparing Your Photos for Upload

Before you hit that upload button, it’s crucial to get your photos ready. Proper preparation not only helps you stay compliant with Shutterstock’s guidelines but also boosts your chances of acceptance and sales. Here’s what you need to focus on:
1. Choose Your Best Shots
Pick the photos that are sharp, well-composed, and visually appealing. Avoid blurry or poorly lit images unless they have a creative purpose. Remember, Shutterstock is a professional platform, so quality matters. Look for images with interesting subject matter, good composition, and proper framing. Don’t upload every shot you take—select only the top-tier ones that tell a story or evoke emotion.
2. Edit and Enhance
Post-processing is your friend! Use photo editing software to adjust lighting, contrast, and color balance. Remove distracting elements or imperfections. Keep edits natural unless your artistic style calls for something more creative. A polished photo shows professionalism and increases the likelihood of approval. Be cautious with over-editing, especially with filters or effects that can make your image look unnatural.
3. Check Image Specifications
Shutterstock has specific technical requirements:
- Resolution: Minimum of 4 megapixels (e.g., 2400 x 1600 pixels).
- File Format: JPEG only.
- Color Mode: RGB.
- File Size: Usually under 50MB, but check current guidelines.
Make sure your images meet these specs before uploading to avoid rejection.
4. Mind the Legalities and Releases
If your photos include recognizable people, private property, or trademarks, ensure you have the necessary model or property releases. Shutterstock often requires proof of consent for commercial use. This step is crucial to avoid legal issues and to keep your portfolio compliant.
5. Organize Your Files and Metadata
Keep your files well-organized with clear filenames. Prepare relevant metadata such as descriptive titles, detailed descriptions, and accurate keywords. Good metadata helps your images get discovered by buyers and improves your chances of sales. Think about what keywords a buyer might use to find your photo and include those naturally.
By taking these steps to prepare your photos, you set yourself up for a smooth upload process and increase your chances of success on Shutterstock. Remember, quality and compliance are key—so invest time in refining your images before sharing them with the world!
Creating a Shutterstock Contributor Account
So, you’re ready to start sharing your amazing photos with the world? Great! The first step is setting up your Shutterstock Contributor Account. Don’t worry — it’s pretty straightforward, and I’ll walk you through the process.
First things first, head over to the Shutterstock Contributor Signup Page. You’ll see an option to sign up as a contributor. Click on it, and you’ll be prompted to fill out some basic information like your name, email address, and creating a password. Make sure to choose a strong password to keep your account secure.
Once you’ve entered your details, you’ll need to agree to Shutterstock’s Contributor Agreement. It’s always good to read through the terms, but if you’re in a hurry, just know that agreeing allows you to submit images and earn royalties.
Next, you’ll verify your email address. Check your inbox for a verification email from Shutterstock and click the link inside to confirm your account. This step is crucial because it activates your contributor profile.
Setting Up Your Profile
After verification, you’ll be asked to fill out your profile details. This includes uploading a profile picture, adding your location, and linking your payment information. Providing accurate and complete information helps build trust with buyers and makes sure you get paid smoothly.
Remember, the more professional and complete your profile looks, the more confident buyers will feel about purchasing your photos. Don’t skip this step!
Uploading Your First Photos
Once your account is set up, you can start uploading images. Shutterstock has a user-friendly dashboard where you can drag and drop files, add titles, descriptions, and keywords. Don’t worry if you’re new; take your time exploring the dashboard and familiarize yourself with the upload process.
And that’s it! Creating a Shutterstock contributor account is your first big step toward sharing your work and earning money. Just keep in mind that your account will be reviewed by Shutterstock before your images go live, so make sure everything is in order.
Understanding Shutterstock Submission Requirements
Before you start uploading tons of photos, it’s essential to understand what Shutterstock expects from your submissions. This way, you can avoid rejections and ensure your images get approved quickly.
Technical Specifications
Here are the key technical requirements for your images:
- File Format: JPEG (RGB color mode)
- Resolution: Minimum 4 megapixels (e.g., 2000 pixels on the shortest side)
- File Size: Up to 50MB
- Compression: Avoid excessive compression to maintain quality
Content Guidelines
Shutterstock has clear policies on what content is acceptable:
- Originality: Your images must be your own work and not copied from others.
- Quality: Sharp focus, good lighting, and proper exposure are essential.
- Model and Property Releases: Required for images featuring recognizable people or private property.
- Prohibited Content: No offensive, violent, or illegal content. Avoid images with logos or trademarks unless you have permission.
Model and Property Releases
If your photos include recognizable people or private property, you need to provide the appropriate releases. Without these, Shutterstock cannot accept your images for sale. Make sure to obtain signed releases from models and property owners beforehand—you can upload scans or digital copies during the submission process.
Keywording and Metadata
Proper keywording is vital for discoverability. Use relevant, specific keywords that accurately describe your photo. Think about what someone might search for when looking for an image like yours. Avoid keyword stuffing—be honest and precise. This helps your images appear in the right searches and increases your chances of making sales.
In summary, understanding Shutterstock’s submission requirements is about ensuring your images meet quality standards, are legally compliant, and are easy for buyers to find. Take the time to review these guidelines each time you prepare a new batch of photos—doing so will save you time and improve your success rate as a contributor.
Step-by-Step Guide to Upload Photos on Shutterstock
Uploading your stunning photos to Shutterstock might seem a bit intimidating at first, but once you get the hang of it, it’s actually pretty straightforward. Here’s a simple step-by-step guide to help you navigate the process smoothly:
Step 1: Sign Up or Log In
If you haven’t already, create a contributor account on Shutterstock. It’s free and quick! Just head over to their contributor portal and sign up. If you already have an account, just log in.
Step 2: Prepare Your Photos
Before uploading, make sure your photos meet Shutterstock’s requirements:
- File format: JPEG (.jpg)
- Resolution: At least 4 MP (e.g., 2000 pixels on the shortest side)
- Color profile: sRGB
- File size: Under 50 MB
Ensure your images are sharp, well-lit, and free from watermarks or branding. A quick check can save you time later!
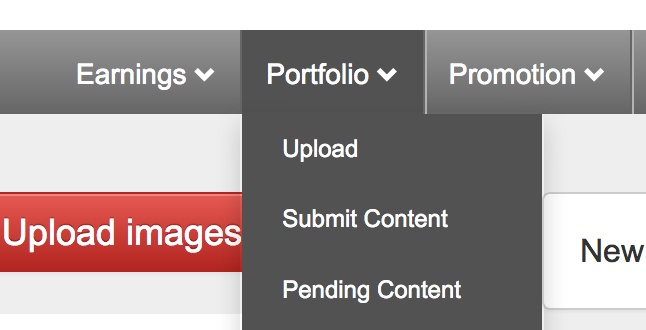
Step 3: Upload Your Photos
Once your files are ready:
- Click the “Upload” button on your dashboard.
- Choose the images from your device or drag and drop them into the upload window.
- Wait for the files to upload. This might take a few minutes depending on your internet speed.
.
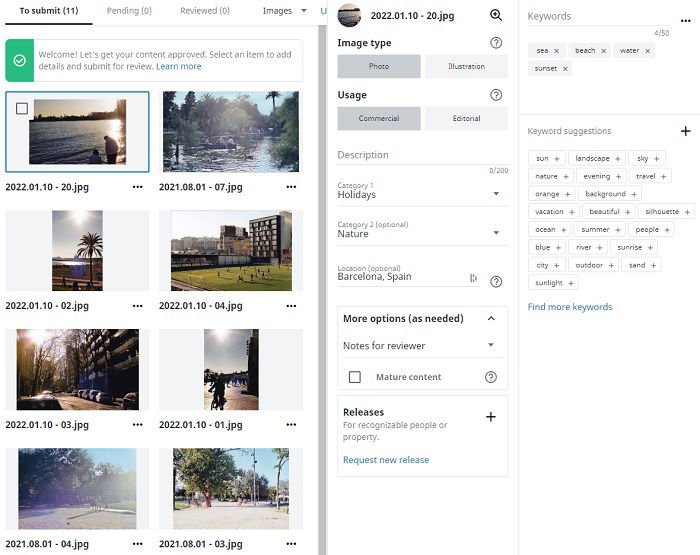
Step 4: Add Metadata
Metadata helps your photos get discovered. You’ll need to add:
- Title: Clear and descriptive (e.g., “Golden Sunset over Mountain Range”)
- Keywords: Up to 50 relevant keywords that describe your image
- Description: A brief summary that highlights the main elements
Take your time here; well-crafted metadata increases your chances of sales!
Step 5: Choose Licensing Options
Shutterstock offers different licensing types:
- Standard License: Suitable for most uses like websites, blogs, or ads.
- Enhanced License: For high-volume uses or merchandise.
Select the appropriate license for each photo. Don’t worry—this can be adjusted later if needed.
Step 6: Submit for Review
Once everything looks good, click “Submit”. Your images will go into Shutterstock’s review process, which typically takes a few days. You’ll get notified once they’re approved or if any edits are needed.
Tips for Optimizing Your Photos for Better Visibility
Getting your photos noticed on Shutterstock isn’t just about uploading high-quality images; it’s also about making sure they’re easy to find. Here are some friendly tips to boost your visibility and increase your chances of making sales:
1. Use Descriptive and Keyword-Rich Metadata
This is your best friend when it comes to discoverability. Think about what someone might search for when looking for images like yours. Be specific and include variations. For example, instead of just “tree,” try “oak tree in autumn.” Use all 50 keyword slots wisely, mixing broad and niche terms.
2. Focus on Quality Over Quantity
Uploading a handful of top-notch, well-edited photos is better than a large batch of mediocre images. Shutterstock favors images that are sharp, well-composed, and free from noise or artifacts. Invest time in editing and selecting your best shots.
3. Tag Your Photos Effectively
While keywords are crucial, don’t forget to add relevant tags in the description and title. Use synonyms and related terms to expand your photo’s reach. For example, if you upload a photo of a “coffee cup,” also include tags like “morning routine,” “breakfast,” or “hot beverage.”
4. Stay Consistent and Niche Down
Building a niche portfolio can help you stand out. Whether it’s travel, food, or business images, focusing on a specific area can attract targeted buyers. Consistency also signals to Shutterstock that you’re an active contributor.
5. Keep Up with Trends and Seasons
Seasonal and trending topics tend to get more searches. For example, during the holidays, images of Christmas decorations or winter scenes are in high demand. Upload timely content to capitalize on these trends.
6. Regularly Update Your Portfolio
Don’t just upload once and forget about it. Keep adding new images regularly. The more quality content you have, the higher the chances of your photos appearing in searches.
By following these tips, you’ll give your photos the best shot at being seen and purchased on Shutterstock. It’s all about combining quality, strategic metadata, and consistency. Happy uploading!
Common Upload Issues and How to Resolve Them
Uploading your photos to Shutterstock should be a smooth process, but sometimes, you might encounter a few hiccups along the way. Don’t worry—most issues are easily fixable once you know what to look out for. Let’s go over some of the most common upload problems and how you can resolve them quickly.
File Format and Size Errors
One of the most typical issues is uploading files in the wrong format or with incorrect dimensions. Shutterstock prefers high-resolution JPEG files for photos. Make sure your images are saved as JPEGs, with a minimum of 4 MP (megapixels), and avoid formats like PNG or TIFF unless specified otherwise.
- Solution: Save your images as JPEG, check their resolution, and ensure they meet Shutterstock’s minimum requirements.
File Size Limitations
If your file is too large, the upload might fail or be rejected. Shutterstock recommends files under 50MB, but ideally, stay well below that limit for faster processing.
- Solution: Compress your images using photo editing software or online tools to reduce file size without sacrificing quality.
Metadata and Keywording Problems
Accurate and relevant keywords are crucial for your images to be discoverable. Sometimes, incorrect or missing metadata can cause issues during review or delay approval.
- Solution: Double-check your keywords and descriptions to ensure they are relevant and free of typos. Use Shutterstock’s keyword suggestions for inspiration.
Uploading Errors and Connectivity Issues
Slow or unstable internet connections can lead to failed uploads or corrupted files. Also, browser issues or outdated software might interfere with the process.
- Solution: Use a stable internet connection, clear your browser cache, or try uploading via a different browser. Keep your software updated for the best experience.
Review and Approval Delays
Sometimes, your images are uploaded successfully but remain in review longer than expected. This can be due to high submission volume or the need for additional checks.
- Solution: Be patient, and avoid resubmitting the same images multiple times. If your images are held for an unusually long time, contact Shutterstock support for clarification.
By understanding these common issues and applying these simple fixes, you’ll streamline your uploading process and get your photos out into the world faster. Remember, patience and attention to detail go a long way!
Best Practices for Increasing Your Photo Sales on Shutterstock
If you want to boost your earnings and get your photos noticed, it’s essential to follow some proven strategies. Shutterstock is a competitive marketplace, but with the right approach, you can stand out from the crowd and increase your sales.
Optimize Your Metadata
Think of metadata as your photo’s digital passport. Well-crafted titles, descriptions, and keywords make your images easier to find. Use relevant keywords that describe the content, mood, and possible uses of your photos. Avoid keyword stuffing—aim for a natural, descriptive set of tags.
- Tip: Use both specific and broad keywords. For example, instead of just “beach,” add “sunset at the beach,” “family vacation,” or “summer holiday.”
Create a Consistent Upload Schedule
Regular uploads keep your portfolio fresh and increase your chances of being featured. Set a manageable goal—whether it’s uploading a few images weekly or monthly—and stick to it. Consistency helps build your reputation and keeps your content appearing in searches.
Focus on High-Quality, Relevant Content
Quality always beats quantity. Invest time in capturing sharp, well-lit, and visually appealing images. Also, stay updated on trending topics and popular themes in stock photography, such as remote work, sustainability, or health & wellness.
| Tip | Details |
|---|---|
| Stay Trendy | Research current market trends and incorporate them into your shoots to meet demand. |
| High Resolution | Always upload images with high resolution and good composition to stand out. |
| Variety | Offer a diverse portfolio covering different subjects, styles, and concepts. |
Engage with the Shutterstock Community
Participate in forums, read other contributors’ tips, and stay updated on platform policies. Engaging with the community can provide valuable insights and inspiration.
Promote Your Portfolio Outside Shutterstock
Share your best work on social media, personal websites, or blogs to drive traffic to your Shutterstock portfolio. The more exposure your images get, the higher the chance of sales.
Following these best practices will help you grow your presence on Shutterstock, attract more buyers, and ultimately increase your photo sales. Remember, patience and persistence are key—building a successful stock photography business takes time, but the rewards are worth it!
Conclusion and Final Tips for Successful Uploads
Successfully uploading photos to Shutterstock can significantly boost your portfolio’s visibility and revenue potential. To maximize your chances of approval and sales, keep in mind a few essential final tips. First, ensure your images meet Shutterstock’s quality standards—sharp focus, proper exposure, and minimal noise are crucial. Always review their content guidelines to confirm your photos are free from prohibited elements such as logos, watermarks, or identifiable private property without permission. Before uploading, organize your files with clear filenames and add detailed, keyword-rich descriptions to improve discoverability. Use relevant tags that accurately describe your images, including specific subjects, locations, and themes. Consider creating multiple versions of your best shots with slight variations to increase their appeal. Additionally, pay attention to technical specifications such as aspect ratio and resolution to prevent rejection. Remember, patience is key; review feedback carefully and make necessary adjustments for future uploads. Regularly updating your portfolio with fresh, high-quality images will help you build a strong presence on the platform. Lastly, stay informed about Shutterstock’s evolving policies and market trends to tailor your submissions effectively.
By adhering to these best practices and maintaining a consistent upload schedule, you can enhance your success on Shutterstock and turn your photography passion into a profitable venture.