Thinking of sharing your videos with the world? Shutterstock is a fantastic platform not only for earning from your creative work but also for reaching a global audience. The process might seem a bit daunting at first, especially if you’re new to video submissions, but don’t worry! This guide will walk you through each step to make your upload smooth and help you get approved quickly. Whether you’re a seasoned videographer or just starting out, understanding the ins and outs of Shutterstock’s requirements can make all the difference in getting your videos approved fast and easily. Let’s dive in!
Preparing Your Video Files for Submission
Before you even think about hitting that upload button, it’s crucial to prepare your video files properly. Proper preparation ensures your videos meet Shutterstock’s standards, which can speed up the approval process and reduce the chances of rejection.
1. Check the Technical Requirements
- File Format: Shutterstock accepts MP4 files with H.264 compression. Make sure your videos are exported in this format for compatibility.
- Resolution: Aim for a minimum of 1920×1080 pixels (Full HD). Higher resolutions like 4K (3840×2160) are preferred and can fetch higher royalties.
- Frame Rate: Use a standard frame rate such as 24, 25, or 30 fps. Avoid variable frame rates or unusual frame rates.
- File Size: Keep your file size under 4GB to ensure smooth uploads, but larger files are acceptable for high-quality videos.
2. Edit and Enhance Your Video
Make sure your video is polished and professional. Remove any unwanted sections, stabilize shaky footage, and enhance colors if needed. Remember, clear audio, good lighting, and steady shots improve your chances of approval.
3. Add Metadata and Keywords
Prepare descriptive titles, tags, and keywords that accurately reflect your video content. This helps Shutterstock’s review team understand your video better and makes it easier for buyers to find your work.
4. Check for Copyright and Model Releases
Ensure you own the rights to all content in your video. If your video features recognizable people, locations, or copyrighted items, gather appropriate model or property releases before submission. This step is vital to avoid rejection and legal issues later on.
By taking these steps to prepare your video files properly, you’ll set yourself up for a smoother upload experience. When your files are in the right format, high quality, and well-tagged, approval can become a much quicker process. So, get your videos ready, and let’s move on to the next step!
Creating a Shutterstock Contributor Account
So, you’re ready to start sharing your videos with the world and potentially earn some income? Great! The first essential step is creating a Shutterstock Contributor account. Don’t worry; the process is pretty straightforward and designed to get you up and running quickly.
First things first, head over to the Shutterstock Contributor registration page. You’ll see a big, inviting button that says “Join Now” or “Become a Contributor.” Click that to get started.
Steps to Create Your Account
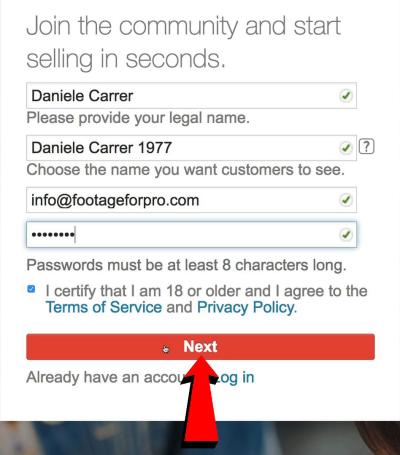
- Fill in your personal details: You’ll need to enter your full name, email address, and create a secure password. Make sure your email is active because Shutterstock will send you a confirmation email.
- Choose your country and agree to terms: Select your country of residence and read through the contributor agreement. If everything looks good, check the box to agree.
- Complete your profile: Shutterstock might ask for additional details like your payment information, tax details, and a brief bio or portfolio link. Providing comprehensive info helps streamline the approval process later.
- Verify your email: Check your inbox for a verification email from Shutterstock. Click the link inside to confirm your account and activate your contributor profile.
Tips for a Smooth Setup
- Use a professional email address: This adds credibility and makes communication smoother.
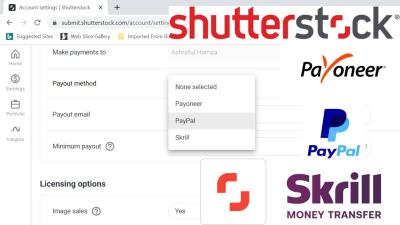
- Prepare your payment info: Have your PayPal, Skrill, or bank account details ready for easy setup.
- Upload a sample video or portfolio link: If you have a website or social media showcasing your work, include it. This can help reviewers get a sense of your style and professionalism.
Once you’re set up, Shutterstock will review your information. While the review process can take a few days, ensuring your profile is complete and professional will help speed things along. After approval, you’ll be ready to upload your videos and start your journey as a contributor!
Uploading Your Videos to Shutterstock
Now that your account is active, it’s time to upload your videos. Uploading might seem simple, but there are a few best practices to follow that can help speed up approval and ensure your videos meet Shutterstock’s standards.
Preparing Your Videos
- File format: Shutterstock accepts MP4 files, encoded with H.264 compression. Make sure your videos are in this format before uploading.
- Resolution: Aim for a minimum of 1920×1080 (Full HD). Higher resolutions like 4K are even better and more appealing to buyers.
- Duration: Keep videos between 5 seconds and 60 minutes. Most successful clips are between 10 seconds and 2 minutes long.
- File size: Try to keep files under 4 GB for smooth uploads, but larger files are acceptable if your internet connection allows.
- Metadata and keywording: Prepare descriptive titles, detailed descriptions, and relevant keywords. Well-tagged videos are more discoverable.
Uploading Your Videos
- Log in to your Contributor Dashboard: Use your credentials to access your account.
- Click on the “Upload” button: Usually located at the top right of the dashboard.
- Select your video files: Use the file picker to upload multiple videos at once. You can upload up to 20 files per batch.
- Fill in metadata: For each video, enter a compelling title, a clear description, and at least 10 relevant keywords. Think about what buyers might search for.
- Set categories and licensing options: Choose appropriate categories and confirm whether your videos are royalty-free or rights-managed.
- Review your uploads: Double-check all details for accuracy and completeness before submitting.
Submitting for Review
After uploading and filling out all necessary info, hit the “Submit for Review” button. Shutterstock’s review team will then evaluate your videos based on quality, content, and adherence to guidelines. If everything is in order, your videos can be approved quickly, especially if you’ve followed best practices.
Pro tip: Keep an eye on your email and dashboard notifications. Shutterstock often provides feedback if any issues need fixing, which you can address promptly to speed up approval.
Uploading videos may seem simple, but paying attention to quality, metadata, and formatting details can significantly influence your approval speed. Once approved, your videos are live and ready for buyers worldwide!
Understanding Shutterstock’s Video Submission Guidelines
Before you start uploading your videos, it’s crucial to get a clear picture of Shutterstock’s submission guidelines. Think of it as the rulebook that helps your content get approved quickly and smoothly. If you ignore these guidelines, your videos might get rejected, which can be frustrating and delay your earning potential.
First, let’s talk about the technical specifications. Shutterstock prefers videos that are high quality and meet certain standards. Here’s a quick rundown:
- Resolution: At least 1920×1080 pixels (Full HD). 4K videos are also welcome and can even boost your chances!
- Format: MP4 (preferred) or MOV files.
- Codec: H.264 for MP4 files.
- Frame Rate: Typically 24, 25, or 30 fps. Consistency is key.
- Duration: Up to 60 seconds is ideal. Longer videos are allowed but may need extra scrutiny.
Next, focus on content quality and appropriateness. Shutterstock looks for videos that are clear, well-lit, and free of noise or distortion. Avoid shaky footage unless it’s a deliberate artistic choice, and make sure your videos are in focus.
Another critical aspect is model and property releases. If your video features recognizable people or private property, you must have signed releases. Shutterstock is strict about this because they want to ensure legal clarity for their clients.
Finally, review their content restrictions. Shutterstock doesn’t accept videos with:
- Explicit or adult content
- Violent or graphic material
- Hate speech or discriminatory content
- Copyrighted material without permission
By understanding and adhering to these guidelines, you set yourself up for faster approval and better chances of getting your videos accepted. It’s all about quality, legality, and following the rules!
Tips to Ensure Quick Approval of Your Video Submissions
Now that you’re familiar with the guidelines, let’s talk about practical tips to make sure your videos get approved quickly. After all, nobody wants to wait weeks for their content to go live, right?
1. Double-Check Technical Specifications – Before uploading, verify that your videos meet all technical requirements. Use video editing software to adjust resolution, format, and frame rate if needed. Small technical issues can cause delays or rejections.
2. Keep Your Content Fresh and Unique – Shutterstock favors original, high-quality footage. Avoid overused themes or stock clips that look generic. Think about capturing trending topics or unique perspectives to stand out.
3. Include Clear and Descriptive Metadata – When uploading, fill out the title, description, and tags thoughtfully. Accurate metadata helps reviewers understand your content and speeds up the approval process.
4. Use Proper Releases – Make sure to upload signed model and property releases for every recognizable person or private property in your videos. Having these ready and correctly filed will prevent delays.
5. Review Your Videos Carefully – Watch your videos before submission. Look for any issues like shaky footage, poor lighting, or background noise. Fix problems if possible, or consider re-shooting if necessary.
6. Submit in Batches and Monitor Your Submissions – Instead of uploading dozens of videos at once, start with a smaller batch. Check the status regularly; Shutterstock often reviews submissions within a few days. If rejected, review their feedback and resubmit after improvements.
7. Follow Shutterstock’s Community and Updates – Join forums or read their contributor guidelines periodically. Shutterstock updates its policies, and staying informed helps you adapt quickly.
Remember, patience and attention to detail are your best allies. By following these tips, you increase your chances of fast approval and can start earning sooner. Happy uploading!
Monitoring Your Submission Status and Managing Approvals
Once you’ve uploaded your videos to Shutterstock, the next step is to stay on top of your submissions. It can feel a bit nerve-wracking waiting for approval, but the good news is that Shutterstock provides tools to help you monitor your submission status easily. Knowing where your videos stand in the review process allows you to plan your next steps and ensures you’re prepared for any feedback or rejections.
To check your submission status, simply log into your contributor account and navigate to the dashboard. Here, you’ll see a list of all your uploaded videos, along with their current status. The common statuses include:
- Pending Review: Your video is in the queue waiting to be reviewed.
- In Review: The Shutterstock review team is actively evaluating your video.
- Approved: Congratulations! Your video has been approved and is now available for licensing.
- Rejected: Unfortunately, your video didn’t meet Shutterstock’s standards or guidelines. Don’t get discouraged—review the feedback, make necessary adjustments, and resubmit.
Managing approvals effectively involves a proactive approach. If your video gets rejected, carefully read the reviewer’s comments. Shutterstock typically provides specific reasons, such as issues with quality, content, or metadata. Use this feedback constructively to improve your next submission. Sometimes, it’s just a matter of re-editing the footage, adjusting the audio, or updating the keywords.
It’s also helpful to keep a record of your submissions. Maintain a simple spreadsheet or document listing each video, its upload date, status, and any notes from Shutterstock. This way, you can track patterns, identify common issues, and refine your submission process over time.
Lastly, stay patient. The review process can take anywhere from a few days to a week, depending on the volume of submissions. If your video remains in review for more than a week, you can reach out to Shutterstock support for an update. Remember, staying organized and responsive helps you manage your portfolio more efficiently and increases your chances of quick approval in future uploads.
Conclusion and Best Practices for Successful Video Uploads
Uploading videos to Shutterstock can be a smooth and rewarding experience once you understand the process and follow some best practices. Whether you’re a seasoned contributor or just starting out, these tips can help you improve your chances of fast approval and make your experience more enjoyable:
Key Takeaways:
- Focus on Quality: Always upload high-resolution videos with excellent clarity, proper lighting, and minimal noise. Quality is king in stock footage!
- Follow Guidelines: Review Shutterstock’s content and technical standards carefully. Adhering to their guidelines reduces the risk of rejection.
- Optimize Metadata: Use descriptive, relevant keywords and engaging titles and descriptions. This improves discoverability and increases licensing opportunities.
- Be Consistent: Regularly upload new content to build your portfolio and increase your chances of approval and sales.
- Review Feedback: Take note of rejection reasons and improve your videos accordingly. Don’t be discouraged—each rejection is an opportunity to learn.
- Stay Organized: Keep track of your submissions, statuses, and notes to streamline your workflow.
- Be Patient: The review process takes time. While waiting, continue creating and uploading more content to diversify your portfolio.
Remember, success in stock footage isn’t just about uploading a lot—it’s about uploading quality content that meets market demand. Keep honing your skills, stay updated with Shutterstock’s requirements, and maintain a professional approach. With persistence and attention to detail, you’ll find your videos gaining approval and generating income faster than you might expect.
Happy filming and uploading! Your next great stock footage hit is just a few clicks away.