If you’ve ever come across an image with a watermark that you wish to use or edit, you might have wondered how to remove it easily. Photoshop is a powerful tool that offers various techniques to erase watermarks, but it’s important to understand the proper way to do this. Whether you’re cleaning up your own images or just exploring photo editing, this guide will walk you through the basics of removing watermarks using Photoshop. Remember, always respect copyright laws and use images ethically—this guide is meant for educational purposes and personal projects where you have permission.
Understanding Copyright and Legal Considerations
Before diving into watermark removal, it’s crucial to understand the legal landscape surrounding copyrighted images. Watermarks are placed on photos by creators or stock image providers like Shutterstock to protect their rights and prevent unauthorized use. Removing a watermark without permission can be considered copyright infringement, which might lead to legal issues or penalties.
Here are some key points to keep in mind:
- Always obtain proper licensing before using copyrighted images for any personal or commercial project.
- Removing watermarks from images you do not own or have permission to use is generally illegal and unethical.
- If you’re interested in using a Shutterstock image, consider purchasing the appropriate license—they often provide high-quality images without watermarks.
- For creative projects or personal use, consider using royalty-free images or those with Creative Commons licenses.
Remember, respecting the rights of photographers and content creators is important. If you want to learn how to clean up images for your own editing practice or restore your own photos, always do so within the legal boundaries. This way, you can enjoy the benefits of Photoshop without risking copyright issues or infringing on someone’s intellectual property.
Tools and Materials Needed for the Process
Before diving into the watermark removal process, it’s good to gather everything you’ll need. Don’t worry—it’s pretty straightforward, and you probably already have most of these tools at your fingertips. Here’s what you’ll want to have ready:
- Adobe Photoshop: This is the star of the show. Make sure you have the latest version installed on your computer.
- Good quality image file: Ideally, work with a high-resolution copy of the Shutterstock image. This makes editing smoother and results cleaner.
- Basic familiarity with Photoshop tools: Knowing your way around Photoshop’s interface and tools like the Clone Stamp or Healing Brush will make the process much easier.
- Patience and a steady hand: Removing a watermark can be a bit meticulous, so take your time to do it carefully.
Optional but helpful:
- Graphics tablet or stylus: If you have one, it can give you more control for detailed work.
- Zoom tool: To get a closer look at your editing area for precision.
Remember, the goal is to blend the watermark area seamlessly with the surrounding pixels. Having the right tools and materials makes that task much more manageable and yields better results.
Step-by-Step Instructions for Removing Shutterstock Watermarks
Alright, now that you’re all set with your tools, let’s walk through the process step by step. Keep in mind, practice makes perfect, so don’t worry if it takes a few tries to get it just right!
Step 1: Open Your Image in Photoshop
Start by launching Photoshop and opening the image with the watermark. Go to File > Open and select your file.
Step 2: Zoom In for Precision
Use the Zoom Tool (shortcut: Z) to get a closer view of the watermark. This helps you work more accurately, especially around edges.
Step 3: Select the Clone Stamp Tool or Healing Brush Tool
Navigate to the toolbar and select either the Clone Stamp Tool (S) or the Healing Brush Tool (J). Both are excellent for removing watermarks, but the Healing Brush is often easier for beginners because it automatically blends the area.
Step 4: Sample an Area Near the Watermark
Hold down the Alt key (Option key on Mac) and click on an area close to the watermark that matches the background. This samples the pixels that will replace the watermark.
Step 5: Carefully Paint Over the Watermark
Release the Alt key and gently click or drag over the watermark. Take your time and work gradually to blend the area seamlessly. Adjust your brush size as needed for more precision.
Step 6: Switch Between Tools and Samples
If you notice inconsistencies, switch to a different nearby area for sampling or change between Clone Stamp and Healing Brush. Sometimes, combining both gives the best results.
Step 7: Refine the Area
Zoom out to check your work. If any residual marks or mismatched textures remain, zoom back in and fine-tune as needed. Use smaller brush sizes for detailed touch-ups.
Step 8: Final Touches
Once the watermark is gone, you might want to adjust the overall look of the area. Use tools like Brightness/Contrast or Smudge Tool to ensure everything looks natural and consistent with the surrounding pixels.
Step 9: Save Your Edited Image
When you’re happy with the result, save your work! Go to File > Save As to keep a copy of the edited image. Consider saving it as a new file to preserve the original.
And there you have it! Removing a watermark takes patience, but with these steps, you can achieve a clean, professional-looking result. Just remember to use these skills ethically and responsibly—only for images where you have permission to edit or use them freely.
Tips for Achieving Seamless Results
Removing a watermark from an image can be tricky, especially if you want your final result to look natural and professional. Here are some handy tips to help you achieve seamless results when editing in Photoshop:
- Use the Clone Stamp Tool Wisely: This tool allows you to sample pixels from one area and paint over the watermark. Take your time to select a nearby clean area that matches the background in color and texture.
- Adjust Brush Settings: Fine-tune the size, hardness, and opacity of your brush for better control. Softer brushes work well for blending, while smaller brushes help with detailed areas.
- Work in Multiple Passes: Don’t try to do everything in one go. Make several small adjustments, zoom in for precision, and frequently switch between tools like Clone Stamp, Healing Brush, and Spot Healing Brush.
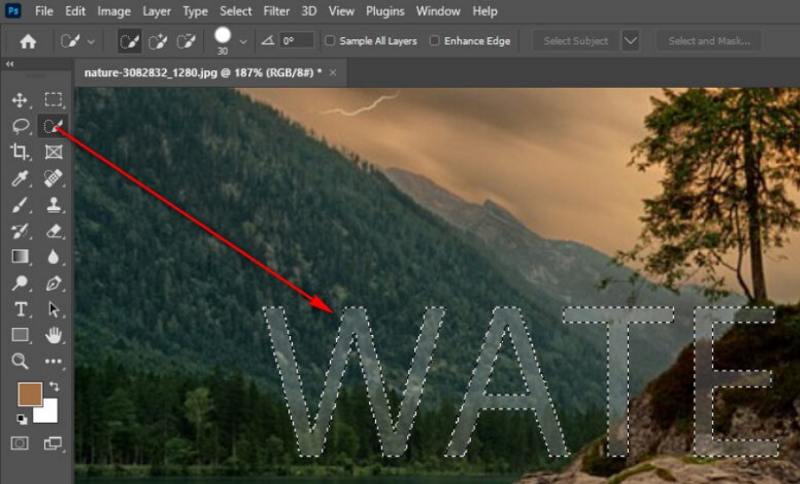
- Use Content-Aware Fill: When appropriate, select the watermark area with the Lasso Tool and go to Edit > Content-Aware Fill. Photoshop will intelligently fill the selected area, often producing great results.
- Refine the Edges: After removing the watermark, zoom in and carefully inspect the edges. Use the Smudge Tool or the Healing Brush to smooth out any inconsistencies or mismatched pixels.
- Color Match: Sometimes the filled areas may stand out due to color differences. Use the Adjustments > Hue/Saturation or Curves to blend the colors seamlessly with the surrounding background.
- Be Patient: Seamless removal takes time and patience. Don’t rush the process—small, careful strokes will produce much better results than hurried edits.
Remember, the key to a natural-looking edit is attention to detail. Practice makes perfect, so don’t get discouraged if your first few attempts aren’t flawless. With these tips, you’ll be well on your way to removing watermarks convincingly and maintaining the integrity of your images.
Alternative Methods for Removing Watermarks
If Photoshop isn’t your favorite tool or you’re looking for other options, there are several alternative methods and tools you can try for removing watermarks. Some are quick and easy, while others might require a bit more effort but can yield excellent results:
Online Watermark Removal Tools
There are many websites designed specifically to remove watermarks automatically. Examples include:
- Inpaint: Upload your image, select the watermark, and let the tool do the rest. It uses intelligent algorithms to fill in the selected area seamlessly.
- Fotor: Offers a clone tool and healing features that can help you manually remove watermarks directly on their platform.
- Pixlr: An online photo editor similar to Photoshop, with tools like Spot Heal and Clone Stamp for manual removal.
Note: Results vary depending on the complexity of the watermark and background details. Be cautious with sensitive images, as uploading to online services might raise privacy concerns.
Mobile Apps
If you prefer editing on your smartphone, several apps can help remove watermarks:
- TouchRetouch: A popular app specifically designed for removing unwanted objects, including watermarks.
- Photo Retouch: Offers clone and healing tools tailored for quick edits on mobile devices.
These apps are user-friendly and quite effective for simple removals, especially when you’re on the go.
Using Other Desktop Software
If you don’t have Photoshop, consider alternatives like:
- GIMP: A free, open-source image editor that offers clone and healing tools similar to Photoshop.
- Paint.NET: A lightweight Windows program with basic editing tools that can help with simple watermark removal.
While these tools might require a bit of a learning curve, they’re capable options for removing watermarks without investing in expensive software.
Professional Help
For complex images or high-stakes projects, hiring a professional retoucher might be the best route. They have advanced skills and tools to ensure the watermark is removed cleanly without damaging the image quality.
In summary, whether through online tools, mobile apps, or alternative software, there are many ways to remove watermarks depending on your needs and comfort level. Just remember, always respect copyright laws and use these methods responsibly.
Finalizing and Saving Your Edited Image
Congratulations! You’ve done the hard work of removing that Shutterstock watermark using Photoshop. Now, it’s time to make sure your image is polished and ready to use. The final step is all about reviewing your edits and saving your image in the right format.
Review Your Image Carefully. Before you hit save, take a moment to look over your work. Check for any leftover artifacts, mismatched areas, or unnatural patches. Sometimes, even after careful editing, small imperfections can slip through. Zoom in and out to see how seamless your retouching looks from different perspectives.
Make Final Adjustments. If you notice any inconsistencies, don’t hesitate to refine your work. Use the Clone Stamp, Healing Brush, or Spot Healing Brush tools again to smooth out any rough spots. Adjust the overall tone or contrast if needed to blend your edits seamlessly into the rest of the image.
Choose the Right File Format. When it comes to saving, the format depends on how you plan to use the image:
- JPEG: Great for web use, social media, or sharing online. It compresses the image, so keep an eye on quality settings to avoid pixelation.
- PNG: Ideal if your image has transparency or needs a higher quality without compression artifacts.
- TIFF or PSD: Best if you want to keep all editing layers intact for future adjustments. Use these for professional printing or archival purposes.
Save a Master Copy. Always save an original, layered Photoshop (.PSD) file before exporting to other formats. This way, you can revisit and tweak your edits later without losing quality.
To save your image:
- Go to File > Save As.
- Choose your desired format (JPEG, PNG, etc.).
- Set the quality or compression level—higher quality means less compression but larger file size.
- Pick a clear filename and save location.
And voilà! Your watermark-free image is ready to be used, shared, or printed. Just remember, always respect copyright laws and licensing agreements—use edited images ethically and responsibly.
Conclusion and Best Practices for Image Editing
Removing a watermark from an image can seem daunting at first, but with patience and the right techniques, it becomes much more manageable. Photoshop offers powerful tools that, when used thoughtfully, help you achieve seamless results. However, it’s essential to approach this process ethically and within legal boundaries. Always ensure you have the right to modify and use the images you work on.
Here are some best practices to keep in mind for future image editing projects:
- Work on a duplicate layer. Always keep your original image untouched. Editing on a duplicate layer allows easy revisions and preserves your original file.
- Use non-destructive editing techniques. Tools like the Clone Stamp and Healing Brush are great, but try to use layer masks or adjustment layers whenever possible to keep edits reversible.
- Zoom in and out frequently. Check your work at different magnifications to catch imperfections that might be invisible at a glance.
- Maintain consistency. When blending patches or removing elements, match the color, tone, and texture to the surrounding areas for a natural look.
- Save regularly. Don’t wait until the end to save your work—frequent saves prevent loss of progress due to crashes or mistakes.
- Respect copyright laws. Always use images legally and ethically. If you’re unsure about licensing, consider licensing your own images or using royalty-free sources.
In the end, patience and practice are key. With each project, you’ll get better at making edits seamlessly and efficiently. Remember, the goal isn’t just to remove watermarks but to create images that look natural and professional. Happy editing!