Thinking about turning your photography hobby into a source of income? Shutterstock is one of the biggest platforms where you can sell your photos to a global audience. But it’s not just about uploading pictures—it’s about uploading the right ones, with the right quality, and understanding what buyers are looking for. In this guide, we’ll walk through the essentials of getting your photos on Shutterstock and making sure they stand out to maximize your earnings. Whether you’re a seasoned pro or just starting out, these tips will help you navigate the process smoothly and profitably.
Preparing Your Photos for Upload
Before you hit that upload button, it’s crucial to prepare your photos properly. This step can make a big difference in how often your images get accepted and how much they sell. Here’s a quick rundown of what you should focus on:
- High-Quality Images: Ensure your photos are sharp, well-exposed, and free of noise or distractions. Use a good camera and proper lighting whenever possible.
- Proper Resolution and Size: Shutterstock recommends a minimum of 4 megapixels, but higher resolution images—like 12 MP or more—are better for maximum sales. Save images in JPEG format with a high-quality setting.
- Correct Metadata: Add detailed and accurate titles, descriptions, and keywords. Think about what buyers might search for and include relevant terms. Use both broad and specific keywords to increase discoverability.
- Organize Your Files: Keep your images organized in folders by themes or categories. This makes it easier to manage uploads and keep track of which photos are ready to go.
- Remove Watermarks and Signatures: Make sure your photos are clean and free of any branding, watermarks, or signatures unless they are part of the creative concept.
Additionally, check Shutterstock’s content guidelines to ensure your photos meet their standards. Avoid overly processed images or those with excessive filters. Focus on authenticity and clarity—these are often what buyers are after. Preparing your photos meticulously not only increases your chances of acceptance but also helps ensure they perform well in searches, leading to more sales and higher profits.
Understanding Shutterstock’s Submission Guidelines

Before you start uploading your stunning photos to Shutterstock, it’s essential to get familiar with their submission guidelines. Think of these as the rules of the game—knowing them will help you avoid rejections and ensure your images are approved quickly. Shutterstock wants high-quality, relevant, and properly prepared images, so paying attention to their standards is a smart move.
First off, image quality is king. Your photos should be sharp, well-exposed, and free from noise or artifacts. Shutterstock recommends a minimum of 4 megapixels, but higher resolution images tend to perform better. Make sure your photos are in focus and free of any distractions or blemishes that don’t add value.
Next, let’s talk about the technical specs:
- File format: JPEG (RGB color space)
- File size: Up to 50MB
- Color profile: sRGB
- Aspect ratio: Maintain a standard aspect ratio; avoid overly stretched or compressed images.
Another important aspect is avoiding copyright issues. Only upload images you own or have the rights to sell. This means no copyrighted logos, trademarks, or branded products unless you have explicit permission. Shutterstock is strict about copyright infringement, and violating these rules can lead to account suspension.
Additionally, be mindful of model and property releases. If your image features recognizable people or private property, ensure you have the appropriate releases signed. Shutterstock might ask for these documents during the review process or after approval.
Finally, pay attention to the content guidelines. Shutterstock prefers images that are relevant, authentic, and of commercial value. Avoid overly staged or heavily edited images that look unnatural. Instead, focus on capturing genuine moments, unique perspectives, and high-quality compositions.
By thoroughly understanding and adhering to these guidelines, you set yourself up for a smoother submission process and increase your chances of earning maximum profit from your photos.
Optimizing Photo Titles and Descriptions for Better Visibility

Once your images are ready and uploaded, the next crucial step is making sure they get noticed. This is where titles and descriptions come into play. Think of these as the signboards that tell Shutterstock’s search algorithms and users what your photo is all about. Well-optimized titles and descriptions can significantly boost your images’ visibility and sales potential.
Start with a clear, descriptive title. Instead of vague titles like “Beautiful Photo,” be specific. For example, “Golden Sunset Over Mountain Lake with Reflection.” This helps users find your image when they’re searching for exactly that scene.
Next, craft a detailed description. Use natural language to describe the scene, colors, mood, and any unique elements. For example:
| Aspect | Sample Description |
|---|---|
| Scene | A vibrant sunset casting golden hues over a tranquil mountain lake, with reflections of the colorful sky on the water surface. |
| Colors | Warm oranges, reds, and cool blues create a peaceful and inspiring atmosphere. |
| Subjects | Mountains, lake, sky, and reflections |
| Mood | Serene, inspiring, and calming |
Use relevant keywords naturally within your titles and descriptions. Think about what your potential buyers might search for. For example:
- Sunset
- Mountain lake
- Reflections
- Nature scenery
- Peaceful landscape
Tip: Incorporate both broad and specific keywords. Broad keywords like “nature” attract a wide audience, while specific ones like “mountain lake reflection” target niche buyers.
Lastly, avoid keyword stuffing. Keep your descriptions readable and natural. Overloading with keywords can hurt your visibility and credibility. Instead, focus on providing accurate, detailed information that truly describes the image.
Remember, good titles and descriptions not only improve your images’ visibility on Shutterstock but also help potential buyers understand the value of your photos quickly. Taking a few extra minutes to optimize can lead to more views, downloads, and, ultimately, higher earnings.
Selecting Appropriate Keywords for Your Photos
Alright, now that you’ve got your photos ready to go, let’s talk about one of the most crucial steps: choosing the right keywords. Think of keywords as the bridge that connects your photos to the people searching for them. The more accurate and relevant your keywords are, the higher your chances of making a sale—and maximizing your profit.
Why are keywords so important? Well, imagine someone searching for “sunset beach” photos. If your image is perfectly described with those keywords, it’ll appear in their search results. But if you skip keywords or use vague ones like “scenery,” your photo might get lost in the shuffle.
Here’s a simple guide to selecting effective keywords:
- Be Specific: Use descriptive words that accurately portray your photo. Instead of “flower,” try “red tulip in spring” or “wild daisies in meadow.”
- Use Synonyms: Think of different ways people might search for the same thing. For example, “car” and “automobile,” or “happy” and “joyful.”
- Include Relevant Details: Mention the setting, mood, colors, or any unique features. For example, “mountain landscape at sunrise with snow-capped peaks.”
- Consider Audience and Usage: If your photo is suitable for commercial use, include keywords like “business,” “branding,” or “advertisement.”
- Research Popular Keywords: Use tools like Google Keyword Planner or Shutterstock’s own search bar to see what people are searching for related to your images.
Pro tip: Keep a list of your best-performing keywords over time. This helps you understand what works and refine your future keyword choices for maximum visibility.
Remember, the goal is to make your photos easy to find. Spend some time on keyword research—it’s an investment that can really pay off in increased views and sales.
Uploading Your Photos to Shutterstock Step by Step
Ready to upload? Let’s walk through the process step by step so you can get your photos online smoothly and efficiently.
- Log in to Your Shutterstock Contributor Account: Head over to the Shutterstock Contributor portal and sign in. If you haven’t signed up yet, it’s quick to register and start uploading.
- Click on the “Upload” Button: Usually located at the top of the dashboard, this is your gateway to adding new images.
- Select Your Files: Choose the high-resolution images you want to upload from your device. Make sure they meet Shutterstock’s technical requirements (e.g., minimum resolution of 4MP, JPEG format).
- Add Titles: Write clear, descriptive titles that summarize the photo. Keep it natural and engaging—avoid keyword stuffing here.
- Write Detailed Descriptions: Use your selected keywords naturally within the description. Explain what the photo depicts, the mood, location, or any interesting backstory.
- Assign Keywords: Input your carefully chosen keywords. Use commas to separate each keyword. Remember, this is where your research pays off!
- Choose Appropriate Categories: Select relevant categories from the dropdown menu to help users find your image more easily.
- Set Licensing Options: Decide whether your photo will be available under royalty-free or rights-managed licenses, depending on your preferences and Shutterstock’s options.
- Review and Submit: Double-check all the information—titles, descriptions, keywords, and categories. Once satisfied, hit the “Submit” button.
- Wait for Approval: Shutterstock reviews your submission to ensure it meets quality standards. This usually takes a short time, but occasionally it might be longer. Don’t worry—if it gets rejected, you’ll get feedback to improve your future uploads.
That’s it! After approval, your photos will be live on Shutterstock, and you’ll start earning whenever someone licenses your images. Consistency is key, so keep uploading new photos regularly and refining your keywords to maximize your earnings.
Best Practices to Maximize Your Photo Sales and Earnings
So, you’ve uploaded some fantastic photos to Shutterstock — great start! But how do you make sure those images actually turn into steady income? Here are some of the best practices to help you maximize your photo sales and earnings:
Optimize Your Keywords
Keywords are the bridge between your photos and potential buyers searching for specific images. Use descriptive, relevant, and specific keywords to improve discoverability. Think about what a buyer might type in — not just “dog,” but “Golden Retriever puppy playing in the park.” Include synonyms and related terms to cover all bases.
Create High-Quality, Versatile Content
Quality matters a lot. Upload sharp, well-lit, and professionally composed photos. Also, try to diversify your portfolio with various subjects, styles, and themes. This increases your chances of matching different buyer needs, from corporate projects to personal blogs.
Stay Trendy and Relevant
Keep an eye on current trends and seasonal themes. Photos related to trending topics, holidays, or popular industries tend to sell better. For example, with remote work on the rise, images depicting home offices, virtual meetings, or digital collaboration are in demand.
Regular Uploads and Consistency
Uploading consistently keeps your portfolio fresh and increases the chances of your photos being seen. Set a manageable goal—maybe upload a few images each week—and stick to it. Over time, this builds your presence on the platform and can lead to more sales.
Engage with the Community and Promote Your Work
Share your Shutterstock portfolio on social media, your personal website, or photography forums. Engaging with other creators can provide feedback, inspire new ideas, and attract more views to your images. The more exposure your work gets, the higher your chances of making sales.
Monitor Your Performance and Adapt
Use Shutterstock’s analytics tools to see which images perform best. Pay attention to your most downloaded photos and analyze what makes them appealing. Adapt your future uploads based on these insights — maybe certain themes, styles, or keywords perform better.
Common Mistakes to Avoid When Uploading Photos
While uploading photos might seem straightforward, there are some common pitfalls that can undermine your efforts to earn on Shutterstock. Let’s go over a few mistakes to watch out for:
1. Poor Image Quality
Uploading blurry, pixelated, or poorly lit photos can hurt your reputation and reduce sales. Always double-check your images before uploading — use high-resolution files and ensure they meet Shutterstock’s technical standards.
2. Overusing or Misusing Keywords
Stuffing keywords or using irrelevant tags can hurt your visibility. Avoid keyword spamming or misleading tags just to get more views. Instead, focus on accurate, descriptive keywords that genuinely reflect the image content.
3. Ignoring Model and Property Releases
If your photos feature recognizable people or private property, you need proper releases. Uploading images without these releases can lead to rejection or legal issues. Always obtain and upload the necessary documentation.
4. Uploading Duplicates or Similar Images
Redundant images clutter your portfolio and can confuse buyers. Try to showcase a variety of images rather than multiple similar shots. Quality over quantity is key.
5. Not Reading Shutterstock’s Guidelines
Each platform has specific rules about image content, technical specs, and metadata. Skipping these guidelines can result in rejected uploads or account issues. Take the time to familiarize yourself with Shutterstock’s policies.
6. Focusing Only on Popular Subjects
While trending topics sell well, neglecting niche subjects can limit your earning potential. Diversify your portfolio to include both popular and niche themes for a broader reach.
7. Neglecting Metadata and Descriptions
Don’t leave your image descriptions blank or vague. Clear, detailed descriptions help search engines and buyers understand what your images depict, increasing the chances of sales.
By avoiding these common mistakes, you’ll set yourself up for greater success and a more profitable Shutterstock experience. Remember, patience and continuous learning are key — keep refining your approach, and your earnings will grow over time!
Monitoring Your Portfolio Performance and Making Improvements
Once you’ve uploaded your photos to Shutterstock, the journey doesn’t end there. To truly maximize your earnings, it’s essential to stay engaged with how your portfolio is performing. Think of it like tending a garden—you need to observe, analyze, and make adjustments to see the best growth.
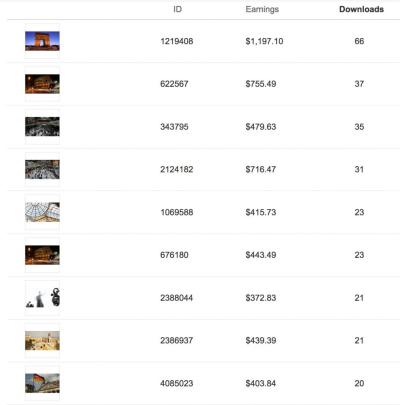
Start by regularly checking your contributor dashboard. Shutterstock provides valuable insights such as:
- Download statistics: Which images are most popular?
- Revenue reports: How much are you earning from each photo?
- Search performance: How often are your images appearing in search results?
With this data, you can identify patterns. For example, if certain types of images consistently perform well, consider creating more content in that niche. Conversely, if some photos rarely get downloaded, it might be time to update or remove them.
Making improvements could involve:
- Refreshing your keywords: Use more relevant or trending keywords to boost discoverability.
- Updating your titles and descriptions: Clear, descriptive, and keyword-rich captions help buyers find your images.
- Adding new versions: For successful images, consider creating variations—different angles, color schemes, or compositions—to expand their appeal.
- Removing underperformers: If certain images aren’t getting any traction after some time, consider deleting or replacing them with fresh content.
Tracking your progress over time helps you understand what works best. Set goals—like increasing downloads by a certain percentage each month—and adjust your strategy accordingly. Remember, the key is consistency and continuous improvement. The more you refine your portfolio based on real data, the better your chances of maximizing your earnings on Shutterstock.
Additional Tips to Increase Profitability on Shutterstock
Looking to boost your Shutterstock income even further? Here are some handy tips that can help you stand out and earn more from your contributions:
1. Focus on Trends and Seasons: Keep an eye on current trends, holidays, and seasonal themes. Creating content around trending topics or upcoming holidays can significantly increase your chances of getting downloads.
2. Diversify Your Portfolio: Don’t put all your eggs in one basket. Upload a variety of images across different niches, styles, and subjects. This not only broadens your audience but also reduces the risk if one category slows down.
3. Use High-Quality, Original Content: Always prioritize quality over quantity. Clear, well-composed, and professionally shot photos attract more buyers. Originality also helps you stand out from the crowd.
4. Master Keyword Optimization: Invest time in researching and applying the most relevant and popular keywords. Use a mix of broad and specific keywords to improve search visibility.
5. Engage with the Shutterstock Community: Participate in forums, webinars, or social media groups. Networking with other contributors can provide valuable insights, tips, and even collaborations.
6. Keep Up with Platform Policies and Guidelines: Regularly review Shutterstock’s submission standards. Ensuring your images meet all requirements prevents rejections and keeps your portfolio active.
7. Promote Your Portfolio: Share your work on your social media, personal website, or blog. While Shutterstock traffic is primarily driven through their platform, your external promotion can bring in additional viewers and buyers.
Remember, increasing profitability on Shutterstock is a mix of strategic content creation, continuous optimization, and staying engaged with the platform. The more effort you put into understanding what sells and refining your approach, the more your earnings can grow over time. Keep experimenting, learning, and adapting—that’s the secret to long-term success!