Ever wondered how to get feedback on your photos before they go live? Shutterstock’s Critique Forum is the perfect place for photographers and illustrators to share their work, ask for constructive criticism, and improve their craft. It’s a friendly community where experienced contributors and newcomers alike can exchange ideas and grow. Whether you’re just starting out or looking to refine your portfolio, understanding how the critique process works can make a huge difference. So, let’s dive into how you can get involved and make the most of this valuable resource!
Creating and Logging Into Your Shutterstock Account
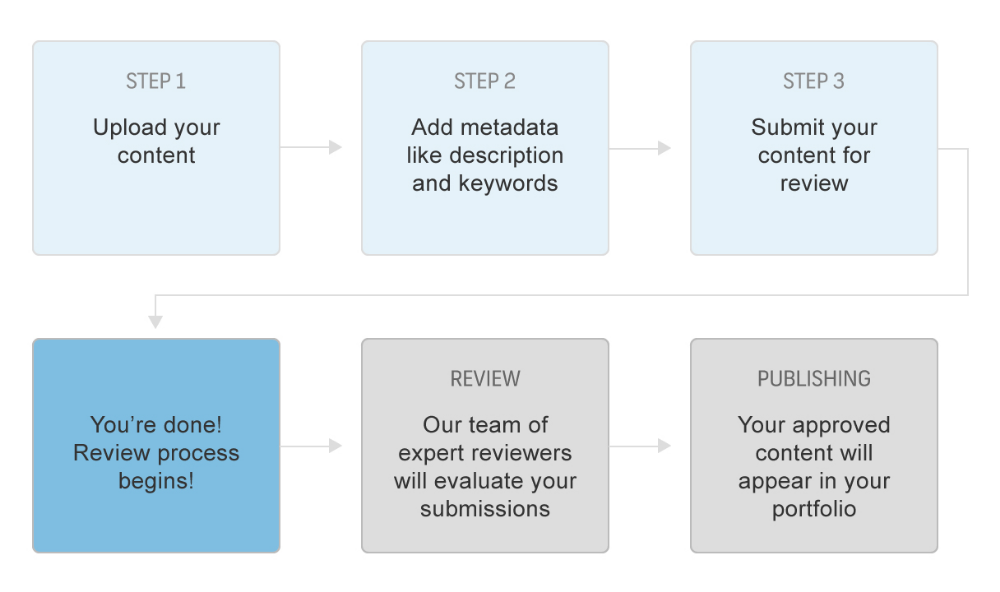
Before you can participate in the Critique Forum, you’ll need to have a Shutterstock account. If you’re new to Shutterstock, no worries—that’s simple to set up! Head over to the Shutterstock homepage and click on the Sign Up button. You can register using your email address or connect through social media accounts like Google or Facebook for quicker access.
Once you’ve entered your details and created your account, it’s time to verify your email. Check your inbox for the confirmation email from Shutterstock and click the link inside to activate your account. After verification, you can log in anytime using your email and password.
If you already have an account, just head to the Shutterstock Contributor Login page. Enter your credentials, and you’ll be directed to your dashboard. From there, you’ll find easy access to the Critique Forum, your portfolio, and other contributor tools. Remember to keep your login details secure, and if you ever forget your password, use the “Forgot Password” link to reset it.
Having your account set up correctly is the first step towards engaging with the community and taking your photography to the next level. Now that you’re logged in, you’ll be ready to participate in discussions, share your work, and get valuable feedback that can help you grow as a creator!
Preparing Your Image for Submission
Before you jump into posting your picture on Shutterstock’s critique forum, taking a little time to prepare your image can make all the difference. Think of it as giving your photo a quick check-up to ensure it’s in the best shape possible for feedback and potential approval.
First off, make sure your image meets Shutterstock’s basic requirements. Typically, this includes:
- File Format: JPEG (.jpg) is the standard for most images.
- Resolution: Aim for a high-resolution image, generally 4 megapixels or more. This not only looks better but also shows you’re serious about quality.
- Color Profile: Use sRGB color space for consistency across devices.
- File Size: Keep it under Shutterstock’s maximum, usually around 50MB, but don’t go crazy—just enough to preserve quality without being hefty.
Next, take a moment to review your photo. Is it sharp and well-focused? Is the lighting good? Clear images are more likely to get constructive feedback and, ultimately, approval.
It’s also a good idea to crop your image properly. Remove any unnecessary background or distractions that don’t add to the composition. A clean, focused shot helps reviewers see what you want to showcase.
Don’t forget about the metadata! Prepare a descriptive, keyword-rich title and description. This not only helps with your image’s discoverability but also gives reviewers context. Be honest and precise—if your photo features a specific landmark, include its name, location, and any relevant details.
Lastly, consider doing a quick visual check for any imperfections—dust spots, blemishes, or other distractions—and edit or remove them if needed. You want your image to look polished and professional, even if it’s just for critique.
Taking these steps ensures your image is in the best shape to receive valuable feedback and increases the chances of a smooth approval process later on. Remember, quality images often get better critiques, which helps you grow as a photographer or designer!
Navigating to the Critique Forum Section
So, you’ve prepped your image, and now you’re ready to share it with the community on Shutterstock’s critique forum. Let’s walk through how to find your way there—think of it as your map to valuable feedback and growth!
First, log into your Shutterstock contributor account. If you haven’t created one yet, you’ll need to sign up—don’t worry, it’s straightforward and free.
Once logged in, head over to the main dashboard. From there, look for the menu or navigation bar—usually at the top or on the side—and find the section labeled “Community” or “Forums”. If you see a dedicated link for Critique Forum, click on that directly. If not, it might be nested under a broader community or support section.
On the critique forum page, you’ll typically find various categories or threads. Look for a section specifically titled “Image Critiques” or something similar. This is where photographers and contributors share their images for feedback.
Before posting, it’s a good idea to read any forum guidelines or pinned posts. These often contain tips on how to get constructive feedback and what to include in your post.
To start a new critique thread, look for a button that says “New Thread” or “Post Your Image for Feedback”. Clicking this will bring up a form where you can upload your image, add a title, and write a brief description or questions about what kind of feedback you’re seeking.
Remember, each forum may have its own rules about image size limits or how to format your posts, so take a moment to review any instructions provided. This helps ensure your post is well-received and easy for others to provide helpful critiques.
And that’s it! Navigating to the critique forum is pretty straightforward once you’re familiar with the layout. It’s a fantastic way to connect with fellow contributors, improve your skills, and get valuable insights on your work. Happy critiquing!
Uploading Your Picture to the Critique Forum
Once you’ve prepared your image and are ready to share it on Shutterstock’s Critique Forum, the uploading process is straightforward but important to do correctly. First, make sure your image meets Shutterstock’s guidelines—this includes proper resolution, acceptable file formats (like JPEG or PNG), and no watermarks or logos. Having a clean, high-quality image will get you better feedback and help you improve.
To upload your picture, follow these simple steps:
- Log in to your Shutterstock Contributor account.
- Navigate to the Critique Forum section—usually found under the community or support menu.
- Click on the “New Post” or “Start a Thread” button.
- Look for the upload area—this might be a button labeled “Attach Files” or “Upload Image”.
- Browse your computer or device to select the image you want to upload. Remember to choose the highest resolution version you have, as this gives reviewers more to evaluate.
- After selecting your file, confirm the upload. You might see a progress bar that indicates the upload process—wait until it’s complete.
Once uploaded, you’ll usually see your image thumbnail appear in the post editor. Make sure the image displays correctly and is the version you want feedback on. If everything looks good, proceed to add your message and submit your post.
Tip: Keep your image file size reasonable—large files can slow down the upload process—and double-check that the image is accessible and not corrupted before posting.
Writing a Clear and Descriptive Post for Your Image
Now that your image is uploaded, it’s time to craft a post that invites helpful feedback. The key here is clarity and detail. Think of your post as a conversation starter—be honest about what you’re hoping to improve or learn from the critique.
Start with a brief introduction:
“Hi everyone! I recently took this photo during a trip to the mountains and would love some feedback on composition and lighting.”
Next, describe the context of your image:
- What inspired this shot?
- What camera or settings did you use?
- Are there specific aspects you’re unsure about?
Then, be specific about what kind of critique you’re seeking. For example, do you want feedback on:
- Composition and framing
- Color balance and exposure
- Focus and sharpness
- Overall impact or storytelling
Here’s an example of a well-crafted critique request:
“I’m especially interested in suggestions for improving the composition. I felt the horizon might be a bit off, and I’m curious if cropping or different framing could enhance the image. Also, any thoughts on the lighting during the golden hour?”
Be polite and open-minded. Remember, the goal is to learn and grow as a photographer or designer. Including a few questions or specific areas for feedback helps reviewers focus their comments and gives you the most useful insights.
Finally, proofread your post before submitting. Clear, detailed, and respectful posts tend to receive more thoughtful feedback, which accelerates your growth and improves your future work.
Engaging with Feedback and Improving Your Image
Once you’ve posted your image on Shutterstock’s Critique Forum, the real fun begins—engaging with the feedback you receive. Think of it as a valuable conversation with fellow photographers and reviewers who want to help you grow. Whether the comments are glowing or constructive, embracing them with an open mind can be a game-changer for your skills.
Start by reading through all the feedback carefully. Sometimes, comments might seem critical at first glance, but they are actually opportunities to see your work from a new perspective. Take notes on recurring themes—are multiple reviewers mentioning composition issues or color balance? That’s a sign to focus your efforts there.
Next, ask questions if something isn’t clear. For example, if a reviewer suggests cropping differently, you might ask, “Would a tighter crop improve the focus on the subject?” Engaging in this dialogue not only clarifies their suggestions but also shows your willingness to learn.
After gathering insights, make a plan for improvement. This could involve re-editing your image, reshooting with different settings, or practicing specific techniques. For example, if your image’s lighting was a concern, experiment with different lighting setups in your next shoot.
| Common Feedback Themes | How to Improve |
|---|---|
| Lighting issues | Try different lighting setups or shoot during the golden hour for natural, soft light. |
| Composition problems | Use the rule of thirds or leading lines to guide the viewer’s eye. |
| Color balance | Adjust white balance settings or post-process with editing software. |
| Subject focus | Ensure your subject stands out by using depth of field or contrasting backgrounds. |
Remember, every piece of feedback is a stepping stone towards creating better images. Celebrate your improvements, and don’t be discouraged by critiques—see them as a roadmap to becoming a more skilled photographer and editor.
Tips for a Successful Posting Experience on the Critique Forum
Getting your work noticed and receiving helpful feedback on Shutterstock’s Critique Forum can be incredibly rewarding. To make the most of your experience, here are some friendly tips to set you up for success.
- Choose your images wisely: Post images that you’re proud of but also open to constructive criticism. Avoid posting multiple similar shots at once—quality over quantity is key.
- Write a clear description: When submitting your image, include some background info—what inspired you, the techniques used, or specific questions you have. This helps reviewers provide targeted advice.
- Be specific with your requests: Instead of simply asking for feedback, ask about particular aspects like lighting, composition, or color grading. For example, “Does the color palette work well with the mood I’m aiming for?”
- Engage respectfully: Remember, everyone on the forum is there to help. Thank reviewers for their insights, even if they’re critical. Keep the tone friendly and open-minded.
- Apply the feedback thoughtfully: When you receive comments, take time to consider each suggestion. Not every critique will fit your vision, but many will spark ideas for experimentation.
- Learn from others: Browse other posts and critiques to see different styles and perspectives. This can inspire your own work and help you understand common pitfalls and best practices.
Finally, stay consistent. Regularly sharing your images, engaging with feedback, and applying new techniques will accelerate your growth as a photographer. Remember, the goal isn’t perfection but continuous improvement. Enjoy the journey, and don’t be afraid to ask for help—everyone starts somewhere!