Ever wanted to make your images look more professional or just get rid of distracting backgrounds? Shutterstock Editor is a fantastic tool that makes this process straightforward, even if you’re not a tech wizard. It offers a variety of editing features, but one of the standout options is its ability to remove backgrounds quickly and effortlessly. Whether you’re creating marketing materials, social media posts, or just playing around with photos, Shutterstock Editor’s background removal feature can save you a ton of time and give your images a polished, clean look. Let’s dive into what makes this tool so handy and how you can make the most of it!
Step-by-Step Guide to Using Shutterstock Editor for Background Removal

Getting started with removing backgrounds in Shutterstock Editor is easier than you might think. Follow these simple steps to transform your images:
- Access Shutterstock Editor: Log in to your Shutterstock account and navigate to the Shutterstock Editor from your dashboard or the main menu. If you don’t have an account yet, signing up is quick and free!
- Upload Your Image: Click on the “Upload” button and select the photo you want to edit from your device. Shutterstock supports various formats like JPEG, PNG, and TIFF, so choose your preferred file type.
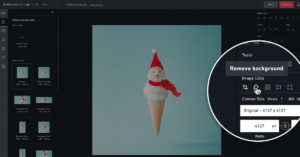
- Open the Image in the Editor: Once uploaded, click on your image to open it in the editing workspace. Here, you’ll see a bunch of tools designed to enhance and modify your photo.
- Locate the Background Removal Tool: Find the “Remove Background” feature—usually marked with an icon resembling a scissors or magic wand. Click on it, and Shutterstock will automatically analyze your image.
- Let the AI Do Its Job: Shutterstock’s AI-powered tool will quickly identify the background and remove it. Sometimes, the auto-removal isn’t perfect, especially with complex backgrounds, so don’t worry!
- Refine the Edges: Use the “Brush” or “Eraser” tools to manually fine-tune areas where the automatic removal might have missed spots or removed parts you wanted to keep. You can zoom in for more precise adjustments.
- Preview and Adjust: Toggle the background on and off to see how it looks. If you’re satisfied, move to the next step. If not, keep refining until you’re happy with the result.
- Download Your Edited Image: When you’re done, click the “Download” button. Choose the preferred file format—PNG is best if you want a transparent background—and save your masterpiece.
And that’s it! With just a few clicks, you’ve successfully removed the background from your image using Shutterstock Editor. It’s a powerful tool that combines ease of use with professional results, making your editing process smoother and more fun. Happy creating!
Tips for Achieving Professional-Looking Results with Shutterstock Editor
Removing backgrounds can seem straightforward, but if you want your images to look polished and professional, a few handy tips can make all the difference. Shutterstock Editor offers powerful tools, but knowing how to use them effectively will elevate your results. Here are some practical tips to help you get that clean, crisp background removal every time.
Start with high-quality images. The better the quality of your original photo, the easier it is to remove the background accurately. Look for images with good contrast between the subject and the background, and avoid blurry or pixelated shots. Clear, high-resolution images provide more detail, making it easier for the editor to distinguish between foreground and background.
Use the zoom feature to work closely on tricky areas. When editing, zoom in on fine details like hair, edges of glasses, or intricate jewelry. This helps you see exactly where you’re making adjustments and ensures you don’t accidentally cut off important parts of your subject.
Refine your selections with precision tools. Shutterstock Editor typically provides options to adjust your cutout with brushes or erasers. Use these tools carefully around detailed areas to improve the edges. For example, if you notice jagged edges or leftover background, zoom in and gently brush over those spots for a cleaner finish.
Leverage the feather and smooth tools. After removing the background, you can soften the edges using the feather or smooth options. This prevents harsh lines and gives your subject a more natural look. A little smoothing can make your cutout blend seamlessly into new backgrounds or designs.
Preview your work frequently. Don’t wait until you’ve finished to check how your image looks. Regularly toggle the background on and off or compare it with the original. This helps you catch any imperfections early and adjust accordingly.
Practice and patience are key. Sometimes, removing backgrounds perfectly takes a few tries. Don’t be discouraged if it doesn’t look perfect on your first attempt. Take your time, experiment with different tools, and learn from each edit to improve your skills over time.
By applying these tips, you’ll find that your background removal results become more professional-looking and ready for use in marketing materials, presentations, or personal projects. Remember, a little effort goes a long way in making your images stand out!
Common Issues and Troubleshooting When Removing Backgrounds
Even with the best tools, background removal can sometimes come with challenges. Don’t worry—many issues are simple to fix once you know what to look out for. Here’s a rundown of common problems users face when removing backgrounds using Shutterstock Editor, along with practical troubleshooting tips to help you achieve cleaner, more professional results.
Issue 1: Jagged or Uneven Edges
This often happens when the selection isn’t precise enough, resulting in rough edges that look unprofessional. To fix this, try using the smooth or feather tools after removing the background. Zoom in on problem areas and carefully refine the edges with the brush or eraser to achieve a softer, more natural transition.
Issue 2: Leftover Background or Halos
Sometimes, faint outlines or halos remain around the subject, especially in high-contrast images. To address this, double-check your initial selection and manually erase any remaining background bits. Using the edge refinement options can also help blend the cutout seamlessly into new backgrounds.
Issue 3: Missing Fine Details (like hair or fur)
Details such as hair, fur, or intricate jewelry can be tricky. If these areas aren’t properly cut out, consider zooming in and using a smaller brush size for more control. You can also utilize the ‘refine edge’ or ‘hair masking’ features available in some editors to improve detailed areas. Patience and careful work are key here.
Issue 4: Over-Removing Parts of the Subject
If parts of your subject are accidentally erased, use the undo feature or switch to the restore tool to bring back those areas. Adjust your brush size for more precision, and proceed gradually to avoid losing important parts of your image.
Issue 5: Slow Processing or Crashes
Large, high-resolution files can sometimes cause the editor to lag or crash. To prevent this, try resizing your image to a smaller resolution before editing, or work on a device with better processing power. Save your progress frequently to avoid losing work due to technical issues.
Remember, troubleshooting is a normal part of the editing process. With patience and practice, you’ll become more adept at resolving these common issues and creating clean, professional backgrounds with Shutterstock Editor. Keep experimenting, and don’t hesitate to revisit tutorials or support resources if you get stuck. Every challenge is a step toward mastering the art of background removal!
Additional Features of Shutterstock Editor to Enhance Your Images and Background Removal
Once you’ve got the hang of removing backgrounds with Shutterstock Editor, you’ll find that it offers a bunch of other handy features to make your images stand out even more. Think of it as your all-in-one toolkit for editing and enhancing your visuals without needing fancy software. Let’s explore some of these features that can really take your images to the next level.
1. Brightness, Contrast, and Color Adjustments: Sometimes, after removing the background, your subject might look a bit flat or dull. With the Editor, you can easily tweak brightness, contrast, saturation, and hue to make your subject pop. Just select your image, head over to the adjustment tools, and play around until it looks just right.
2. Adding Text and Graphics: Want to add a catchy headline or some fun icons? Shutterstock Editor makes it simple. You can choose from a variety of fonts, colors, and styles. Plus, importing your own graphics or logos is a breeze, allowing you to customize your images for social media, blog posts, or marketing materials.
3. Filters and Effects: Sometimes a subtle filter can change the whole vibe of your image. Shutterstock Editor offers a range of effects—from vintage and black & white to modern, vibrant filters. Experimenting with these can help you match your image’s style with your brand or personal aesthetic.
4. Cropping and Resizing: Need your image in a specific size? No problem. The editor provides easy cropping and resizing options. Whether you’re creating a profile picture, Instagram post, or banner, you can set the dimensions precisely.
5. Layering and Transparency: Want to add multiple elements or create a collage? The layering feature allows you to bring in various images and graphics, adjusting their order and transparency to craft a perfect composition.
All these features are designed to make your editing process smooth and fun. They help you transform a simple background removal into a complete, polished image ready for any use. So don’t shy away from experimenting—sometimes, a little tweak here and there makes all the difference!
Conclusion and Final Tips for Effective Background Removal with Shutterstock Editor
Removing backgrounds with Shutterstock Editor is a straightforward process once you get the hang of it, but like any tool, mastering it takes a bit of practice. Here’s a quick recap and some final tips to help you achieve the best results every time.
- Start with a clear image: Higher quality images with good contrast between the subject and background make the removal process much easier and cleaner.
- Use zoom and detail tools: Don’t rush the edge cleanup. Zoom in and carefully refine the edges for a natural look.
- Utilize the undo and history features: If something doesn’t look right, go back and tweak. It’s better to take your time than settle for a rough cut.
- Take advantage of additional features: Enhance your images with adjustments, overlays, and filters to make them more appealing and professional-looking.
- Save your work frequently: Always save multiple versions, especially before making major changes. This way, you can compare or revert if needed.
Remember, patience is key. Background removal might seem tricky at first, but with some practice, you’ll be able to produce crisp, clean images that look professional and polished. Whether you’re creating content for social media, marketing materials, or personal projects, Shutterstock Editor offers a user-friendly platform to bring your vision to life. So go ahead, experiment, and have fun transforming your images effortlessly!
Happy editing!