Ready to showcase your creative work to a global audience? Uploading your photos, illustrations, or videos to Shutterstock is a fantastic way to earn passive income and gain recognition. But with millions of files already on the platform, standing out can seem daunting. Don’t worry! In this guide, we’ll walk you through the essentials of uploading your content effectively, ensuring it gets maximum exposure. Whether you’re a seasoned contributor or just starting out, understanding the process and preparing your files properly can make all the difference in getting noticed and increasing your sales.
Preparing Your Files for Submission
Before you hit the upload button, it’s crucial to ensure your files are perfectly prepared. High-quality files, proper organization, and adherence to Shutterstock’s guidelines will not only improve your chances of approval but also boost your content’s visibility. Here’s what you need to focus on:
- File Quality and Resolution: Always upload the highest quality version of your work. For photos, this means a minimum of 4 MP resolution, but higher is better. For videos, ensure they are HD (1920×1080) or higher. Blurry, pixelated, or compressed files are less likely to be accepted and won’t perform well in search results.
- File Format: Use the recommended formats—JPEG for images, MP4 for videos, and AI, EPS, or PSD for vectors. Make sure your files are saved in the appropriate format to prevent rejection during review.
- File Naming and Metadata: Name your files descriptively, including relevant keywords. Metadata such as title, description, and keywords are vital for SEO; they help buyers find your work. Be specific and avoid keyword stuffing, focusing on what makes your content unique.
- Color Profile and Compression: For photos, embed sRGB color profiles to ensure colors display correctly across devices. Compress files just enough to reduce size without sacrificing quality. Over-compression can cause artifacts that detract from your work’s appeal.
- Organizing Your Files: Keep your files organized on your device with clear folders and naming conventions. This makes uploading more efficient and helps you keep track of your submissions for future updates or revisions.
By taking the time to prepare your files thoroughly, you’ll improve your chances of approval, increase your content’s searchability, and set yourself up for maximum exposure on Shutterstock’s platform. Remember, quality and presentation are key to standing out in a crowded marketplace!
Creating a Shutterstock Contributor Account
If you’re serious about sharing your work and getting it in front of a global audience, the first step is creating a Shutterstock Contributor account. It’s a straightforward process, but a few tips can help ensure everything goes smoothly so you can start uploading as soon as possible.
Start by visiting the Shutterstock Contributor website and clicking on the “Join now” or “Sign up” button. You’ll be prompted to fill out some basic information, such as your name, email address, and creating a password. Make sure to use an email address you check regularly — this will be your primary way Shutterstock communicates important updates or requests.
Once your account is created, you’ll need to complete your profile. This includes providing additional details like your location, payment information, and a brief bio. Filling out your profile completely helps establish credibility and trust with buyers. Plus, a professional profile picture and a compelling bio can make your portfolio stand out in the contributor community.
Next, you’ll want to set up your payment details. Shutterstock offers several payout options, including PayPal and bank transfers. Double-check your banking or PayPal info to avoid delays in receiving your earnings. It’s also wise to review their terms and policies during this setup phase so you’re fully aware of their requirements and your responsibilities as a contributor.
After your account is fully set up, you can start exploring the platform. Familiarize yourself with the dashboard, upload process, and the types of content Shutterstock accepts. Many new contributors find it helpful to review the contributor tutorials and community forums offered on the site. These resources give valuable insights into best practices and common pitfalls to avoid.
Remember, creating an account is just the beginning. The more you engage with the platform, understand its features, and adhere to their guidelines, the better your chances of gaining maximum exposure and earning consistent income from your content. So, take your time to set up your profile properly and get comfortable navigating the contributor tools before diving into your first uploads.
Understanding Shutterstock’s Content Guidelines and Requirements
Before uploading your images, videos, or illustrations, it’s crucial to understand Shutterstock’s content guidelines and requirements. They have specific standards designed to ensure that all content on their platform is high quality, legal, and suitable for a global audience. Ignoring these can lead to rejections, delays, or even account suspension, which nobody wants.
First, let’s talk about the technical requirements. Shutterstock prefers high-resolution images, typically at least 4 megapixels, with a clean, sharp appearance. For videos, they look for high-quality footage that’s free of noise, proper lighting, and steady framing. Keep your files in widely accepted formats — JPEG for images, MP4 or MOV for videos — and ensure they’re correctly named and organized before uploading.
Next, there are content-specific guidelines. For photos and illustrations, avoid overly commercial or promotional content unless it’s relevant and complies with legal standards. For example, images featuring branded products should have proper releases or be free of trademarks. Similarly, avoid explicit, violent, or offensive material, as Shutterstock maintains strict content standards to keep their marketplace safe and welcoming for all users.
Legal considerations are also paramount. You must own the rights to all content you submit, or have proper licenses and releases for recognizable people, private property, or protected intellectual property. Shutterstock requires model releases for identifiable individuals, especially in commercial contexts. If your work features trademarks, copyrighted works, or private property, ensure you have the appropriate permissions documented.
To help you stay compliant, Shutterstock provides detailed contributor guidelines covering:
- Model and property releases
- Content restrictions (no hate speech, violence, or adult content)
- Metadata standards (accurate titles, keywords, and descriptions)
- Technical specifications (resolution, format, and file size)
Pay close attention to keywording and metadata, as this greatly influences your content’s discoverability. Use relevant, specific keywords that accurately describe your content. Avoid keyword stuffing or misleading tags, as this can hurt your reputation and reduce exposure.
Finally, stay updated with Shutterstock’s policies. They occasionally revise their guidelines to adapt to new legal and market trends. Regularly reviewing their contributor resources ensures your submissions stay compliant, helping your content reach the widest audience possible and maximizing your exposure on the platform.
Step-by-Step Guide to Uploading Your Content
Ready to share your stunning photos and videos with the world? Uploading your content to Shutterstock is pretty straightforward once you get the hang of it. Let’s walk through the process together so you can get your work online quickly and smoothly.
Step 1: Sign In or Create an Account
If you haven’t already, head over to Shutterstock and sign in to your contributor account. If you’re new, it’s easy to register — just follow the prompts to set up your profile. Make sure your account details are accurate, as this helps build trust with buyers and Shutterstock itself.
Step 2: Prepare Your Files
Before uploading, double-check that your files meet Shutterstock’s technical requirements:
- File Format: JPEG for photos, MOV or MP4 for videos.
- File Size: Minimum 4 MP for images, 1920 pixels on the longest side; videos should be at least 1080p.
- Quality: High resolution, well-exposed, in focus, with no watermarks or logos.
Properly prepared files mean fewer rejections and faster approval.
Step 3: Upload Your Files
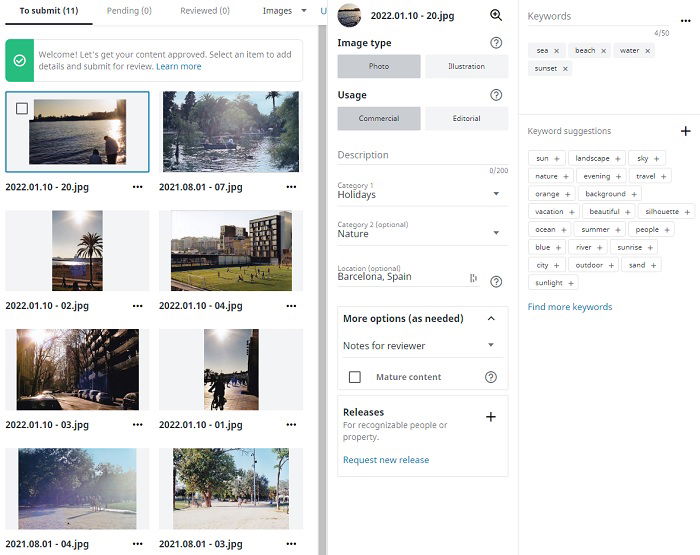
Click on the “Upload” button, usually found in your contributor dashboard. Select your files, and they’ll start uploading. While uploading, you can add details for each file — this is crucial for visibility later on.
Step 4: Add Metadata
Here’s where you add titles, descriptions, keywords, and categories. Take your time to fill these out thoughtfully; they’re key to making your content discoverable. We’ll dive into optimizing metadata in the next section.
Step 5: Set Pricing and Licensing Options
Choose how you want your content to be licensed — standard or enhanced — and set your pricing accordingly. Shutterstock often recommends default settings, but you’re free to customize if you prefer more control.
Step 6: Submit for Review
Once everything looks good, hit the “Submit” button. Shutterstock’s review team will then evaluate your submission for quality and compliance. This process typically takes a few days, and you’ll get notified once your content is approved or if revisions are needed.
That’s it! Follow these steps each time you upload new content, and you’ll be well on your way to building a diverse, high-quality portfolio that attracts buyers.
Optimizing Your Metadata for Better Visibility
Think of your metadata — the titles, descriptions, keywords, and categories you assign — as the secret sauce that helps your content get noticed. Even the most beautiful photo or video won’t sell if no one can find it. So, let’s talk about how to make your metadata work for you.
Why is Metadata Important?
Metadata acts like a map that guides buyers to your content. Properly optimized metadata ensures your work appears in relevant searches, increasing your chances of making sales. It’s also a way to tell the story behind your content, making it more appealing.
Tips for Effective Metadata Optimization
- Use Clear, Descriptive Titles: Be specific. Instead of “Beach Scene,” try “Sunset Over Tropical Beach with Palm Trees.” This helps buyers find exactly what they’re looking for.
- Write Detailed Descriptions: Explain the context, mood, location, and any unique aspects. For example, “A vibrant shot of a bustling street market in Bangkok during the evening, showcasing colorful stalls and lively crowds.”
- Choose Relevant Keywords: Use both broad and specific keywords. Think about what a buyer might search for, such as “mountain,” “hiking,” “sunrise,” or “adventure travel.” Don’t overstuff; aim for 10-15 well-chosen keywords per file.
- Assign Appropriate Categories: Select categories that best fit your content. Shutterstock offers a list — pick the most relevant ones to improve search accuracy.
Additional Metadata Tips:
- Avoid Spammy Keywords: Don’t stuff irrelevant or misleading keywords; it can lead to rejection.
- Use Synonyms and Variations: Cover different search terms. For example, include both “car” and “vehicle.”
- Update Metadata Periodically: As trends change, revisit your keywords and descriptions to keep your content current and searchable.
Putting It All Together
Effective metadata isn’t just about adding words; it’s about crafting a compelling, accurate, and optimized description of your content. When buyers can easily find and understand your work, it increases your chances of making sales and gaining exposure on Shutterstock.
Remember, investing time in metadata optimization pays off in the long run. It’s the bridge between your creative talent and the buyers eager to discover your work!
Strategies to Increase Your Content’s Exposure on Shutterstock
So, you’ve uploaded some fantastic images or videos to Shutterstock, but now what? How do you make sure your content gets noticed amidst thousands of others? The key is to be strategic. Here are some tried-and-true methods to boost your content’s visibility and attract more buyers.
Optimize Your Keywords
Think of keywords as the bridge between your content and potential buyers searching for it. Use relevant, specific, and varied keywords that accurately describe your content. Don’t just stick to obvious terms; consider synonyms and related phrases. For example, if you uploaded a photo of a “sunset over the mountains,” include keywords like “evening sky,” “nature landscape,” or “scenic view.”
Create Diverse Content
Offering a variety of images, videos, and vectors increases your chances of being discovered. Explore different themes, styles, and subjects to appeal to a broader audience. For example, if you primarily upload nature shots, try adding urban scenes or conceptual images to diversify your portfolio.
Maintain Consistency and Quality
Regularly uploading high-quality content keeps your portfolio active and engaging. Consistency can also help build your reputation as a reliable contributor. Quality is king—make sure your images are sharp, well-lit, and free of noise or distractions. Clear, professional content is more likely to get featured and recommended.
Participate in Shutterstock Communities
Engage with other contributors and followers through forums or social media groups. Sharing tips, feedback, and success stories can inspire new ideas and help you stay motivated. Sometimes, collaborations or shout-outs can lead to increased exposure.
Use Trending Topics and Seasonal Themes
Align your uploads with current trends, holidays, or seasons. For example, during the holiday season, upload festive-themed content. This kind of timely content tends to attract higher search volumes and can get featured more prominently.
Leverage Social Media
Promote your Shutterstock portfolio on your social media channels. Share links to your best content, behind-the-scenes shots, or stories about your creative process. The more eyes on your work, the higher the chance of downloads and exposure.
Common Mistakes to Avoid When Uploading Content
While uploading content to Shutterstock seems straightforward, there are some pitfalls that can hinder your success. Avoiding these common mistakes will help ensure your uploads are professional, discoverable, and more likely to generate income.
Ignoring Keyword Optimization
One of the biggest mistakes is neglecting proper keywording. Overloading your images with irrelevant tags or leaving them blank reduces visibility. Take the time to research and add accurate, descriptive keywords that truly reflect your content.
Uploading Poor-Quality Content
Low-resolution images, blurry videos, or cluttered compositions can hurt your chances of acceptance and sales. Always review your submissions carefully—if it doesn’t meet Shutterstock’s quality standards, it’s better to improve it before uploading.
Not Reading Contributor Guidelines
Each platform has specific rules about file formats, size, and content restrictions. Failing to adhere to these guidelines can result in rejection or delayed approval. Make sure to read and follow Shutterstock’s requirements before uploading.
Using Inappropriate or Misleading Titles and Descriptions
Be honest and precise in your titles and descriptions. Avoid clickbait or exaggerated claims. Clear, straightforward information helps buyers find what they need and builds trust in your portfolio.
Uploading Duplicate Content
Uploading the same image multiple times or very similar versions can dilute your portfolio and frustrate buyers. Instead, focus on creating unique, high-quality content that adds value.
Neglecting Metadata and Searchability
Metadata isn’t just about keywords; it includes titles, descriptions, and categories. Properly filling out these fields enhances searchability. Don’t leave fields blank or generic—customize each upload for maximum impact.
Overlooking Trends and Demand
Uploading niche content that doesn’t match current market demand can limit sales. Research popular themes and styles, and aim to contribute content that aligns with what buyers are actively searching for.
By steering clear of these common mistakes and adopting effective strategies, you’ll set yourself up for greater exposure and success on Shutterstock. Remember, patience and persistence are key—keep learning, experimenting, and refining your approach!
Tracking Your Performance and Improving Future Uploads
Once you’ve started uploading your content to Shutterstock, the journey doesn’t end there. To truly maximize your exposure and earnings, it’s essential to keep an eye on how your images and videos are performing. This is where tracking your performance comes into play. By understanding which of your uploads resonate most with viewers, you can tailor your future submissions for better results.
Shutterstock offers a straightforward dashboard where you can monitor various metrics such as:
- Views: How many times your content has been seen.
- Downloads: The number of times your content has been downloaded.
- Favorites: Items that users have marked as favorites, indicating interest.
- Referrers: Where your traffic is coming from, helping you identify popular keywords or sources.
By analyzing these stats, you can identify patterns. For example, if certain themes, colors, or subjects get more downloads, consider creating more content in that niche. Conversely, if some uploads aren’t performing well, it might be worth revisiting your approach—perhaps tweaking the keywords, improving the quality, or experimenting with different styles.
Here are some tips to improve based on performance data:
- Optimize Keywords: Use the insights to refine your keyword strategy, including adding relevant tags that align with popular searches.
- Update Descriptions: Make sure your descriptions are clear, detailed, and include trending keywords.
- Experiment with Content Types: If photos perform better than vectors or videos, consider focusing your efforts there.
- Learn from Successful Content: Study your top-performing uploads—notice what makes them stand out and try to replicate those elements.
Remember, consistent monitoring and tweaking can significantly boost your visibility over time. Think of it as a feedback loop: upload, analyze, adjust, and repeat. This iterative process will help you grow your portfolio strategically and increase your chances of making sales.
Conclusion and Tips for Successful Content Uploads
Uploading content to Shutterstock can be a game-changer for photographers, videographers, and designers looking to showcase their work and generate income. While the process might seem straightforward, mastering it requires some strategic thinking and attention to detail. Here’s a quick recap of key tips to ensure your uploads get the maximum exposure:
- Choose High-Quality Content: Always upload sharp, well-composed images and videos. Quality over quantity makes a difference.
- Use Relevant Keywords and Descriptions: Think like your audience—what would they search for? Be specific and accurate.
- Tag Wisely: Don’t just stuff keywords; use relevant tags that truly describe your content.
- Stay Consistent: Regular uploads keep your portfolio active and fresh, increasing chances of visibility.
- Research Trends: Keep an eye on popular themes, colors, and styles. Trending content tends to perform better.
- Engage with the Community: Participate in forums, follow other contributors, and learn from feedback to improve your craft.
- Track and Analyze Performance: Use Shutterstock’s dashboard to see what works and refine your strategy accordingly.
- Be Patient and Persistent: Success doesn’t happen overnight. Keep uploading, learning, and adjusting your approach.
Finally, remember that every contributor’s journey is unique. What works for one person might not work for another, so stay flexible and open to experimenting. With dedication, smart strategies, and a keen eye on your performance metrics, you can significantly boost your content’s exposure and turn your creative efforts into a steady income stream. Happy uploading!