In today’s world, your smartphone is more than just a device for calls and texts — it’s a powerful tool for capturing stunning, professional-quality photos. Whether you’re a hobbyist or looking to sell images on platforms like Shutterstock, mastering your phone’s camera can open up a world of creative possibilities. The good news is, you don’t need fancy equipment to produce high-quality images; with a few simple tips and tricks, your smartphone can help you take photos that stand out. Let’s explore how you can elevate your mobile photography game and create images that are fit for a professional stock photo portfolio.
Understanding Shutterstock’s Photo Requirements and Guidelines

Before you start snapping away, it’s crucial to understand what Shutterstock looks for in the photos they accept. They have specific guidelines designed to ensure the images meet their quality standards and legal requirements. Here’s what you need to know:
- Resolution and Quality: Shutterstock prefers images that are at least 4 megapixels, but higher resolutions are always better. Aim for sharp, crisp images without pixelation or blurriness.
- Focus and Sharpness: Your main subject should be in clear focus. Blurry or out-of-focus images are typically rejected unless used intentionally for artistic effect.
- Lighting: Well-lit photos with good exposure are key. Avoid harsh shadows or blown-out highlights. Natural light often works best for vibrant, true-to-life images.
- Composition: Use the rule of thirds, leading lines, and other compositional techniques to create balanced and engaging images.
- Content Restrictions: Shutterstock prohibits images that contain copyrighted logos, identifiable private property without permission, or offensive content. Always ensure your photos respect privacy and legal guidelines.
Additionally, Shutterstock encourages diverse and authentic images that tell a story or evoke emotion. High-quality, original photos that meet these standards are more likely to be accepted and appreciated by clients. By understanding and adhering to these guidelines, you’ll improve your chances of getting your smartphone photos approved and earning on the platform.
Preparing Your Phone for Photography Success
Before you even start snapping away, it’s super important to get your phone ready to capture the best possible shots. Think of it like preparing your tools before a big project — the better the setup, the smoother the process. Here are some simple steps to set your phone up for photography success:
- Clean Your Camera Lens: It might sound obvious, but a quick wipe with a soft cloth can do wonders. Fingerprints, dust, or smudges on your lens are sneaky culprits that can make your photos blurry or hazy. Keep your lens clean and clear for crisp images every time.
- Update Your Phone’s Software: Make sure your phone’s operating system and camera app are up to date. Updates often include improvements to camera performance, new features, and bug fixes that can enhance your photo quality.
- Check Your Storage Space: Nothing kills the mood faster than running out of storage mid-shoot. Clear out unused apps, old photos, or files you no longer need. Having ample space ensures you can shoot and save high-res photos without interruptions.
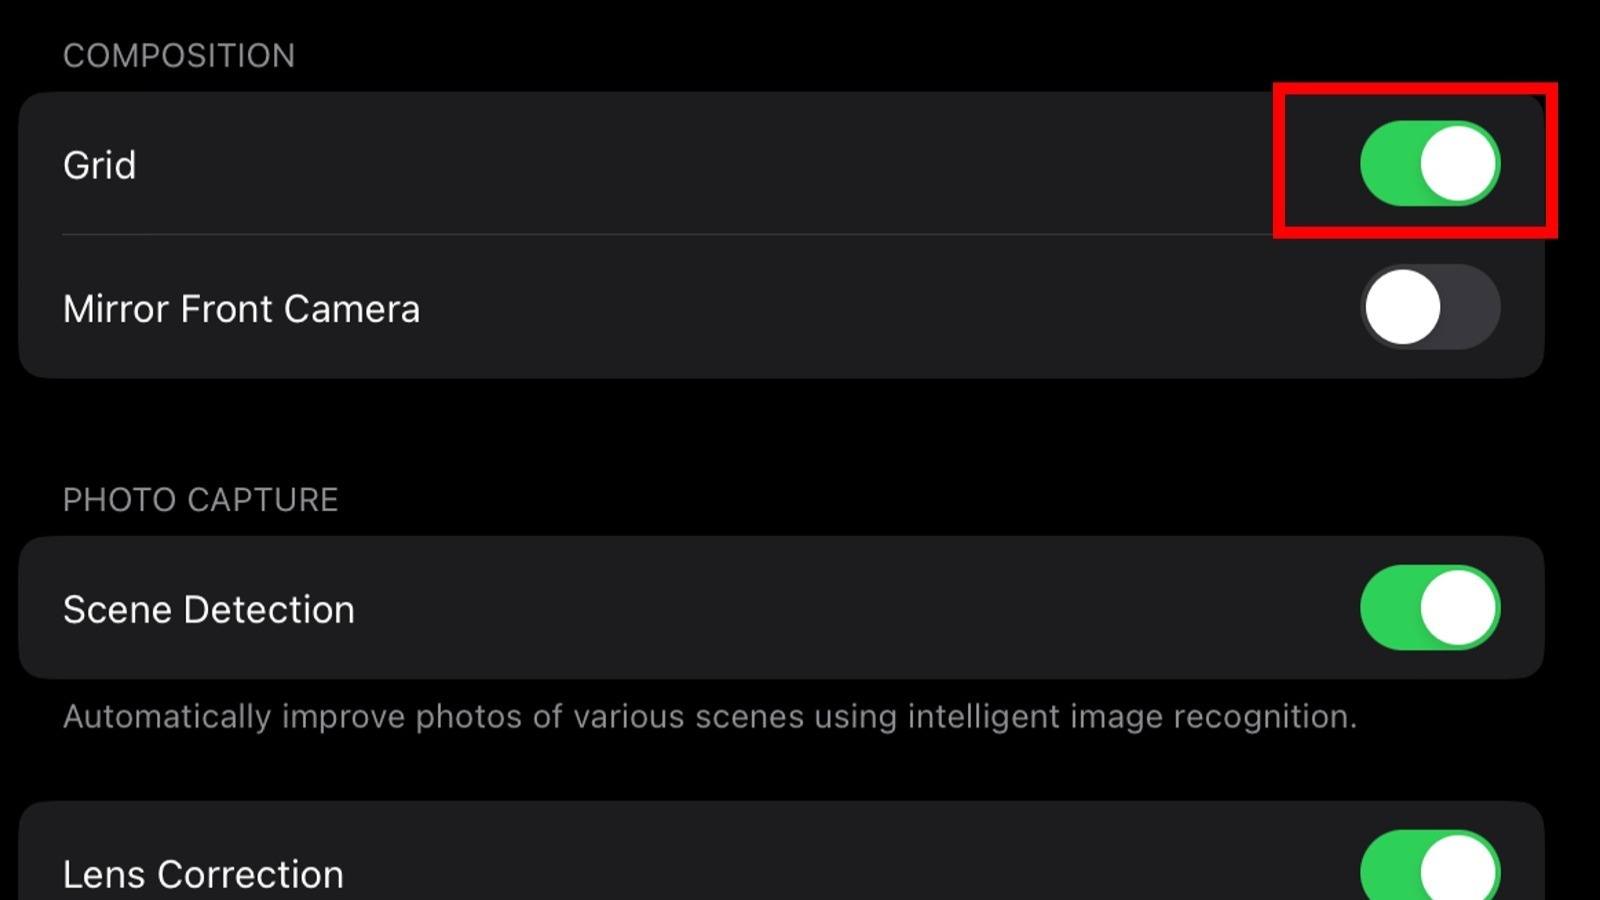
- Adjust Camera Settings: Dive into your camera settings to optimize for your scene. For example, turn on grid lines to help with composition, enable HDR for better dynamic range, or switch to the highest resolution available. Familiarize yourself with these options so you can quickly tweak them when needed.
- Charge Your Phone: Nothing’s more frustrating than your phone dying in the middle of a shoot. Make sure it’s fully charged or carry a portable charger or power bank, especially if you plan to shoot for a while.
Taking these preparatory steps might seem simple, but they set a solid foundation for capturing stunning photos. Think of it as warming up before a workout — the better prepared you are, the more likely you are to hit your photography goals!
Tips for Capturing Clear and Sharp Photos with Your Phone
Now that your phone is prepped and ready, it’s time to focus on technique. Achieving clear, sharp photos isn’t just about having a fancy camera; it’s about how you use your phone and your environment. Here are some tried-and-true tips to help you get those crisp shots every time:
- Steady Your Hands: Camera shake is a common culprit behind blurry photos. To minimize this, hold your phone with both hands, keep your elbows close to your body, and brace yourself against a stable surface if possible. Alternatively, use a small portable tripod designed for smartphones for ultimate stability.
- Tap to Focus: Most smartphones allow you to tap on the screen to set focus precisely. Tap on the main subject to ensure it’s sharp and clear. Some phones also let you lock focus and exposure, which is handy when shooting in tricky lighting conditions.
- Use Proper Lighting: Good lighting makes a huge difference. Whenever possible, shoot in natural light — think early morning or late afternoon for soft, warm tones. Avoid harsh midday sun that can cause shadows and overexposed spots. If indoors, position your subject near windows or use diffused artificial light.
- Enable Grid Lines and Use the Rule of Thirds: Composing your shot thoughtfully contributes to clarity and interest. Turn on grid lines in your camera settings, then position your subject along the lines or at intersections for a balanced, professional-looking photo.
- Focus on the Subject: Tap on your main subject to focus sharply. Wait for the focus to lock before pressing the shutter. Some phones also have focus peaking features that highlight the focused areas, making it easier to get sharp details.
- Avoid Digital Zoom: Digital zoom can reduce image quality, making photos appear pixelated or blurry. Instead, move closer to your subject if possible, or crop the photo afterward for a cleaner result.
- Use the Timer or Remote Shutter: To eliminate any shake caused by pressing the shutter button, use the timer feature or a Bluetooth remote shutter if you have one. This is especially helpful for long exposures or low-light shots.
Remember, capturing clear and sharp photos is a skill that improves with practice. Play around with these tips, experiment in different lighting conditions, and soon you’ll notice your phone photography reaching new heights. The key is to stay patient, be mindful of your environment, and have fun with the process!
Utilizing Photography Apps to Enhance Your Shots
Let’s face it, sometimes your phone camera isn’t quite enough to get that perfect shot, especially if you’re aiming for professional-quality images for Shutterstock. Luckily, there are a ton of photography apps out there that can help you elevate your photos without needing fancy equipment. These apps can assist with everything from editing and filters to advanced adjustments like exposure and focus.
Some of the most popular and user-friendly apps include:
- Snapseed – A powerful, free editing app from Google. It offers tools like tune image, details, curves, and a variety of filters that can really make your photos pop.
- VSCO – Known for its beautiful filters and easy-to-use interface. It’s perfect for giving your photos a consistent aesthetic, which can be great for stock images.
- Adobe Lightroom Mobile – Offers advanced editing options like RAW editing, gradient filters, and precise adjustments. It’s a favorite among photographers for its professional features.
- Afterlight – Combines simple editing tools with creative overlays, textures, and filters to add a unique touch to your images.
Using these apps, you can correct lighting issues, sharpen details, adjust colors, or even add subtle effects that make your photos more appealing for Shutterstock‘s audience. The key is to enhance your images naturally—avoid over-editing, which can make photos look unnatural and less professional. Spend some time experimenting with different filters and adjustments to find what best highlights your subject.
Another tip: shoot in the highest resolution possible and save your original images before making edits. This way, you can always go back to the raw version if needed and ensure your final photos are crisp and clear for licensing.
Practicing Composition and Lighting for Better Photos
Great photos start with solid composition and lighting—two fundamentals that can make or break your images, especially when working with a smartphone. The good news? You don’t need fancy gear to master these elements; practice and understanding are all you need.
Composition is about arranging elements within your frame in a way that’s visually appealing and tells a story. Here are some tips to improve your composition:
- Follow the Rule of Thirds: Imagine dividing your frame into nine equal parts with two horizontal and two vertical lines. Place your main subject along these lines or at their intersections for a balanced shot.
- Look for Leading Lines: Use roads, fences, or shadows to guide the viewer’s eye toward your subject.
- Keep it Simple: Avoid cluttered backgrounds. Focus on your main subject and eliminate distractions.
- Try Different Perspectives: Don’t just shoot from eye level. Get low, shoot from above, or experiment with angles to add interest.
Lighting is equally vital. Natural light is your best friend—try to shoot during the golden hour (shortly after sunrise or before sunset) when the light is soft and warm. Here are some lighting tips:
- Avoid harsh midday sun: It creates strong shadows and can cause overexposure.
- Use diffused light: Overcast days or shooting near windows with sheer curtains can soften shadows and highlight details.
- Pay attention to shadows: Make sure shadows fall in a pleasing way and don’t obscure your subject.
- Utilize reflectors: A simple white sheet or piece of cardboard can bounce light back onto your subject, filling in shadows and adding glow.
Practice makes perfect. As you take more photos, pay attention to how different compositions and lighting conditions affect your images. Over time, you’ll develop an instinct for framing and lighting that works best for your style and the Shutterstock marketplace. Remember, every great photo is a combination of good eyes and good light—so keep experimenting and refining your skills!
Editing Your Photos Before Uploading to Shutterstock
Once you’ve captured some great shots with your phone, the next step is to make sure they look their absolute best before you upload them to Shutterstock. A little bit of editing can elevate your photos, making them more appealing and professional-looking. The good news is, you don’t need fancy software — there are plenty of mobile editing apps that are user-friendly and packed with powerful features.
First up, consider cropping your photos to improve composition. Sometimes, a simple crop can eliminate distractions or better frame your subject. Look for apps like Adobe Lightroom, Snapseed, or VSCO — all of these are free or offer free versions and are perfect for quick edits.
Next, adjust the exposure, contrast, and brightness to bring out the details. Shutterstock prefers clear, sharp images with good lighting — so don’t be afraid to brighten up a dark photo or dial down overly harsh highlights. You can also tweak the saturation and vibrance to make colors pop, but keep it natural — over-saturated images might be rejected or look unprofessional.
Sharpness and clarity are also crucial. Use your editing app’s sharpening tools to enhance details, especially if your original photo is slightly soft. Be cautious — too much sharpening can introduce noise or make images look unnatural.
Another handy tip is to remove any blemishes or distractions. Many apps have healing or clone tools that allow you to erase spots, dust, or distracting objects in the background. This helps your main subject stand out more clearly.
Finally, always save your edited version in the highest quality possible. Shutterstock recommends JPEG format with a minimum of 4 megapixels, and high-quality settings ensure your photos look sharp and professional. Take a moment to review your edited photo on different screens or in full size to make sure it looks perfect before moving on to upload.
Remember, the goal of editing is to enhance your original shot without overdoing it. Clean, well-lit, and properly composed images tend to perform best on Shutterstock, so keep edits subtle and natural. A polished photo can make all the difference in attracting buyers and increasing your sales!
Uploading Your Photos to Shutterstock from Your Phone
Now that your photos are edited and ready to go, it’s time to upload. Shutterstock has a straightforward process for submitting images directly from your phone, making it super convenient whether you’re in bed, on the go, or just prefer using your mobile device.
First, make sure you have the Shutterstock Contributor app installed. It’s available for both iOS and Android devices — just head to the App Store or Google Play, search for “Shutterstock Contributor,” and download it for free.
Once installed, open the app and log in with your contributor account credentials. If you don’t have an account yet, you can create one directly within the app — it’s quick and easy.
To upload a photo, tap the “Upload” button, usually represented by a camera or plus sign icon. You’ll then be prompted to select photos from your phone’s gallery. Choose the high-quality, edited images you want to submit.
After selecting your images, you’ll be guided through the upload process. Here are some helpful tips:
- Add relevant titles and descriptions: Use descriptive, keyword-rich titles and descriptions. Think about what a buyer might search for when looking for images like yours.
- Choose appropriate categories: Proper categorization helps your photo get discovered. Take your time to select the most fitting categories and subcategories.
- Set keywords: Keywords are essential for searchability. Include relevant words that describe the content, colors, mood, and potential uses of your photo. Use all available keyword slots for maximum exposure.
Once all the details are filled out, review your submission to ensure everything looks good. Double-check that the image is in the correct format, resolution, and that your keywords are accurate.
When you’re satisfied, tap the “Submit” button. Your photo will go into Shutterstock’s review queue. The review process typically takes a few days; Shutterstock will notify you via email once your image is approved or if it needs any adjustments.
Uploading from your phone makes it easy to contribute fresh content regularly. With just a few taps, you can expand your portfolio, keep your account active, and increase your chances of earning royalties. So, keep capturing, editing, and uploading — your next great sale could be just a few clicks away!
Common Mistakes to Avoid When Taking Smartphone Photos for Shutterstock
Getting high-quality images for Shutterstock isn’t just about pointing your phone and clicking away. There are some common pitfalls that can trip you up and lower the chances of your photos being accepted or selling well. Let’s go over a few of these mistakes so you can steer clear and improve your mobile photography game.
1. Ignoring Lighting Conditions
Lighting is everything in photography. Many beginners overlook how important natural light is, especially when shooting with a phone. Poor lighting can result in dull, flat images with little detail. Try to shoot during the golden hour—early morning or late afternoon—when the light is soft and warm. Avoid harsh midday sun, which can create ugly shadows and overexposed highlights.
2. Using the Digital Zoom
It’s tempting to zoom in on subjects, but digital zoom often reduces image quality, making your photos appear pixelated or blurry. Instead, get closer to your subject physically whenever possible. If that’s not feasible, consider cropping the image during editing to maintain clarity.
3. Forgetting to Keep the Camera Steady
Blurred images are a common mistake, especially when holding your phone shaky. Use both hands, brace your elbows against your body, or stabilize your phone on a surface. Even a slight shake can ruin a shot, so take your time and be patient.
4. Over-Editing or Over-Filtering
While editing can enhance your photos, overdoing it can make them look unnatural and potentially cause rejection on Shutterstock. Aim for natural, clean edits—adjust brightness, contrast, and sharpness subtly. Remember, Shutterstock prefers images that are true to life and ready for commercial use.
5. Not Paying Attention to Composition
Good composition makes your photos more appealing. Avoid cluttered backgrounds, center your subject with the rule of thirds, and leave some space around your subject. Taking a moment to compose your shot thoughtfully can dramatically improve its quality.
6. Shooting in Low Resolution or Poor Quality Settings
Make sure your phone is set to the highest resolution. Low-quality images won’t meet Shutterstock’s standards and will likely be rejected. Check your camera settings before shooting to ensure maximum image quality.
By avoiding these common mistakes, you’ll give your smartphone photos a much better shot at being accepted and loved by Shutterstock’s audience. Remember, practice makes perfect—and paying attention to detail can transform a simple shot into a stunning, professional-looking image.
Conclusion and Final Tips for Success in Mobile Photography for Stock Images
Congratulations! You now have a solid foundation for capturing high-quality stock images using just your smartphone. Mobile photography is incredibly accessible, and with a few smart habits, you can produce images that stand out on Shutterstock. Here are some final tips to keep in mind as you continue your journey:
- Practice Regularly: The more you shoot, the better you’ll understand your phone’s capabilities and how to work with different lighting and compositions.
- Focus on Composition: Use the rule of thirds, leading lines, and framing to create visually appealing images. Take your time to set up each shot thoughtfully.
- Pay Attention to Lighting: Natural light is your best friend. Avoid harsh midday sun, and consider shooting during golden hour for warm, inviting images.
- Keep Your Lens Clean: A simple step that makes a huge difference. Dirty lenses can cause blurry or dull photos, so wipe your lens regularly.
- Edit Carefully: Use simple editing apps to enhance your photos subtly. Avoid over-editing; keep things natural and professional.
- Stay Consistent: Develop a style or theme for your portfolio. Consistency helps attract buyers looking for specific types of images.
- Respect Shutterstock Guidelines: Always review their submission standards and avoid images with recognizable people or trademarks unless you have proper releases.
Remember, every shot is a learning opportunity. Don’t get discouraged by rejections; instead, use them as motivation to improve. Mobile photography is a fantastic way to create beautiful, marketable stock images without investing in expensive gear. Keep experimenting, stay patient, and enjoy the creative process!