If you’re diving into the world of stock photography on Shutterstock, the first step to success is understanding their submission guidelines. Think of these as the rules of the game—knowing them helps ensure your photos have the best shot at being accepted. Shutterstock wants high-quality, professional images that are clear, well-composed, and meet certain technical standards.
Some key points include:
- Technical Quality: Your photos should be sharp, properly exposed, and free of noise or artifacts.
- File Format & Size: Upload in JPEG format with a minimum of 4MP resolution; files should be under 50MB.
- Model & Property Releases: If your image features recognizable people or private property, proper releases are necessary.
- Content Restrictions: Avoid images with illegal, offensive, or copyrighted content without permission.
- Originality & Authenticity: Shutterstock favors authentic, natural images over heavily edited or overly staged shots.
Taking time to review their detailed submission guidelines can save you a lot of frustration. Remember, each category—such as lifestyle, business, or nature—may have specific requirements, so tailor your submissions accordingly.
Reasons Why Photos Get Rejected on Shutterstock

Getting your photo rejected can feel disheartening, but it’s often a learning opportunity. Understanding common reasons for rejection can help you improve your future submissions and increase your acceptance rate.
Here are some of the most frequent causes:
- Poor Technical Quality: Blurry, pixelated, or poorly exposed images won’t pass muster. Always check the image resolution and clarity before uploading.
- Incorrect or Missing Releases: Photos featuring identifiable people or private property require proper releases. Without these, your image is likely to be rejected.
- Overly Edited or Filtered Images: Shutterstock prefers natural-looking photos. Heavy filters, excessive HDR, or unrealistic edits can be a red flag.
- Copyright or Trademark Violations: Using copyrighted logos, brands, or artwork without permission is a surefire way to get rejected. Always ensure your content is original or properly licensed.
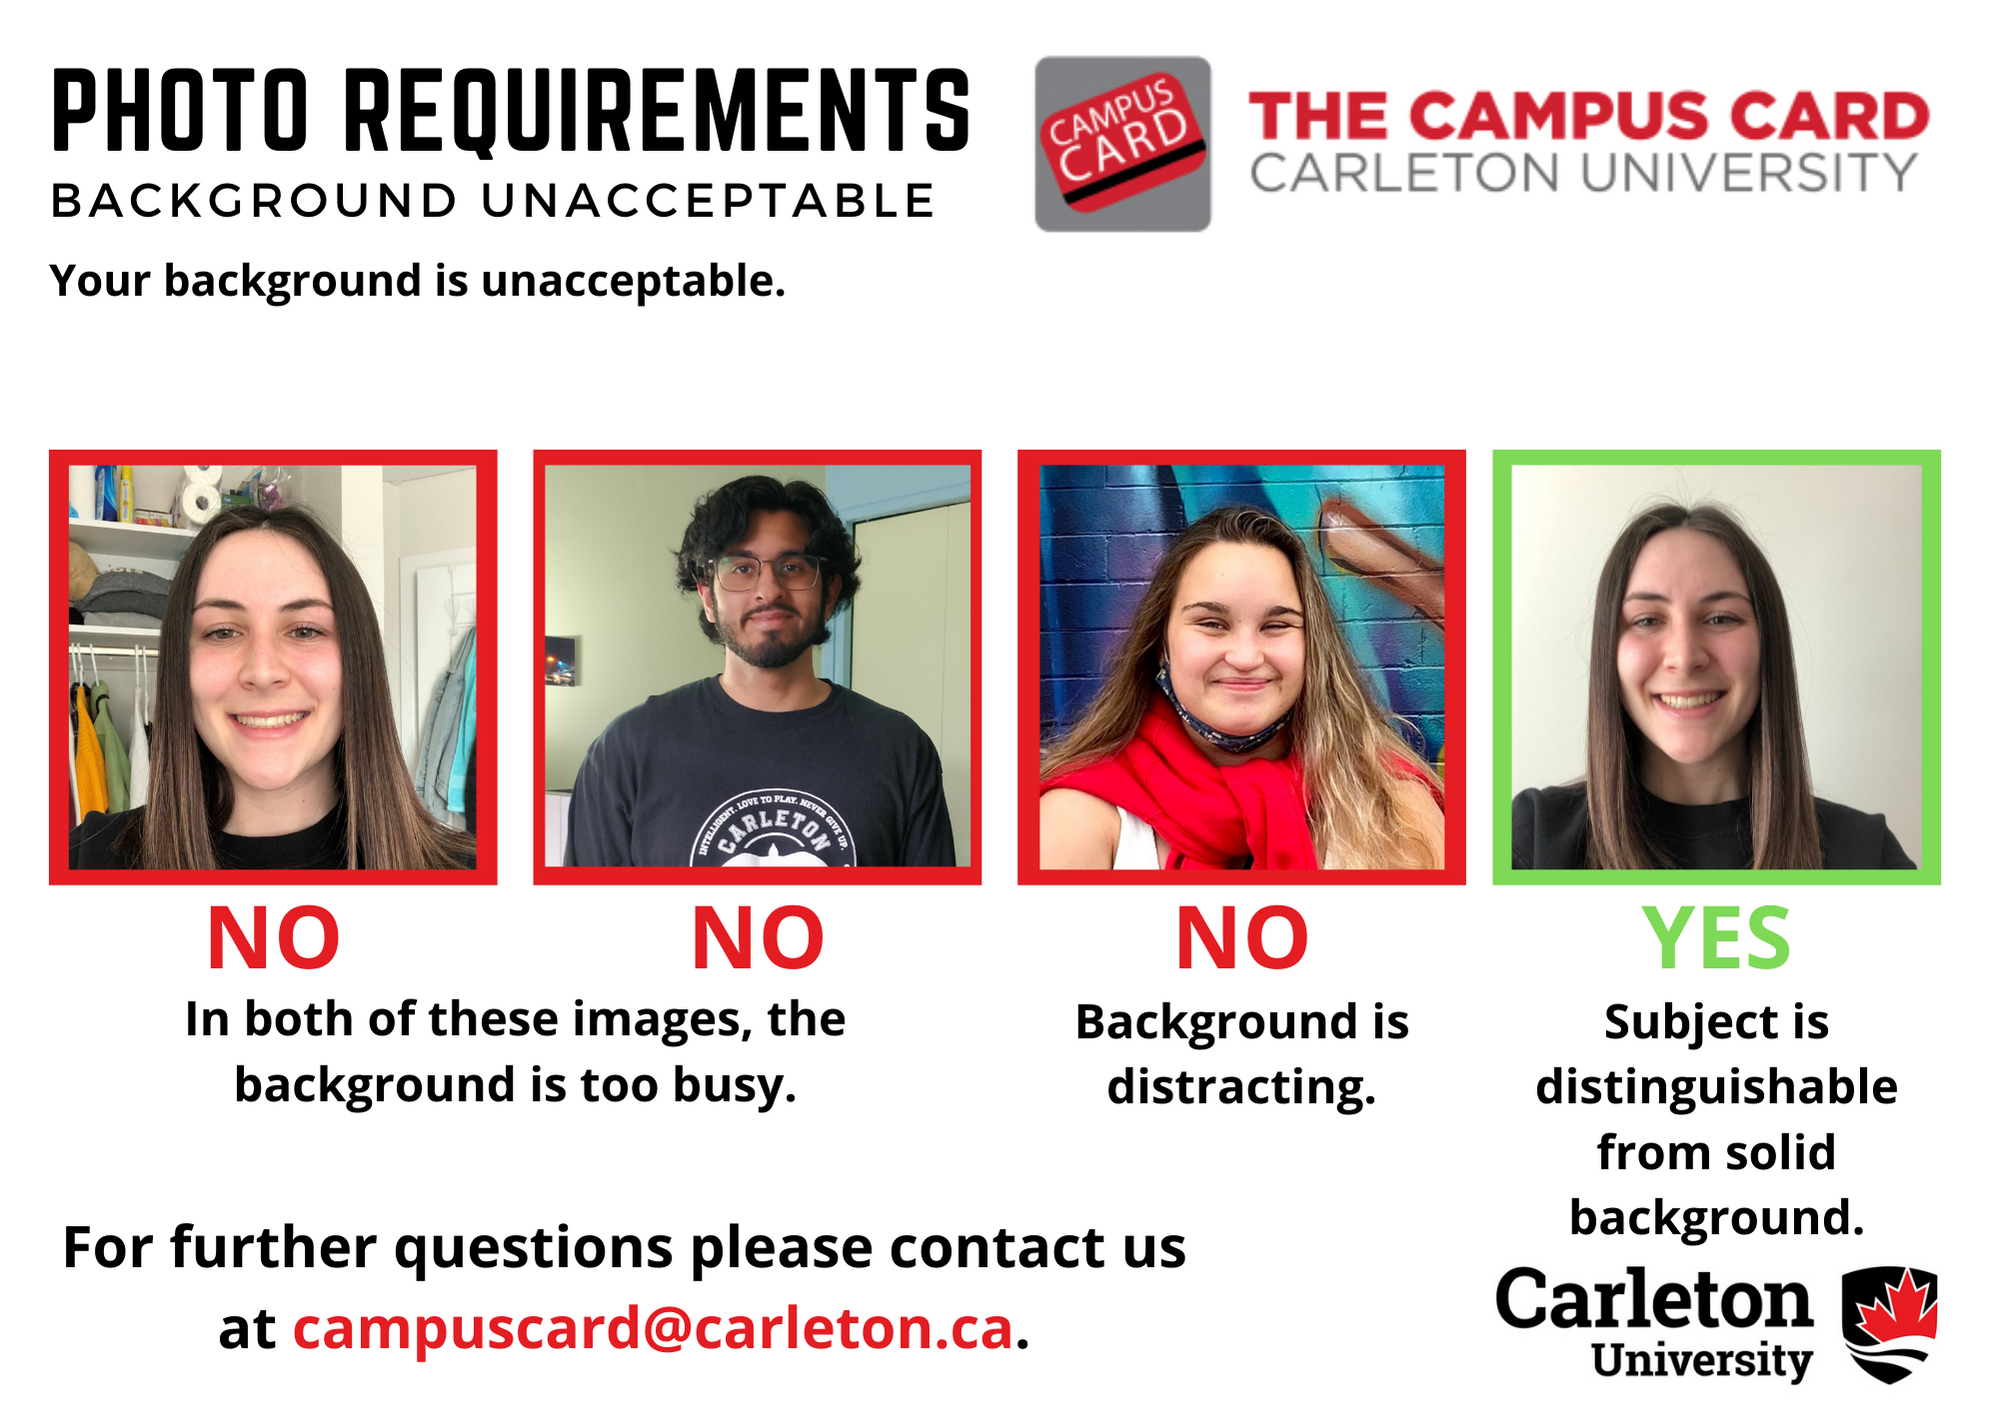
- Content Does Not Fit Shutterstock’s Quality Standards: Photos that are poorly composed, with distracting backgrounds or bad lighting, often don’t make the cut.
- Inappropriate or Offensive Content: Images that contain nudity, violence, or offensive themes generally don’t align with Shutterstock’s community standards.
If your photo gets rejected, Shutterstock usually provides a reason. Take this feedback seriously—review the images, make necessary adjustments, and consider resubmitting. Sometimes, a small tweak can turn a rejected photo into a top-seller!
Steps to Review Your Rejected Photo and Identify Issues
So, your photo didn’t make the cut on Shutterstock, huh? Don’t worry—this is a pretty common part of the process, and it’s actually a great opportunity to learn and improve. The key is to approach the rejection with a clear, analytical mindset. Here’s a step-by-step guide to help you review your photo effectively and pinpoint what might have gone wrong.
Step 1: Read the Rejection Notice Carefully
Start by carefully reading the rejection email from Shutterstock. They usually specify the reason or reasons why your image was declined—whether it’s due to technical issues, content policies, or other concerns. Understanding their exact feedback is essential before making any assumptions or changes.
Step 2: Compare Your Image Against Shutterstock’s Guidelines
Visit Shutterstock’s contributor guidelines and review their standards for quality, content, and technical specifications. Pay close attention to:
- Technical quality (sharpness, exposure, noise)
- Content appropriateness (no controversial or restricted themes)
- Model and property releases (if applicable)
- Composition and framing
- Color consistency and editing
Step 3: Examine Your Image Critically
Open your photo and analyze it objectively:
- Is the photo sharp and in focus? Are there any blur or motion artifacts?
- Are there any distracting elements or clutter that detract from the main subject?
- Is the lighting even and natural-looking? Or are there harsh shadows or blown-out highlights?
- Is the color balance accurate and appealing?
- Does the composition follow basic principles like the rule of thirds?
Sometimes, it helps to get a second opinion—ask a friend or fellow photographer to critique it honestly.
Step 4: Check for Content Issues
If your rejection was due to content, verify that your image doesn’t include any prohibited elements. For example, certain recognizable brands, logos, or sensitive content may be restricted. Ensure you have all necessary model or property releases if people or private property are featured.
Step 5: Make a List of Necessary Improvements
Based on your review, jot down specific issues that need fixing. For example:
- Sharpen the image
- Crop to improve composition
- Remove distracting background elements
- Adjust exposure and color balance
- Obtain model releases if needed
Taking these steps allows you to clearly identify what needs to be addressed before resubmitting. Remember, the goal is to align your photo with Shutterstock’s standards without losing the creative essence that makes it special.
Preparing Your Photo for Resubmission

Once you’ve identified the issues, it’s time to prepare your photo for a successful resubmission. The process involves fixing technical flaws, ensuring compliance with guidelines, and packaging your image properly. Here’s how to do it:
Step 1: Edit and Enhance Your Photo
Use a reliable photo editing software like Adobe Lightroom, Photoshop, or even free options like GIMP to improve your image. Focus on:
- Sharpening details where needed
- Correcting exposure and contrast
- Adjusting white balance for natural colors
- Removing noise or artifacts
- Cropping or straightening to improve composition
Be cautious not to over-edit—aim for a natural look that meets professional standards.
Step 2: Ensure Technical Specifications Are Met
- Resolution: Shutterstock recommends images at least 4 MP (megapixels), typically 3000 pixels on the long side.
- File Format: Save your photo as a JPEG with high quality (around 80-100%).
- Color Profile: Use sRGB color space for web and stock images.
- File Size: Keep it under 50MB for easy upload, but high enough quality for clarity.
Step 3: Check for Content Compliance
Verify your photo doesn’t violate any Shutterstock policies:
- Remove any inappropriate or sensitive content
- Ensure you hold all relevant releases if your image includes identifiable people or private property
- Make sure the content aligns with Shutterstock’s acceptable themes
Step 4: Write a Clear, Informative Description and Tags
When resubmitting, include relevant keywords, titles, and descriptions that accurately describe your image. Think about what buyers might search for. Use specific tags and avoid keyword stuffing. This can help your image get discovered more easily.
Step 5: Double-Check and Re-upload
Before hitting submit, review your image once more. Compare it to other successful images on Shutterstock to ensure quality and compliance. When you’re ready, upload the corrected version, fill out all metadata fields carefully, and submit it for review.
Remember, patience is key. Shutterstock’s review process can take a few days, but if you’ve addressed the issues thoroughly, your chances of acceptance increase significantly. Keep a positive attitude—every rejection is a step closer to mastering the art of stock photography!
How to Submit a Challenge for a Rejected Photo on Shutterstock
So, your photo didn’t make the cut on Shutterstock, but don’t worry — you have the option to challenge that rejection. Submitting a challenge is a straightforward process, and it’s your chance to clarify any misunderstandings or provide additional information that might sway the reviewers. Here’s how you can do it:
- Review the Rejection Details: First, carefully check the rejection email or message. Shutterstock usually provides a reason for the rejection, whether it’s due to technical issues, content restrictions, or metadata problems. Understanding the specific cause helps you formulate a strong challenge.
- Log into Your Contributor Dashboard: Head over to your Shutterstock contributor account and navigate to the “Rejected Files” section. Here, you’ll find your photo listed along with the rejection reason.
- Click on the “Appeal” Button: Next to your rejected photo, there should be an option to “Appeal” or “Challenge”. Click that to start the process.
- Provide a Clear Explanation: When submitting your challenge, be polite and concise. Explain why you believe your photo should be reconsidered. If you’ve made any adjustments (like fixing technical issues or clarifying metadata), mention these here.
- Attach Supporting Evidence (if applicable): If you have additional information, such as a higher-resolution version, model releases, or other documentation, upload these files to strengthen your case.
- Submit Your Appeal: Once everything is filled out, review your submission and click “Send”. Shutterstock’s review team will then reevaluate your photo, which might take several days.
Important Tips: Be respectful and professional in your communication. The reviewers are more likely to reconsider if your appeal is clear and polite. Also, avoid repeatedly submitting the same challenge without making any changes — focus on addressing the specific reasons for rejection first.
Tips for Increasing Your Chances of Approval on Resubmission
Facing rejection isn’t the end of the road — it’s an opportunity to learn and improve. When you resubmit your photo, it’s crucial to give it the best shot possible. Here are some practical tips to boost your chances of getting that green light on the second try:
- Address the Rejection Reason: Carefully review the feedback from Shutterstock. Whether it’s technical issues, composition, content restrictions, or metadata problems, make sure you fix these before resubmitting.
- Enhance Technical Quality: Ensure your image is sharp, well-exposed, and properly color-corrected. Use editing software to remove noise, adjust contrast, and straighten horizons if needed.
- Follow Shutterstock’s Content Guidelines: Make sure your image complies with Shutterstock’s content policies. For example, avoid copyrighted logos, trademarks, or sensitive content unless you have proper releases.
- Optimize Metadata and Keywords: Use accurate, relevant, and specific keywords. Well-crafted metadata helps reviewers understand the context of your photo, increasing the chance of approval.
- Crop and Compose Thoughtfully: Pay attention to composition and framing. Ensure your subject is clear and the image is visually appealing. Sometimes, minor adjustments in cropping can make a big difference.
- Use the Correct File Format and Size: Upload your photo in the required format (usually JPEG or TIFF) with the appropriate resolution and size. Follow Shutterstock’s technical specifications precisely.
- Seek Feedback Before Resubmitting: If possible, get an outside opinion from fellow photographers or online communities. Fresh eyes can spot issues you might have missed.
- Be Patient and Persistent: Sometimes, rejection happens for reasons beyond your control. If your resubmission is rejected again, review the feedback, make necessary improvements, and try again.
Remember, improving your image quality and understanding Shutterstock’s standards are key. Each challenge and resubmission is a learning opportunity that brings you closer to becoming a successful contributor. Keep refining your work, stay patient, and don’t be discouraged — persistence pays off!
Additional Resources and Support from Shutterstock
If you’re looking to improve your chances of success or need assistance navigating the rejection process, Shutterstock offers a variety of resources designed to support contributors like you. First, their Contributor Help Center provides detailed articles and FAQs covering common questions about photo submissions, rejection reasons, and how to resubmit effectively.
For personalized guidance, Shutterstock’s Contributor Support Team is available via email or live chat. They can help clarify specific rejection reasons and offer tailored advice to enhance your future submissions. Accessing this support is straightforward through your contributor dashboard.
Shutterstock also provides Educational Resources including webinars, tutorials, and best practice guides to help you understand industry standards, improve your photography skills, and optimize your metadata for better visibility.
| Resource | Description |
|---|---|
| Contributor Help Center | Comprehensive FAQs, articles, and submission guidelines |
| Support Team | Personalized assistance via email or live chat |
| Educational Webinars | Live and recorded sessions on photography and submission tips |
| Community Forums | Peer support, feedback, and sharing experiences with other contributors |
Engaging with these resources can significantly improve your understanding of Shutterstock’s standards and submission process. Remember, continuous learning and seeking help when needed are key to overcoming rejection hurdles and advancing your contributor journey.
In summary, leveraging Shutterstock’s comprehensive support tools and educational materials can empower you to refine your work and increase your chances of acceptance in future submissions.