If you’re new to WordPress or just stepping into the world of website design, you may have heard of Gutenberg Blocks. This innovative feature was introduced with WordPress 5.0 and revolutionizes the way we create and organize content. Instead of the classic editor where you’d type text and add media in a linear format, Gutenberg allows you to build your posts and pages using a modular approach. Think of it as playing with digital building blocks where each piece can be customized and rearranged to create stunning layouts effortlessly.
Understanding the Basics of Gutenberg
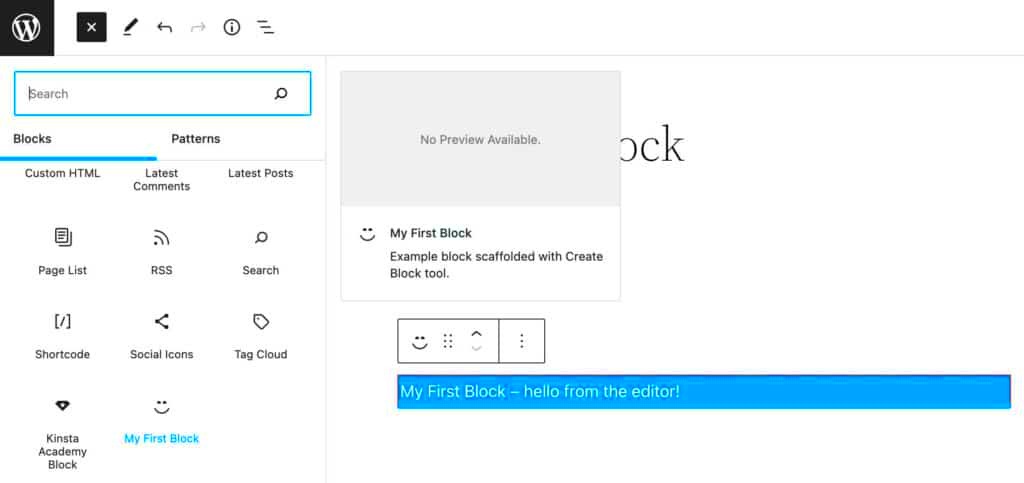
Let’s dive deeper into what makes Gutenberg so special. At its core, it’s all about *blocks*, each serving a distinct purpose. Here’s an overview to get you started:
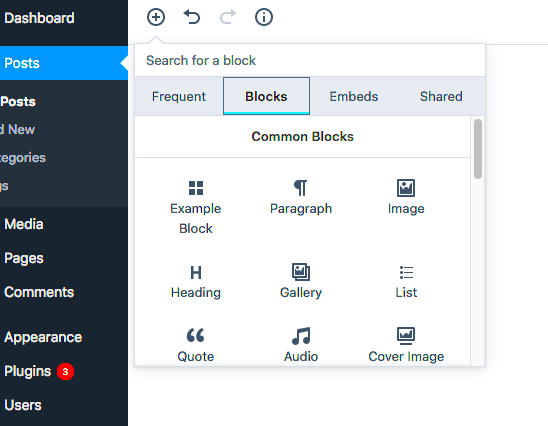
- Paragraph Block: This is your standard text block for paragraphs, allowing for basic formatting like bold and italic.
- Image Block: Use this block to add images easily. You can upload new images or select from your media library.
- Heading Block: Create headings and subheadings to structure your content effectively.
- Gallery Block: Group images together in a cohesive gallery layout.
- List Block: Perfect for bullet points or numbered lists to organize information neatly.
- Button Block: Easily create call-to-action buttons to direct your readers to specific actions.
Next, it’s important to understand how these blocks work together:
| Feature | Description |
|---|---|
| Drag and Drop: | Move blocks around with ease to arrange your content as you prefer. |
| Reusable Blocks: | Create blocks that can be saved and inserted across different posts or pages. |
| Customizable: | Apply specific styles and settings to each block, tailoring them to your design needs. |
In a nutshell, Gutenberg transforms the content creation experience in WordPress by allowing you to visually construct and customize your website with ease. So roll up your sleeves and get ready to build!
Benefits of Using Gutenberg Blocks
When it comes to building a website with WordPress, using Gutenberg blocks can be a game changer. This innovative editor allows you to create content in a modular way, making your site not only more appealing but also easier to manage. Let’s dive into some of the key benefits of using Gutenberg blocks:
- Intuitive User Interface: The block-based approach offers a drag-and-drop functionality, allowing users—regardless of their technical skill level—to create beautiful layouts with ease. You won’t need to fiddle with complex coding or plugins.
- Real-Time Previews: One of the best parts about using Gutenberg is seeing your changes in real-time. As you edit your content, you can instantly view how it will look, minimizing the risk of surprises once you hit publish.
- Flexible Layout Options: From text blocks to media embeds, Gutenberg provides a plethora of options to customize your layout. You can mix and match blocks, enabling you to create unique designs tailored to your brand’s identity.
- Improved Performance: Gutenberg blocks are optimized for speed and efficiency, resulting in improved site performance. This means quicker loading times, which is crucial for retaining visitors and improving SEO.
- Extensibility: There’s a wide range of third-party blocks available. If the default options don’t meet your need, you can always find additional blocks to enhance your functionality, like forms, galleries, or testimonials.
In summary, incorporating Gutenberg blocks into your WordPress website not only simplifies the content creation process but also enhances your site’s overall performance and flexibility.
Getting Started: Enabling Gutenberg in Your WordPress Site
If you’re eager to harness the power of Gutenberg blocks in WordPress, you’re in luck! Enabling Gutenberg is straightforward and doesn’t require any advanced technical skills. Let’s walk through the steps together:
- Check Your WordPress Version: Gutenberg is built into WordPress since version 5.0. Make sure your site is running this version or higher. You can verify this in your WordPress dashboard under Dashboard > Updates.
- Editing Posts and Pages: Once you’re sure you’re using an updated version, head to your posts or pages section. Click on Add New to create content. You’ll automatically see the Gutenberg editor!
- Toggle Between Editors: If you prefer the classic editor for any reason, don’t worry! You can switch back easily. Look for the Classic Editor option in your plugins and install it. You can toggle between Gutenberg and the classic editor as needed.
- Explore Available Blocks: Take some time to familiarize yourself with the variety of blocks available. Click on the plus (+) icon in the top left corner of the editor to open the block library.
- Customize Your Workspace: You can adjust your workspace layout to suit your preferences! Use the options in Settings to customize toolbar settings and display preferences.
And voilà! You’re all set to start creating stunning content with Gutenberg blocks in WordPress. Just remember to keep experimenting and have fun with it!
Exploring Default Gutenberg Block Options
One of the best things about WordPress’s Gutenberg editor is the variety of default blocks it offers. Whether you’re a seasoned developer or a newbie, these blocks provide a flexible framework for building visually appealing and effective content without any coding. Let’s dive into some of the most popular default block options available in Gutenberg.
- Paragraph Block: This is the most basic block, perfect for writing text content. You can easily format your text using the toolbar options that appear when you click on the block.
- Heading Block: Use this block to create headings and subheadings, which helps in organizing your content and improving SEO.
- Image Block: Upload or select an image from the media library to enhance the visual appeal of your post. You can also add alt text for accessibility.
- List Block: Great for creating bullet points or numbered lists. This feature helps in breaking down information into digestible bits.
- Quote Block: If you want to highlight a quote or testimonial, this block makes it simple and visually striking.
- Button Block: Adding a call-to-action button is a breeze. You can customize the text and link, drawing in more interaction from your readers.
- Cover Block: This block can be used to create an eye-catching header with a background image or color, often used to capture attention when readers land on your page.
Each of these blocks comes with various settings and customization options, allowing you to tweak them to best suit your content’s needs. Not only does this save time, but it also gives you the freedom to be creative!
Creating Custom Blocks: A Step-by-Step Guide
Creating custom blocks in WordPress Gutenberg can sound intimidating, but it’s a powerful way to enhance your site’s functionality and aesthetics. By building your own blocks, you can tailor the way your content is displayed, making your website truly unique. Below is a simple, step-by-step guide to get you started on your journey to custom blocks.
Step 1: Set Up Your Environment
Before diving into coding, ensure you have a local development environment ready. This is where you can experiment safely. Tools like Local by Flywheel or MAMP are great options!
Step 2: Create a Plugin or Theme
You can create custom blocks through a plugin or directly in your theme. For beginners, creating a simple plugin is usually easier:
1. Create a new folder in wp-content/plugins.2. Inside, create a PHP file (e.g., my-custom-blocks.php).3. Add the necessary plugin header info to that file.
Step 3: Enqueue Scripts and Styles
You’ll need to add JavaScript and CSS for your custom block. Use the following code to enqueue them in your plugin:
function my_custom_block_assets() { wp_enqueue_script('my-custom-blocks', plugins_url('block.js', __FILE__), array('wp-blocks', 'wp-element'), '1.0', true); wp_enqueue_style('my-custom-blocks-style', plugins_url('style.css', __FILE__));}add_action('enqueue_block_editor_assets', 'my_custom_block_assets');
Step 4: Register Your Block
In your JavaScript file, you’ll want to use the following code to register your block:
const { registerBlockType } = wp.blocks;registerBlockType('my-plugin/my-custom-block', { title: 'My Custom Block', icon: 'smiley', category: 'widgets', edit: () => Hello from my custom block!
, save: () => Hello from my custom block!
});
Step 5: Test Your Block
Now that everything is set up, it’s time to test! Activate your plugin from the WordPress dashboard, and you should see your custom block available in the Gutenberg editor. Try dragging and dropping it to see how it works!
And there you have it! Creating custom blocks is not only functional but can also be an enjoyable process. As you get familiar with it, the possibilities for customization are endless. Happy building!
Best Practices for Designing with Gutenberg Blocks
Designing with Gutenberg blocks can be a pleasurable experience, especially when you adhere to best practices that not only enhance the aesthetics but also improve user experience. Here are some effective strategies that can guide you in creating visually appealing and functional pages:
- Keep It Simple: It’s tempting to use many blocks, but less is often more. Aim for a clean layout that focuses on essential content.
- Consistent Styles: Stick to a consistent color palette and font choices throughout your blocks to maintain a cohesive look across the website.
- Utilize Spacing: Be mindful of padding and margins. Adequate spacing prevents clutter and enhances readability.
- Responsive Design: Test your block layouts on various devices. Ensure that content is displayed clearly on mobile, tablet, and desktop screens.
- Accessible Content: Use proper heading structures (H1, H2, H3) and alternatively text for images to support users with disabilities.
- Preview Often: Regularly preview your changes as you edit. This can save you from making design choices that may not work visually when published.
By following these best practices, you can create engaging and effective content that not only looks great but also fulfills its purpose. Remember, the goal of using Gutenberg is to make the design process intuitive while delivering the best experience to your visitors.
Enhancing Functionality with Plugins and Block Libraries
One of the charming features of WordPress Gutenberg is its extensibility through plugins and block libraries. This opens up a wealth of functionalities to enhance your website without needing to dive deep into coding. Here are some critical ways to elevate your Gutenberg experience:
- Additional Block Libraries: Explore libraries like Stackable or CoBlocks, which offer extra pre-designed blocks that add customization and functionality.
- Custom Block Development: If you have specific needs, consider creating custom blocks using WordPress’s Block API, giving you total control over any unique functionalities.
- SEO Optimization Plugins: Leverage plugins like Yoast SEO or All in One SEO to enhance your page’s visibility in search engines directly through your Gutenberg editor.
- Form Plugins: Integrate plugins like Gravity Forms or WPForms to easily add contact forms or registration forms directly into your blocks.
- Performance Enhancement: Use caching or performance optimization plugins to ensure that your beautifully designed blocks don’t slow down your site.
With the right combination of plugins and block libraries, you can significantly elevate the functionality of your Gutenberg-designed website. Embrace the flexibility, experiment with different tools, and watch your site come to life!
Common Issues and Troubleshooting Tips
Building with Gutenberg blocks in WordPress can be a smooth experience, but like any tool, you may encounter a few bumps along the way. Here are some common issues users face and handy troubleshooting tips to help you get back on track.
- Blocks Not Loading Properly: Sometimes, you might notice that certain blocks aren’t rendering or loading correctly. This can be due to a few reasons:
- Cache Issues: Clear your browser cache and refresh the page.
- Plugin Conflicts: Disable all plugins and reactivate them one by one to find the culprit.
- Theme Compatibility: Switch to a default WordPress theme (like Twenty Twenty-One) to check if the issue persists.
- Performance Slowdowns: If your site is running a bit sluggish, it might be due to heavy blocks or excessive use of images. Consider optimizing your images and limiting the number of blocks on a page.
- Content Formatting Issues: Sometimes, the formatting might go awry, making your content look different than intended. Always preview your post before publishing and use the “Group” and “Column” blocks to help structure your layout more clearly.
- Missing Block Options: If you notice some block settings are missing, be sure you’re updated to the latest version of WordPress and check settings within your block for any hidden options.
Remember, WordPress has a vibrant community and lots of resources. Don’t hesitate to visit forums or support pages if you’re stuck!
Conclusion: The Future of Content Creation with Gutenberg
As we look ahead, it’s clear that Gutenberg is reshaping how we think about content creation on WordPress. The block-based approach not only simplifies the editing process but also empowers users to create more visually appealing and flexible layouts.
With its modular design, Gutenberg opens the door to endless creative possibilities, allowing both seasoned developers and beginners to craft unique experiences without the need for extensive coding knowledge. Here’s a quick glimpse of what the future may hold:
| Aspect | Vision |
|---|---|
| Advanced Block Options | Expect more customizable options, allowing users to tweak blocks further to align with their brand. |
| Integration with Third-Party Tools | Integration with popular marketing and design tools will enhance functionality within the Gutenberg editor. |
| AI-Assisted Content Creation | The potential for AI to assist in block suggestions and content generation could revolutionize how we write. |
In conclusion, as developers continue to enhance Gutenberg, the way we create and interact with content will only become more dynamic. So, whether you’re a casual blogger or a professional developer, embracing this change will not only make your content creation process more enjoyable but also push the boundaries of what you can achieve!

