Are you looking to add a touch of interactivity to your website? Google Maps in Elementor can be a game-changer! With its user-friendly interface, Elementor allows you to integrate maps directly into your pages, making it simple to showcase locations, such as stores, services, or event venues. Whether you’re a blogger wanting to highlight travel destinations or a business owner eager to show your clients where to find you, using Google Maps in
Benefits of Using Multiple Pins

When you utilize multiple pins on your Google Maps integration, you’re unlocking a whole new level of functionality and engagement for your website. Let’s dive into some of the key benefits:
- Enhanced Navigation: Multiple pins allow users to easily navigate between different locations. This is particularly useful for businesses with several branches or services in various areas.
- Improved User Engagement: Maps with multiple points of interest can captivate your audience, encouraging them to explore various locations, which keeps them on your page longer.
- Informative Experience: Each pin can hold specific information like addresses, contact details, and reviews, helping users make informed decisions without leaving your site.
- Visual Appeal: A map with various pins adds a dynamic visual element to your site, making it look more professional and interactive.
- Customizability: You can customize pins to reflect your brand colors or styles, ensuring that they fit seamlessly within your website’s aesthetics.
In conclusion, using multiple pins in Google Maps can provide a rich, engaging experience for your visitors and showcase all the great places you want to highlight.
Setting Up Google Maps in Elementor

Setting up Google Maps in Elementor is a straightforward process that can dramatically enhance the functionality of your website. It allows you to visually represent locations, making it easier for users to navigate to your business or any other significant spots. Here’s how to get started:
- Ensure You Have an API Key: Before you begin, you need a Google Maps API key. To obtain one, go to the Google Cloud Console, create a new project, and enable the Maps JavaScript API. This key will be essential for displaying maps on your site.
- Open Elementor: Navigate to the page you want to edit and click on ‘Edit with Elementor’. This action will open the Elementor editor, providing a variety of widgets on the left-hand panel.
- Drag and Drop the Google Maps Widget: In the Elementor sidebar, locate the “Google Maps” widget. Simply drag and drop it into your desired section of the page.
- Configure the Map Settings: Once you’ve placed the widget, you’ll see options to customize the map. Here you can enter your API key, adjust the map’s height and width, and set the default location by entering an address or coordinates.
- Stylize the Map: Utilize the ‘Style’ tab to modify the map’s appearance. You can adjust borders, box-shadow, and add custom widths to match your site’s overall aesthetic.
With these steps, you should have Google Maps set up effectively on your Elementor page. Now, let’s talk about how to add multiple pins, so you can highlight several locations seamlessly!
Adding Multiple Pins to Your Map
Adding multiple pins to your Google Maps in Elementor is a fantastic way to showcase various locations related to your business or any points of interest you want to share with your audience. It’s as simple as a few extra clicks! Let’s break it down:
- Return to Google Maps Settings: Click on the Google Maps widget you previously added. In the section dedicated to the map’s settings, you will find the option to add multiple locations.
- Add New Locations: Under the “Locations” section, you’ll have fields to input multiple addresses. Enter each address where you want a pin to appear. After entering an address, hit ‘Add Location’ to insert more pins.
- Customize Each Pin: For each location you add, you can customize the pin’s title and description. This feature allows users to get more context about what each pin represents. Be sure to include engaging information!
- Set a Default Center Point: You may want to set a default location for the map’s viewport to center on. This could be one of your key locations or a midpoint between all the addresses you’ve added.
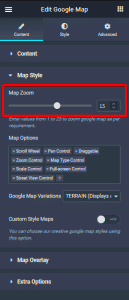
- Adjust the Zoom Level: Don’t forget to set an appropriate zoom level. This zoom should be conducive to displaying all your pins clearly without overcrowding.
And that’s it! With just a few tweaks, you’ll have multiple pins on your Google Maps embedded through Elementor. This functionality not only enhances user experience but also allows you to effectively showcase your business’s various locations. Happy mapping!
Customizing Pin Icons and Information
When it comes to enhancing the functionality of your Google Maps in Elementor, customizing pin icons and the information displayed on them can significantly improve user experience. Personalization not only makes your map visually appealing but also helps convey relevant information effectively.
To customize your pin icons, Elementor provides a variety of options. Here’s how you can go about it:
- Choose from Pre-made Icons: Elementor allows you to select from a gallery of pre-made pin icons. You can browse through various shapes and colors to match your website’s branding.
- Upload Custom Icons: If you want something unique, you can upload your custom pin icons. Just make sure they’re in an acceptable format like PNG or SVG to maintain quality.
- Size and Position: Adjust the size of your pins according to your map’s design. Make sure they don’t overwhelm the map but are still large enough to catch the user’s attention.
Now, let’s talk about the information displayed on each pin. With Elementor, you can easily add descriptions, images, and even links that pop up when a user clicks on a pin. Here’s what you can include:
- Title of the Location: Make sure the title is clear and informative.
- Description: Include a brief description to give users more context. You can specify services offered or interesting facts about the location.
- Images: A picture speaks a thousand words! You can upload images to make the information more engaging.
- Links: If you want users to take action, like visiting your website or making a reservation, including links is a smart move.
In short, customizing pin icons and the information on your Google Maps is an easy yet powerful way to enhance user engagement and provide valuable insights for your visitors.
Responsive Design Considerations
Responsive design is a crucial aspect of web development today, and when you’re embedding Google Maps in Elementor, it’s essential to ensure that your map looks great and functions well on all device sizes. If your map isn’t responsive, you risk users struggling to navigate it, which can lead to a frustrating experience.
Here are some key considerations to keep in mind:
- Viewport Settings: Make sure you adjust the viewport settings in Elementor. This ensures that your map scales appropriately on different screens, maintaining proportions without distorting.
- Pin Size and Layout: While customizing pins, ensure they remain legible and clickable on mobile devices. Bigger icons are more user-friendly for touch screens.
- Info Window Efficiency: When users click on a pin, an info window pops up. Make sure that the content within this window is easy to read and doesn’t overflow the screen on smaller devices.
To test responsiveness, utilize Elementor’s Responsive Mode feature. It allows you to preview your design on various devices, such as desktops, tablets, and smartphones. Here’s a quick checklist:
| Device Type | Checkpoints |
|---|---|
| Desktop | Ensure all elements are visible; check the overall aesthetics. |
| Tablet | Test clickable areas; verify that info windows are appropriately sized. |
| Mobile | Make sure everything is fingertip-friendly; check for text overflow. |
By paying attention to responsive design considerations, you ensure that your Google Maps experience is seamless for every visitor, no matter how they access your site. A responsive map is crucial to keeping users engaged and informed–something every online business aims for!
Best Practices for Integrating Maps with Your Content
When it comes to integrating Google Maps into your website using Elementor, there are several best practices to keep in mind. These practices not only enhance user experience but also ensure that your map serves its purpose effectively.
- Keep It Relevant: Ensure that the maps you use are relevant to the content on your page. If you’re discussing locations or services, a map can provide valuable context.
- Limit the Number of Pins: Too many pins can clutter your map and confuse users. Aim for a clear, straightforward display that highlights key locations without overwhelming the viewer.
- Optimize for Mobile: With a significant portion of web traffic coming from mobile devices, ensure your maps are responsive. Test how your map looks on different screen sizes and adjust as needed.
- Highlight Call-to-Action: If your map serves a specific purpose, like directing users to your business, accompany it with clear call-to-action prompts. This could be buttons like ‘Get Directions’ or ‘Visit Us’.
- Provide Contextual Information: Along with the map, offer brief descriptions or information related to the locations. This could include opening hours, contact information, or special services offered at each location.
By following these best practices, you’ll create a seamless experience that incorporates maps into your content effectively, leading to better engagement and satisfaction for your users.
Troubleshooting Common Issues
Integrating Google Maps in Elementor usually goes smoothly, but sometimes users may encounter issues. Understanding these common problems and knowing how to fix them can save you a lot of headaches.
| Issue | Possible Causes | Solutions |
|---|---|---|
| No Map Displayed | API key issues or incorrect shortcode. | Check if your Google Maps API key is correctly entered and has billing enabled. |
| Map Zoom Level Issues | Incorrect zoom settings in Elementor. | Adjust the zoom level in the map settings to ensure that the key locations are properly displayed. |
| Markers Not Showing | Improper coordinates or missing location data. | Review the coordinates and ensure that the pins are correctly set within Elementor. |
| Slow Loading Map | Heavy website load or outdated plugins. | Optimize your website for speed and ensure all plugins are updated. |
If you encounter any of these issues, don’t panic! Just follow the provided solutions, and you’ll be back on track in no time.
Conclusion and Further Resources
Using multiple pins in Elementor Google Maps can significantly enhance the user experience on your website, making it more interactive and informative. This feature allows you to showcase various locations pertinent to your business, events, or service areas, providing a visual representation that guides users effectively. By following the steps outlined in this guide, you can easily integrate multiple pins into your Elementor Google Maps, tailoring it to meet your specific needs. Here are some essential considerations and resources for further exploration:
- Customization: Experiment with different icons, colors, and pop-up content for your pins to improve clarity and engagement.
- Responsive Design: Ensure that your Google Maps display well on both desktop and mobile devices for a seamless user experience.
- SEO Benefits: Utilize Google Maps for local SEO by embedding your maps with multiple pins to enhance visibility in local searches.
- User Interaction: Consider adding custom info windows that provide extra detail, including images, links, or contact information related to each pin.
| Resource | Description |
|---|---|
| Elementor Google Maps Widget Help | A comprehensive guide on using the Google Maps widget in Elementor. |
| Google Maps JavaScript API | Official documentation for the Google Maps API to learn more about advanced features. |
In conclusion, mastering the art of using multiple pins in Elementor Google Maps can greatly enhance your website’s functionality and information delivery, while the resources listed above will assist you in further refining your skills.


