Have you ever visited a website and noticed that the menu stays at the top of your screen as you scroll down? That’s what a sticky menu is! These menus provide a simple yet effective way to enhance user experience on your WordPress site. Instead of having to scroll back up to access navigation options, users can easily find what they’re looking for right at their fingertips. In this blog post, we’ll explore some fantastic free sticky menu plugins for WordPress that can help you implement this feature effortlessly.
Benefits of Using Sticky Menus on Your Website

So, why should you consider adding a sticky menu to your website? Here are some compelling benefits:
- Improved User Experience: Sticky menus enhance navigation, making it easy for visitors to find their way around your site. No more endlessly scroll up and down!
- Increased Engagement: By keeping essential links visible, sticky menus encourage longer visits and deeper engagement with your content.
- Better Accessibility: A sticky menu ensures that navigation is accessible at all times, catering to users on mobile devices and desktops alike.
- Brand Visibility: A sticky header can include your logo and branding elements, keeping your brand in the user’s view at all times.
- Enhanced Conversion Rates: With quick access to important pages such as contact forms or product categories, sticky menus help in guiding users towards making conversions.
Incorporating a sticky menu into your site not only makes it look modern and functional but also contributes to achieving your overall website goals, whether they involve engagement, sales, or brand awareness. With numerous free sticky menu plugins available for WordPress, you can easily set up one that suits your needs.
Top Free Sticky Menu Plugins for WordPress
Choosing the right sticky menu plugin can dramatically enhance your website’s navigation and user experience. Luckily, there are several free options available that can help you create a sleek and functional sticky menu without breaking the bank. Here’s a look at some of the top free sticky menu plugins for WordPress that you can easily integrate into your site:
- myStickymenu – A simple yet effective plugin, myStickymenu allows you to make your menu stick to the top of the page as users scroll down. You can customize the background color and top spacing to suit your design.
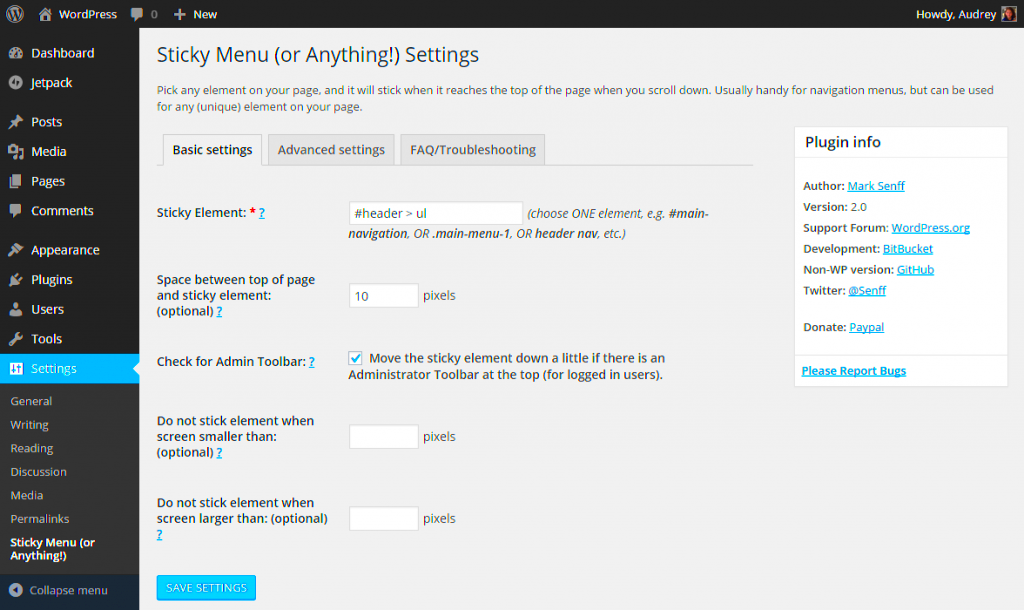
- Sticky Menu (or Anything!) on Scroll – This versatile plugin is not just limited to menus! You can choose to make any element sticky. It offers robust customization options, including responsive settings, which make it perfect for all devices.
- WP Sticky – WP Sticky offers an easy way to create sticky headers and menus. The intuitive drag-and-drop interface makes it super user-friendly, allowing you to configure settings without any coding knowledge.
- Q2W3 Fixed Widget – While primarily designed for widgets, this plugin can also be used for menus. It helps in keeping your specific widgets fixed on the page as users scroll, enhancing the overall usability of your site.
- Sticky Menu for WP – A straightforward plugin that does the job. It’s particularly useful for those new to WordPress, featuring easy-to-follow settings and compatibility with most themes.
With these options at your fingertips, you can ensure that your visitors will easily navigate your website, leading to a more engaging and enjoyable user experience.
How to Install and Configure Sticky Menu Plugins
Installing and configuring sticky menu plugins in WordPress is a straightforward process. Don’t worry if you’re not tech-savvy; I’ll guide you step-by-step! Here’s how to get started:
- Step 1: Login to Your WordPress Dashboard – First, you need to log into your WordPress admin panel. You can do this by visiting yourwebsite.com/wp-admin.
- Step 2: Go to Plugins – On the left sidebar of your dashboard, click on the “Plugins” option, then select “Add New.”
- Step 3: Search for the Plugin – In the search bar, type the name of the sticky menu plugin you want to install (for example, “myStickymenu”).
- Step 4: Install the Plugin – Once you find your desired plugin, click the “Install Now” button. After the installation completes, click “Activate” to make the plugin live on your site.
- Step 5: Configure Plugin Settings – Each plugin will have its own settings interface. Typically, you can find this under the “Settings” section or directly under the plugin name on the sidebar. Customize the options such as sticky behavior, appearance, and responsiveness according to your needs.
- Step 6: Preview and Test – After configuring your settings, visit the front end of your site. Scroll down to see your new sticky menu in action! Make sure everything looks good and functions properly on different devices.
And there you have it! With just a few easy steps, you can install and configure a sticky menu plugin on your WordPress site, improving both aesthetics and functionality for your visitors.
5. Comparing the Features of Recommended Plugins
If you’re diving into the world of sticky menu plugins for WordPress, you’re in for a treat! There are several options available, each boasting a unique set of features that can help enhance user experience on your site. Let’s break down some popular choices to give you a clearer picture.
| Plugin Name | Key Features | User Rating |
|---|---|---|
| myStickymenu |
|
4.8/5 |
| WP Sticky |
|
4.7/5 |
| Sticky Menu (or Anything!) on Scroll |
|
4.6/5 |
When choosing the right sticky menu plugin, you want to consider your site’s design and whether you need particular features like responsiveness or compatibility with certain themes. By comparing plugins side by side, you can make an informed choice that best suits your needs!
6. Tips for Optimizing Your Sticky Menu
Once you’ve selected a sticky menu plugin for your WordPress site, it’s time to optimize it for maximum impact. A well-configured sticky menu can greatly enhance navigation and user experience, so here are some handy tips to get you started:
- Keep It Simple: A sticky menu should make navigation easier, not clutter your page. Limit the number of items in your menu to avoid overwhelming visitors.
- Choose the Right Visibility: Decide when your sticky menu should appear. Consider enabling it only after scrolling a certain amount down the page to prevent it from interfering with the initial viewing experience.
- Responsive Design: Ensure your menu looks good on all devices. Test it on various screen sizes to confirm it doesn’t lose functionality or aesthetics on mobile devices.
- Regularly Review Analytics: Keep an eye on your site’s analytics. This data can provide insights into how well your sticky menu is performing and if it’s providing the intended benefits.
- Use Clear Labels: Make sure each menu item is labeled clearly. Avoid jargon or overly clever phrases that might confuse visitors.
By keeping these tips in mind, you can not only enhance the usability of your sticky menu but also contribute to a smoother, more enjoyable browsing experience for your site visitors!
7. Common Issues and Troubleshooting Tips
Using sticky menu plugins can greatly enhance the navigation experience on your WordPress site. However, like any other tool, they may come with their own set of challenges. Here are some common issues you might encounter and some handy troubleshooting tips to get you back on track:
- Menu Overlap: Sometimes, a sticky menu can overlap with other elements on the page. This might happen if your theme has custom positioning.
Tip: Check the z-index property in your CSS to ensure that your menu is on top of other elements. - Incompatibility with Themes: Not all sticky menu plugins work seamlessly with every WordPress theme.
Tip: Test different plugins to see which one fits your theme best or consider contacting the theme’s support for assistance. - Mobile Responsiveness: Some menus might not appear sticky on mobile devices, resulting in a frustrating user experience.
Tip: Review the responsive settings of your plugin. Ensure that it’s configured to activate on mobile screens. - Slow Loading Times: If your site experiences sluggishness after adding a sticky menu plugin, it could lead to high bounce rates.
Tip: Optimize your images and scripts and consider using caching plugins. - Error Messages: Occasionally, you might encounter error messages during installation or use.
Tip: Try deactivating other plugins to see if there’s a conflict, or check the plugin’s support forums for similar issues.
By keeping these common issues and solutions in mind, you can ensure your sticky menu operates smoothly, enhancing your website’s navigation without a hitch!
8. Conclusion: Choosing the Right Sticky Menu Plugin for Your Needs
When it comes to enhancing your WordPress site, a sticky menu can be a game-changer. But with so many options available, how do you choose the right one? Here are a few key considerations:
- Ease of Use: Look for a plugin that offers a user-friendly interface. The last thing you want is to struggle with complicated settings.
- Customization Options: A good sticky menu plugin should offer various styling options to match your site’s aesthetics. This includes colors, fonts, and hover effects.
- Responsiveness: Make sure the plugin works seamlessly across different devices. A sticky menu that looks great on desktop but terrible on mobile isn’t going to serve your audience well.
- Support and Updates: Opt for a plugin that’s regularly updated and comes with solid support. This ensures compatibility with future WordPress updates and provides assistance if you encounter issues.
- Reviews and Ratings: Take a look at the reviews and ratings to gauge how other users feel about the plugin. Often, real user experiences can give you insight into potential issues or benefits.
Ultimately, the best sticky menu plugin is one that fits your specific needs, enhances user experience, and aligns with your website’s goals. Try out a few free options, test their features, and see which one feels right for you. Happy plugin hunting!


