If you’re running a WordPress site, you might have noticed that your emails sometimes end up in the spam folder or, worse yet, don’t get delivered at all. This can be particularly frustrating if you’re trying to communicate with your audience through newsletters, contact forms, or order confirmations. In this guide, we’re going to walk you through the process of setting up SMTP with Gmail for your WordPress site. Trust me, by the end, you’ll feel empowered to ensure your emails reach their destination reliably!
Why Use SMTP for WordPress?

When it comes to sending emails from WordPress, using the built-in mail function isn’t always the best option. Here’s why switching to SMTP (Simple Mail Transfer Protocol) is a game changer:
- Improved Deliverability: SMTP helps ensure that your emails are delivered reliably, minimizing the chances of them ending up in spam. When you use Gmail’s SMTP server, you benefit from Google’s reputation for email deliverability.
- Enhanced Security: SMTP provides a more secure environment for sending emails. Using authentication methods protects your credentials and prevents unauthorized access.
- Better Tracking: With SMTP, you can often gain access to tracking features that show when your emails were opened or clicked. This can be essential for measuring your marketing efforts.
- Compatibility with Plugins: Many popular WordPress plugins, such as WooCommerce, contact form plugins, and newsletter systems, work seamlessly with SMTP, ensuring that transactional and promotional emails are sent correctly.
- Easier Troubleshooting: If there’s an issue with your emails not sending, SMTP can provide better error messages, making it easier to troubleshoot and fix the problem.
Overall, using SMTP adds that extra layer of reliability and professionalism to your WordPress site’s email communications. It’s a small step that makes a big difference!
3. Prerequisites for Setting Up SMTP with Gmail

Before diving into the nitty-gritty of setting up SMTP with Gmail for your WordPress site, there are a few essential prerequisites you’ll need to check off your list. Taking care of these will ensure a smooth and successful process, allowing your site to send emails without a hitch.
- WordPress Site: Naturally, you’ll need a running WordPress site. Whether it’s self-hosted or through WordPress.com, make sure you have admin access.
- Gmail Account: You’ll need a Gmail account to utilize Google’s SMTP server. If you don’t have one, creating one is easy and free!
- SMTP Plugin: You’ll need a suitable SMTP plugin installed on your WordPress site. Some popular choices include WP Mail SMTP and Easy WP SMTP. You can find these in your WordPress dashboard under “Plugins” > “Add New.”
- Email Sending Limitations: Familiarize yourself with the limitations Google imposes on SMTP usage. As of 2023, Gmail has a daily sending limit of 500 emails per day for standard accounts, so keep this in mind!
- Two-Factor Authentication (Optional): While optional, enabling 2FA on your Gmail account is advisable for added security, and it can be configured with App Passwords for even safer email sending.
Make sure you’ve ticked off these prerequisites, and you’ll be ready for the next steps in setting up SMTP with your Gmail account!
4. Step 1: Enable Less Secure Apps in Google Account

To make sure your WordPress site can communicate with Gmail’s SMTP servers, you’ll need to enable the “Less Secure Apps” option. Now, this might sound a tad worrisome, but don’t fret—this setting allows applications like your WordPress site to connect without undergoing rigorous security verifications. Here’s how to do it:
- Log in to your Gmail Account: Open your web browser and log into the Gmail account that you want to use for sending emails.
- Go to Google Account Settings: Click on your profile picture in the top right corner, then select “Manage your Google Account.”
- Navigate to Security: Once you’re in your account settings, click on the “Security” tab that’s located on the left sidebar.
- Find Less Secure App Access: Scroll down until you see “Less secure app access.” In some accounts, you may have to pull up the “Access and security” or something similar in the menu.
- Enable Access: You’ll see an option to allow less secure apps. Click the toggle to turn it ON. This will allow WordPress to send emails through your Gmail account.
Note: If you have Two-Factor Authentication enabled, you’ll need to create an App Password instead of using the “Less Secure Apps” option.
Once you’ve done this, you’re well on your way to setting up WordPress SMTP with Gmail! Stay tuned for the next steps, where we’ll guide you through configuring your SMTP plugin!
Step 2: Configure Your WordPress Site
Now that you have your Gmail account ready for SMTP access, it’s time to dive into the configuration settings of your WordPress site. Configuring your site correctly is crucial for ensuring that emails sent from your site reach your inbox without getting lost in the vast ocean of the internet!
Here’s a simple guide to help you configure your WordPress site for SMTP:
- Access Your WordPress Dashboard: First things first, log in to your WordPress dashboard. This is your control center where you can manage all aspects of your site.
- Navigate to Settings: On the left-hand side menu, hover over the “Settings” option and then click on “General.” Here, you will set the email address that is used for sending messages.
- Update Your Email Address: In the “Email Address” field, put the email address you will be using with Gmail. Make sure this address is valid and active so that you can receive notifications and messages.
Once you’ve updated your email address, don’t forget to scroll down and click on the “Save Changes” button. This ensures all your alterations are locked in. Next, to test if your setup is correct, you may want to check your email settings through your SMTP plugin, which we’ll cover in the next step.
Step 3: Install and Activate an SMTP Plugin
Alright! Now that you’ve configured your WordPress site settings, the next step is to install and activate an SMTP plugin. This part is essential because it bridges the gap between your WordPress site and Gmail’s SMTP server, ensuring that your emails are sent smoothly and securely.
Let’s walk through the process of installing and activating an SMTP plugin:
- Choose an SMTP Plugin: There are several SMTP plugins available, but we recommend WP Mail SMTP due to its popularity and ease of use. You can also explore alternatives like Easy WP SMTP or Post SMTP Mailer/Email Log.
- Install the Plugin: From your WordPress dashboard, navigate to “Plugins” in the sidebar. Click on “Add New” and search for “WP Mail SMTP.” When you find it, simply click the “Install Now” button.
- Activate the Plugin: Once the installation is complete, click “Activate” to enable the plugin on your site.
After activation, you might see a new menu item for WP Mail SMTP in your WordPress dashboard. This is where the magic happens!
To summarize, getting the right SMTP plugin is crucial for efficient email communication. Take your time to explore the settings, and don’t hesitate to reach out to their support if you run into any hiccups. You’re doing great; just a few more steps to go!
Step 4: Configure the SMTP Plugin
Now that you’ve installed your chosen SMTP plugin, it’s time to configure it. Don’t worry, it’s usually a straightforward process! Let’s break it down into manageable steps:
- Access the Plugin Settings: Navigate to your WordPress dashboard, and find the SMTP plugin you’ve just installed. You can usually find it under ‘Settings’ or ‘Plugins’ in the left sidebar.
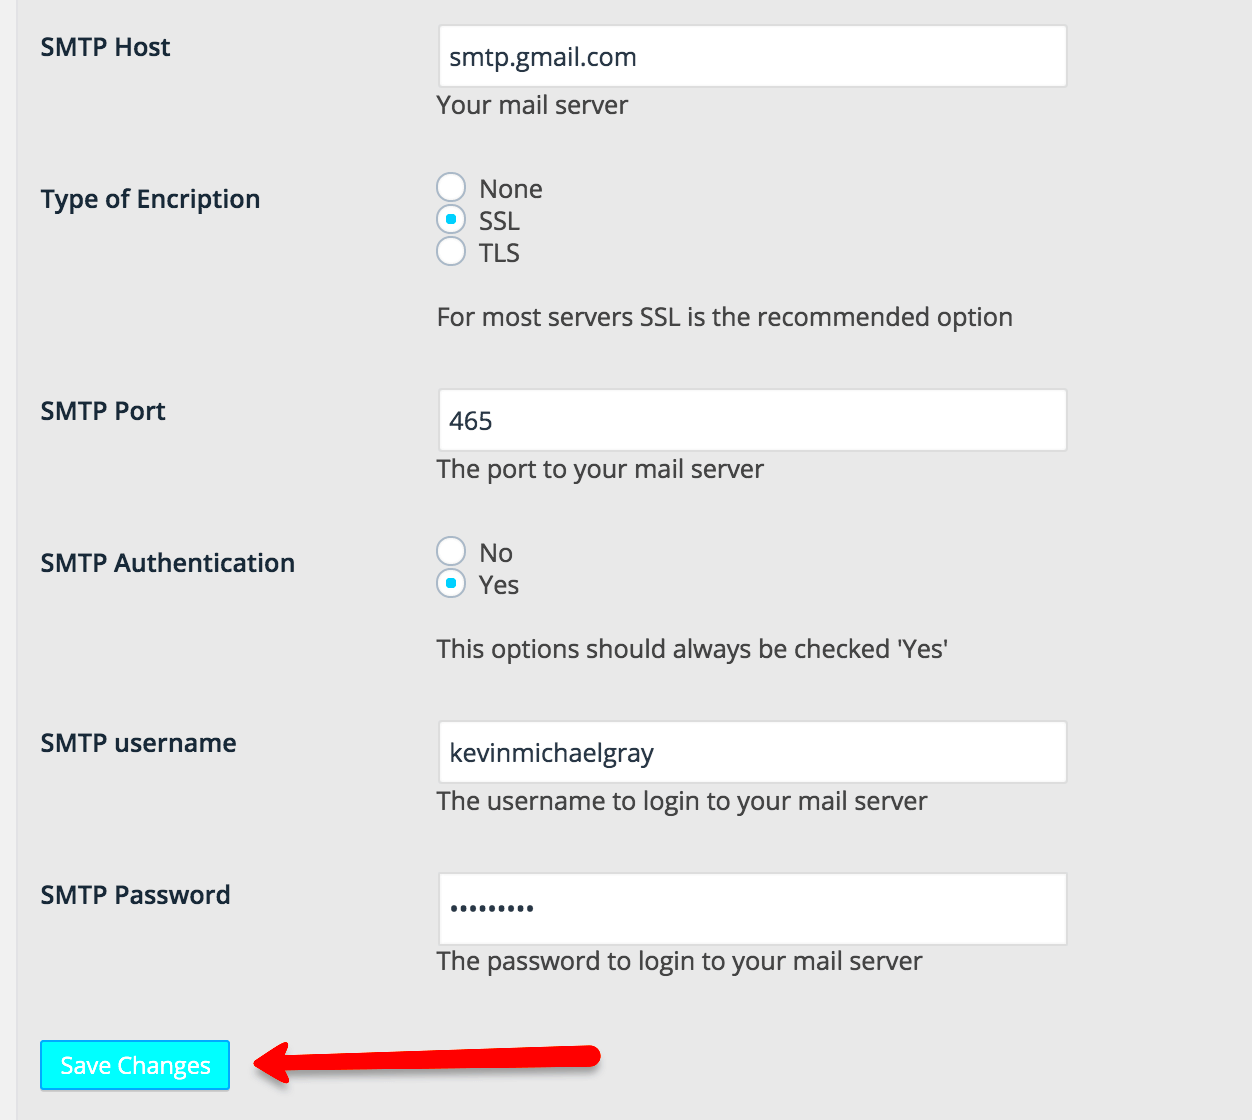
- Enter SMTP Host Details: In the plugin settings, you’ll need to enter the SMTP host. For Gmail, this is smtp.gmail.com. It’s the main office responsible for sending out your emails!
- Set the SMTP Port: The standard port for Gmail SMTP is 587 when using TLS (recommended) or 465 for SSL. Pick the one that best fits your security needs.
- Enable Authentication: Make sure to turn on authentication for your SMTP settings. This means your WordPress site will need to login to your Gmail account to send emails.
- Input Your Gmail Credentials: Here’s where you’ll insert your Gmail address and the app password (if you’ve enabled two-factor authentication). Remember, using an app password instead of your main password is crucial for security!
- Test the Configuration: Many plugins offer a testing feature. Look for a button to send a test email. This will help you confirm everything is working before you conclude the setup.
With these configurations, your SMTP plugin should be all set to send emails through your Gmail account. How easy was that?
Step 5: Test Your SMTP Settings
Alright, you’ve done all the heavy lifting in setting up the SMTP plugin, but before you start sending out emails, it’s crucial to test those settings. Here’s how:
- Locate the Test Email Function: In your SMTP plugin settings, there should be an option for sending a test email. This is usually labeled something like “Send Test Email” or “Test Configuration.” Go ahead and find that.
- Input Test Recipient Email: Enter an email address where you’d like to receive a test email. This could be your primary email or a secondary one, just to see if everything is functioning well.
- Send the Test Email: Click the button to send. This can feel a bit nerve-wracking, but don’t worry; you’ve got this! Just tap that button and watch the magic happen.
- Check Your Inbox: Almost instantly, check the inbox of the email address where you sent the test. You should receive an email confirming your setup. If you see it, congratulations! Your SMTP plugin is working like a charm!
- Troubleshooting: If you don’t see the email in your inbox, make sure to check your spam folder. If it’s not there either, revisit your SMTP settings. Common issues involve incorrect credentials or server settings.
Testing your SMTP settings is crucial. Not only will it save you headaches later, but it also ensures that your emails will reach your audience reliably. So go ahead, give it a go!
Troubleshooting Common Issues
Setting up WordPress SMTP with Gmail can sometimes lead to a few hiccups along the way. But don’t worry! Many of these issues are pretty straightforward to resolve. Here’s a handy guide on some common problems you might encounter and how to fix them.
- Emails Not Sending: If you’re finding that emails are not reaching recipients, double-check your SMTP settings. Ensure that you have entered the correct Host, Port, Username, and Password. Sometimes, small typos can create big headaches!
- Authentication Errors: If you see error messages indicating authentication failures, your credentials could be off. Make sure your Gmail password is entered correctly. If you’re using two-factor authentication (2FA), ensure you’re using an App Password instead of your standard password.
- Connection Timeouts: If your emails take forever to send or you get timeout error messages, it might be an issue with server connections. Check your internet connection and make sure your firewall settings allow outgoing SMTP ports like 587 or 465.
- Spam Folder Issues: Sometimes, emails sent through SMTP might land in the spam folder. If you notice this happening, encourage your recipients to mark your emails as ‘not spam’ or whitelist your email address to improve deliverability.
- Gmail Sending Limits: Remember, Gmail has sending limits. If you exceed these limits, emails will not go through until the limit resets. It’s generally 500 emails per day for personal accounts and 2,000 for G Suite accounts.
By following these troubleshooting tips, you’ll likely clear up any issues and get your SMTP setup working smoothly!
Conclusion
In wrapping up, setting up WordPress SMTP with Gmail can be an immensely beneficial step for your website and its communication needs. By using Gmail’s SMTP server, you can enhance email deliverability and ensure that your messages actually reach the inboxes of your audience. Plus, the process is quite straightforward when you know what you’re doing!
Remember, you’ve learned to:
- Configure your Gmail account for SMTP access.
- Install and set up the SMTP plugin in WordPress.
- Test your configuration to ensure everything works correctly.
- Troubleshoot common issues if something goes awry.
So, if you haven’t already done so, why not dive right in? With this comprehensive guide at your fingertips, you’re well-equipped to conquer potential challenges and fully embrace WordPress SMTP with Gmail. Happy emailing!


