Navigating a website is crucial for both user experience and SEO, and in the realm of WordPress, the main navigation plays a pivotal role in achieving this. The main navigation, often referred to as the menu, is typically located at the top of your site and serves as a roadmap for visitors. It allows them to easily find the pages or posts they’re interested in, guiding them through your digital content seamlessly. In this post, we’ll explore how to edit this essential component of your WordPress site, customizing it to better suit your needs.
Understanding the Importance of Main Navigation
Main navigation is like the backbone of your website—it supports everything else! Here are a few reasons why it’s vital for your site:
- User Experience: A well-structured navigation menu ensures that visitors can find what they’re looking for without frustration. Clear labeling and easy access to important pages enhance user satisfaction.
- SEO Benefits: Search engines use your navigation structure to crawl your website. A logical structure helps them and can positively impact your rankings.
- Branding: Your navigation can reflect your brand’s personality. Whether it’s formal, fun, or minimalistic, your menu sets the tone for visitors.
- Conversion Rates: By guiding visitors to key pages (like product pages or contact forms), a well-designed navigation can lead to increased conversions.
Additionally, inconsistent or cluttered navigation can confuse users, leading to a high bounce rate. To keep your visitors engaged, it’s essential to focus on clarity and functionality in your main navigation. With a little customization, you can turn your navigation into a powerful tool that benefits both you and your audience!
Accessing the WordPress Admin Dashboard
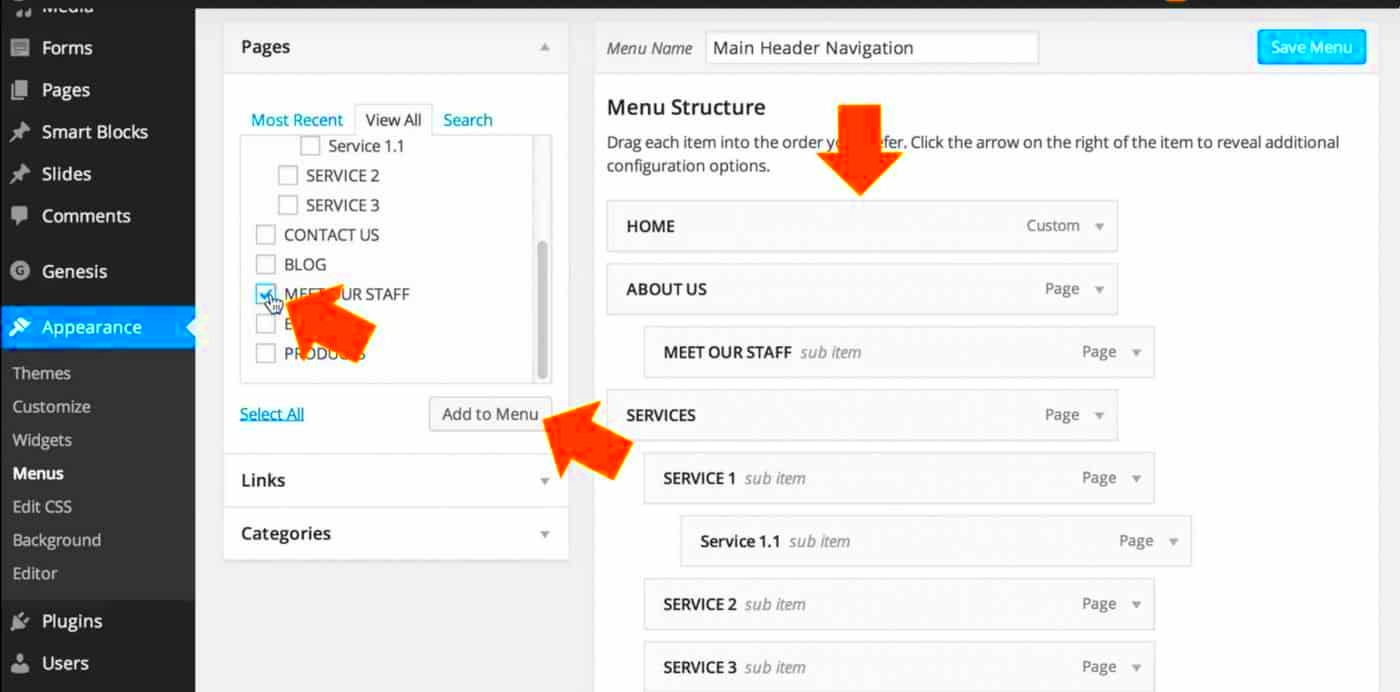
To start editing the main navigation of your WordPress website, the first step is to access the WordPress Admin Dashboard. This is the control center where you can manage all aspects of your site, including posts, pages, and obviously, menus.
Here’s how to get there:
- Open Your Web Browser: Launch any web browser of your choice like Chrome, Firefox, or Safari.
- Go to Your Website URL: Type in your website’s URL. For most WordPress sites, the Admin Dashboard can be accessed by adding
/wp-adminto the end of your website’s main URL. For example,www.yourwebsite.com/wp-admin. - Enter Your Credentials: You will be prompted to enter your username and password. Make sure to use the credentials you set up during the installation of WordPress. If you’ve forgotten your password, there’s usually a ‘Forgot Password’ option available.
Once you log in, you’ll find yourself looking at a user-friendly interface filled with various menu options on the left side. This is where all the magic happens! Take a moment to familiarize yourself with the dashboard layout. You’re now ready to dive into editing your main navigation!
Navigating to the Menu Settings
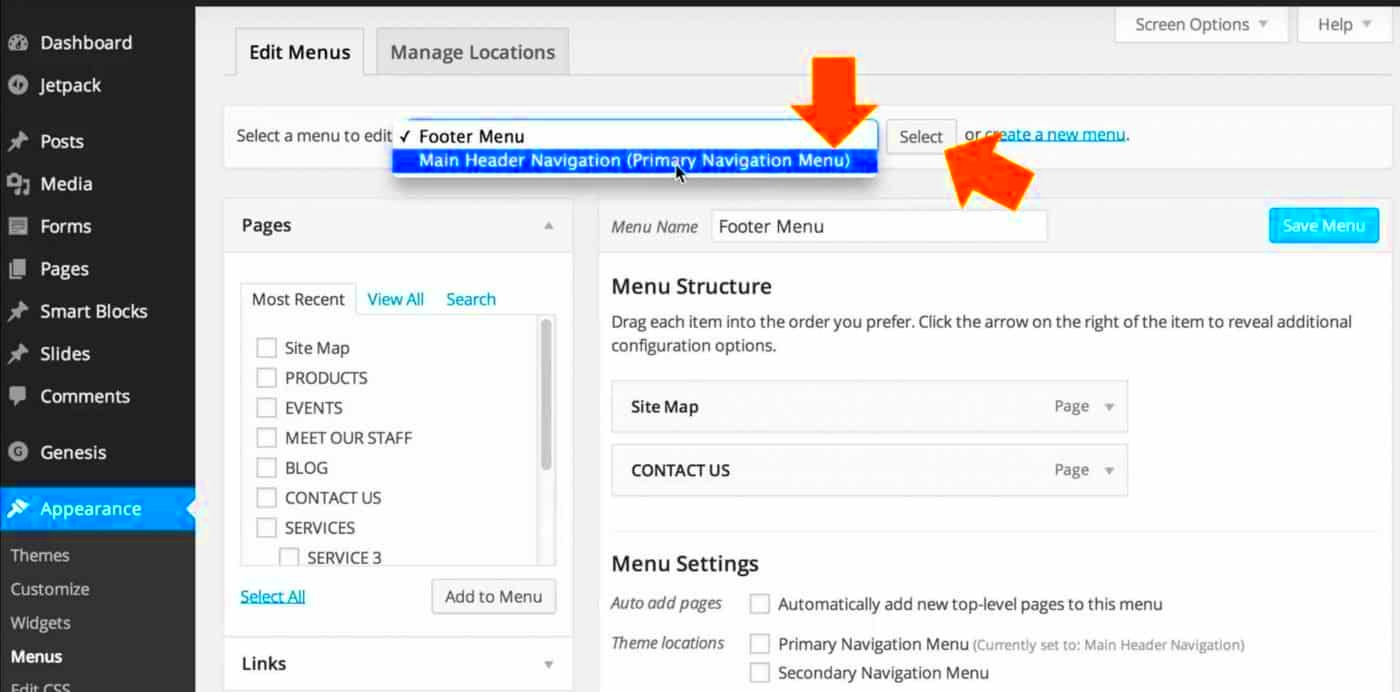
Now that you’re in the WordPress Admin Dashboard, the next step is to navigate to the menu settings, where all your navigation menus are stored. This area gives you the power to add, remove, or rearrange links on your site’s main navigation bar.
Follow these simple steps to get there:
- Look for the Appearance Tab: On the left-hand side of the dashboard, you’ll see several options. Hover over or click on Appearance to reveal a dropdown menu.
- Select Menus: From this dropdown, click on Menus. This will direct you to the Menu Settings page where you can edit your navigation options.
Once you arrive at the Menus page, you might notice a couple of things:
- You might see existing menus listed — these are your current navigation setups.
- There’s an option to create a new menu if you wish to start from scratch.
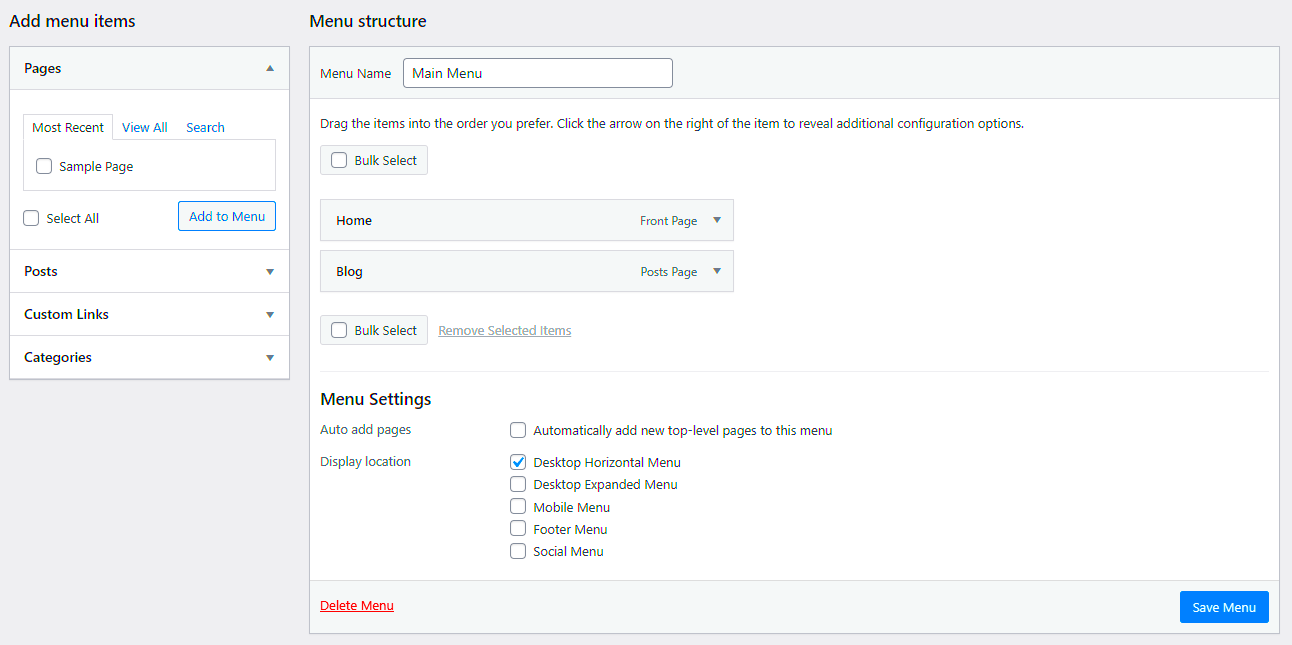
- On the left, there are boxes allowing you to add pages, posts, categories, or custom links to your menu.
This page is the hub for all your editing needs. Don’t worry if it seems a bit daunting at first; with a little exploration, you’ll find it’s quite intuitive! Now, you’re all set to dive into the exciting part—creating the perfect main navigation for your website.
Editing Existing Menu Items
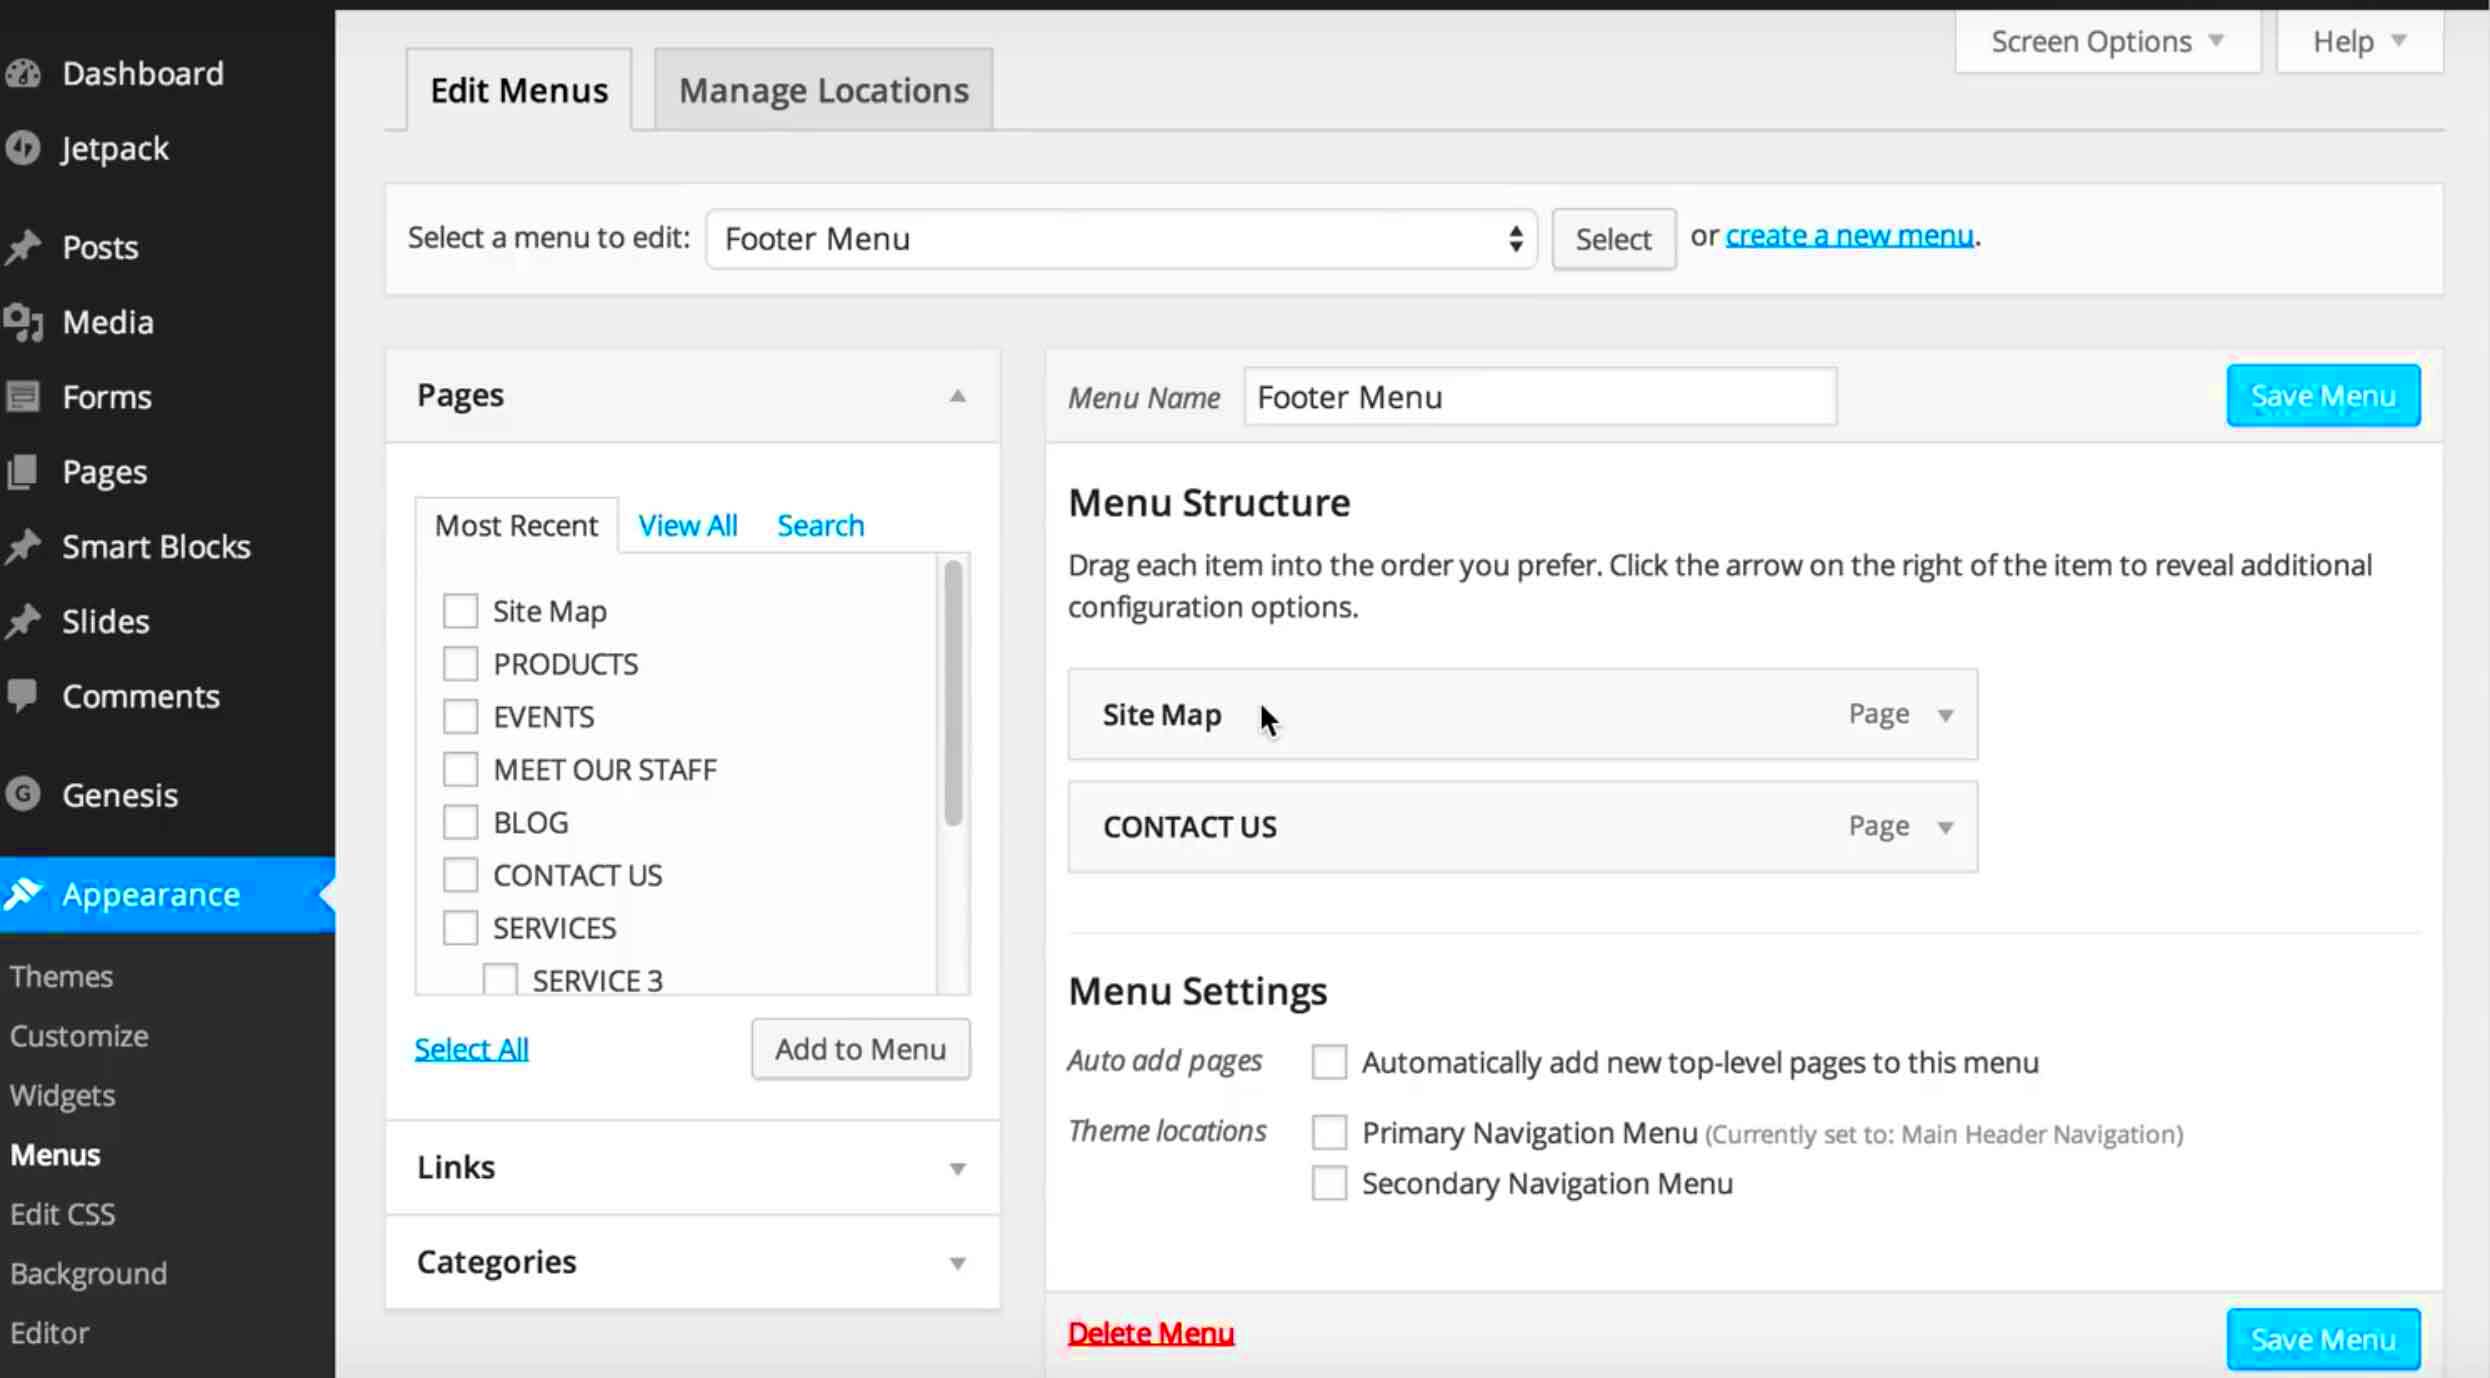
Editing existing menu items in WordPress is a straightforward process, and it’s an important skill to master. Whether you want to change the label of a menu item, adjust its link, or move it around, the WordPress menu editor allows for easy customization.
Here’s a step-by-step way to edit your main navigation menu:
- Log into Your WordPress Dashboard: Start by logging into your WordPress site. You’ll need to access your admin panel to make any changes.
- Navigate to Appearance: On the left sidebar, hover over the ‘Appearance’ option, and then click on ‘Menus.’ This will take you to the menu editing page.
- Select the Menu to Edit: If you have multiple menus, ensure you select the one you want to edit from the ‘Select a menu to edit’ dropdown.
- Edit the Menu Item: Once you have the menu open, you will see a list of your existing menu items. You can click the small arrow next to the item you want to edit. This action will expand the item and display options for editing. Here, you can:
- Change the Navigation Label: Modify the text that appears in the menu.
- Change the URL: Update the link that the menu item directs to.
- Remove the Item: If you want to delete the item, there’s an option for that too!
Editing your existing menu items ensures that your navigation remains relevant and user-friendly. Keep it fresh!
Adding New Menu Items
Adding new menu items to your WordPress navigation is equally simple and can enhance your site’s usability. By introducing new pages, categories, or custom links to your menu, you can help visitors easily navigate your site and find what they’re looking for.
Here’s how to add new items to your navigation menu:
- Login to Dashboard: Just like before, start by logging into your WordPress admin area.
- Go to Menus: Navigate to ‘Appearance’ and then click on ‘Menus’ from the dropdown list.
- Select Your Menu: If you have multiple menus, pick the one you wish to add new items to.
- Add Items: On the left side of the menu editor, you will find several boxes. These typically include options for:
- Pages: Select existing pages from your site.
- Posts: Choose specific blog posts.
- Categories: Add categories to display your blog content more effectively.
- Custom Links: Add an external URL that doesn’t fall under your current navigation.
By adding new menu items, you can guide your visitors effectively and keep them engaged with your content. Your navigation should work for you!
7. Rearranging Menu Items
Rearranging menu items in WordPress is a straightforward process, yet it can significantly enhance the user experience on your website. Whether you want to prioritize certain pages or create a logical flow for your visitors, having the right order is essential.
To rearrange menu items, follow these simple steps:
- Log in to your WordPress dashboard.
- Navigate to Appearance and then select Menus.
- You will find a list of all your current menu items. To rearrange them, simply click and drag the items into your desired order. You’ll see the cursor change, indicating that you can move the item.
- Once you’re satisfied with the arrangement, don’t forget to click the Save Menu button to confirm your changes.
Additionally, if you find that some items are more important than others, consider using bold text or icons to highlight those elements. Your visitors will appreciate the clarity and ease of navigation, making them more likely to stay on your site longer.
Keep in mind that it’s a good idea to periodically review your menu items and their arrangement. As your content grows, the structure might need adjusting to keep it intuitive and user-friendly.
8. Creating Sub-Menus for Better Organization
Creating sub-menus in WordPress is a fantastic way to keep your main navigation clean while providing users with easy access to related content. Sub-menus allow you to categorize items effectively, making it easier for visitors to navigate through your site.
Here’s how to create sub-menus:
- Go to your WordPress dashboard.
- Select Appearance and then click on Menus.
- In the Menu Structure panel, locate the items you want to add to a sub-menu.
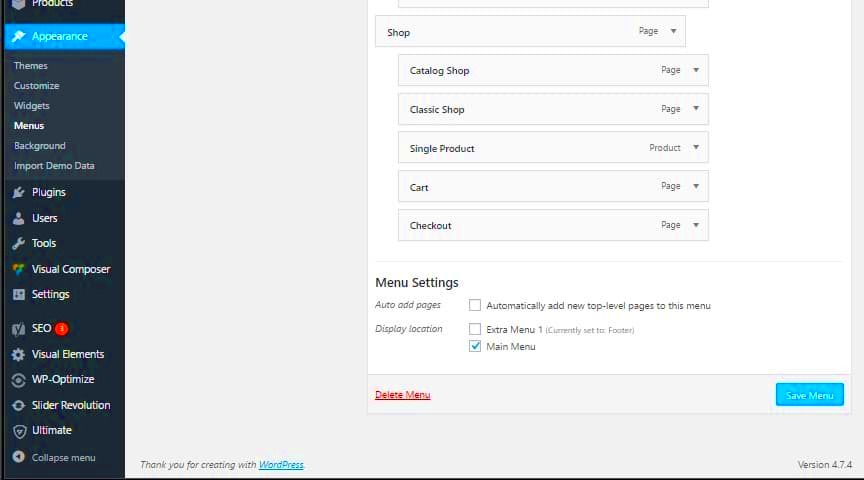
- To create a sub-menu, drag an item slightly to the right underneath the main menu item. You’ll see a slight indentation indicating it’s now a sub-item.
- After arranging your items, click on Save Menu to apply changes.
Using sub-menus not only organizes your content but also improves the aesthetic appeal of your navigation bar. You might want to structure your sub-menus based on topics, services, or frequently visited pages to help users find what they need quickly.
Pro Tip: Keep your sub-menus concise. Too many items can overwhelm the user. Aim for a balance that keeps navigation intuitive while providing all necessary options. A well-organized website encourages visitors to explore more—and who doesn’t want that?
9. Assigning Menu Locations
Once you’ve crafted the perfect menu for your WordPress site, the next step is to make sure it appears in the right place. Assigning menu locations is a crucial part of the navigation process that ensures your visitors can easily find their way around your site.
WordPress themes often have predefined menu locations where you can assign your menus. Common locations include a header, footer, and sidebar. Here’s how you can assign your menu to these locations:
- Navigate to Appearance in your WordPress dashboard.
- Select Menus.
- After creating or selecting a menu, look for a section labeled Menu Settings or Menu Locations.
- You’ll see different locations available for your theme, such as Main Menu, Footer Menu, or Social Links.
- Check the box next to the menu location you want your current menu to occupy.
After selecting the desired location, make sure to hit the Save Menu button. Assigning your menu properly ensures that your visitors encounter a coherent and user-friendly structure. If you’re uncertain which locations are available, consider checking your theme’s documentation or settings to see what options you have.
10. Saving and Testing Your Navigation Changes
Now that you’ve customized and assigned your menu, it’s time to save your changes and put your new navigation to the test. This step is vital because it not only ensures that your efforts are not in vain, but it also helps in confirming that your visitors will have a seamless experience.
Here’s how to save and test your navigation changes:
- After making your adjustments, confidently hit the Save Menu button. This action stores all your hard work, so don’t skip it!
- Open a new tab or window and visit your website to see the changes live. Make sure to clear your browser’s cache if necessary, as cached versions can sometimes display old menus.
- Navigate through your site to ensure that all links function correctly and lead to the intended pages.
- Check the responsiveness of your navigation on different devices (desktop, tablet, mobile) to confirm that it looks great everywhere.
If everything looks good and functions properly, congratulations! You’ve successfully edited your main navigation in WordPress. If you encounter any issues, feel free to return to the menu settings and make adjustments until you’re satisfied.
Troubleshooting Common Navigation Issues
When you’re editing the main navigation in WordPress, sometimes things don’t go as planned. Navigational hiccups can frustrate even the most seasoned webmasters. Here’s a rundown of some common issues you might encounter and how to fix them.
- Menu Items Not Saving: One of the most frustrating issues is when your changes don’t save. Ensure you have the most recent version of WordPress and try clearing your cache. Sometimes, browser issues can interfere, so switching to a different browser may help.
- Menu Display Problems: Have you ever noticed that your new menu isn’t showing up as expected? Check if it’s assigned to the correct theme location. You can do this in the Menus section by selecting the right theme location under “Display location.”
- Missing Links: If a link is missing from your menu, double-check your settings to ensure you’ve added it properly. It’s also worth revisiting your site’s pages to see if they are published and visible.
- Styling Issues: Sometimes your menu may look great on the back end but a bit off on the front end. Inspect your site with web developer tools to identify potential CSS conflicts. You can then tweak the CSS in the customizer.
- Responsive Design Problems: With mobile usage skyrocketing, ensuring your navigation is mobile-friendly is crucial. Review your menu on different devices, and consider switching to a mobile menu plugin if it isn’t displaying well.
Remember, troubleshooting your main navigation isn’t just about fixing problems; it’s also about making your site user-friendly. Don’t hesitate to explore forums or support channels for further assistance!
Conclusion and Best Practices for Navigation Editing
Editing the main navigation in WordPress can greatly enhance user experience on your site. To wrap things up, let’s look at some best practices you should follow for effective navigation editing.
- Simplicity is Key: Keep your menu options straightforward. Too many links can overwhelm visitors, making it difficult for them to find the information they need.
- Categorize Your Content: Group similar pages under dropdown menus. This organization not only looks neat but also helps visitors navigate through your content easily.
- Regular Updates: Make it a habit to periodically review your navigation. As your content evolves, so should your menu. Removing outdated links can improve usability and SEO.
- Label Clearly: Use clear and concise labels for your menu items. Avoid jargon and ensure even new users can understand what to expect when clicking a link.
- Test Functionality: After making changes, always test your menu on various devices and browsers. This ensures a seamless experience for all users.
In conclusion, the main navigation of your WordPress site is crucial for guiding visitors and improving engagement. By following these best practices, you’ll create a positive browsing experience that keeps users coming back for more!

