Have you ever visited a website and found it bursting with vibrant images that catch your attention? If so, you understand the magic of visuals! In this blog post, we’ll explore how to display random images on your WordPress website. Whether you’re looking to jazz up your blog or add a fun element to a portfolio, showcasing random images can create a dynamic browsing experience for your visitors. Let’s dive in!
Why Display Random Images?

Displaying random images on your website can serve several purposes, making your site more engaging and appealing. Here are some strong reasons to consider:
- Visual Variety: Random images break up monotonous text and keep your website visually appealing. When users see different images each time they visit, it adds an element of surprise and excitement.
- Increased Engagement: Fresh content attracts users and encourages them to spend more time on your site. Random images can prompt viewers to explore more, thus increasing overall engagement.
- Enhanced User Experience: A dynamic visual display can contribute significantly to a positive user experience. It can help maintain interest and cater to different tastes and preferences.
- Brand Personality: Depending on the choice of images, you can convey your brand’s personality and ethos, making your site resonate with your target audience.
- Content Promotion: By showcasing random images from various blog posts or products, you can guide users to explore more content, thereby boosting traffic and conversions.
In a world where first impressions matter, displaying random images might just be the secret ingredient to making your WordPress website stand out. So let’s talk about how to make it happen!
Choosing the Right Plugin for Random Image Display

When it comes to adding random images to your WordPress website, selecting the right plugin is crucial. With a plethora of options available in the WordPress Plugin Repository, it can be overwhelming to decide which one fits your needs best. Let’s break down some key factors to consider when choosing a random image plugin:
- Usability: The plugin should have an intuitive interface that makes it easy for you to add and manage images without requiring extensive technical knowledge. A user-friendly dashboard is a big plus!
- Customizability: Look for plugins that allow you to customize how images are displayed. Do you want them to show in a slider, gallery, or grid format? Being able to personalize the layout is essential.
- Responsive Design: Ensure the plugin is responsive, meaning it works well on both desktop and mobile devices. A non-responsive design can lead to poor user experience, especially with increasing mobile traffic.
- Performance: Choose a plugin optimized for speed. A slow plugin can hinder your site’s performance, leading to longer load times and a potential drop in user engagement.
- Support and Updates: Evaluate the developer’s support and update frequency. A plugin that is regularly updated is more likely to remain compatible with the latest WordPress version.
Some popular plugins to consider include Random Image Widget, WP Random Image, and Simple Random Image. Always read the reviews and check the ratings to ensure you’re making a wise choice.
Step-by-Step Guide to Installing a Random Image Plugin

Now that you’ve chosen the right plugin, it’s time to get it up and running on your WordPress site. Here’s a simple step-by-step guide to help you through the installation process:
- Log into Your WordPress Dashboard: Start by accessing your WordPress admin area. This is where all the magic happens!
- Navigate to Plugins: On the left sidebar, hover over the “Plugins” menu, and click on “Add New.” This will take you to a page filled with various plugins you can explore.
- Search for Your Chosen Plugin: In the search bar, type the name of the plugin you decided on, like “Random Image Widget.” Press Enter to see the results.
- Install the Plugin: Once you find the plugin, click the “Install Now” button. WordPress will handle the downloading and installation for you.
- Activate the Plugin: After installation, you’ll see an “Activate” button. Click on it to make the plugin active on your site.
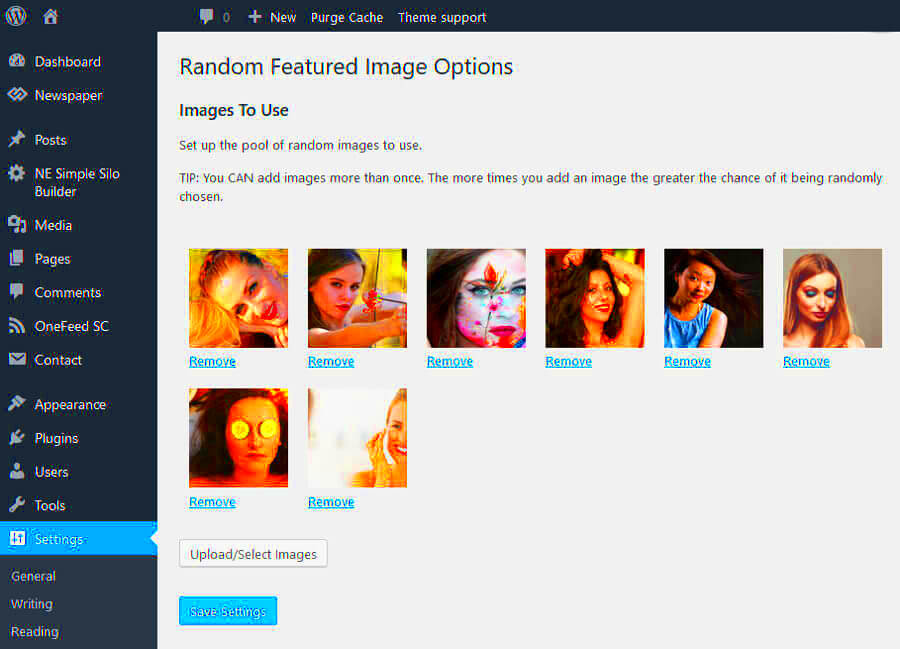
- Configure Your Settings: Go to the plugin’s settings page, which is usually found under the “Settings” or “Widgets” menu. Here, you can upload images and customize display options to suit your site’s aesthetic.
Following these simple steps, you’ll have your random image plugin up and running in no time, adding a splash of creativity to your WordPress website!
Customizing Your Random Image Settings
Once you’ve set up a way to display random images on your WordPress website, it’s time to jump into customization. Tailoring the image settings not only enhances the aesthetic appeal of your site but also enhances user engagement.
Most plugins or custom functions allow a variety of settings for random image displays. For instance, you may want to limit the number of images shown on your homepage or select a specific category your images will pull from. Here’s how you can effectively customize your settings:
- Image Source: Choose whether to pull images from your Media Library, specific folders, or even from external sources.
- Display Style: Decide how images are presented. Options range from traditional thumbnails to sliders or full-width banners.
- Randomization Frequency: Set how often images will change. This could be every page load, on refresh, or even at specific intervals.
- Image Sizes: Optimize the size of the images for better loading times without sacrificing quality. Get the right dimensions to suit your layout.
- Device Responsiveness: Ensure that your images look great on all devices. Test appearance on desktops, tablets, and smartphones.
Remember to keep your audience in mind. The goal of customizing your random image settings should align with enhancing user experience while keeping your website visually appealing.
Using Shortcodes to Embed Random Images
Shortcodes are one of WordPress’s most magical features, making it incredibly easy to add dynamic functionalities like random images without writing any complex code. Imagine being able to sprinkle random images throughout your posts or pages just by inserting a little snippet of text!
Here’s how to effectively use shortcodes to integrate random images:
- Find or Create a Shortcode: Depending on the plugin or function you’ve implemented to display random images, the documentation usually provides a default shortcode. It might look something like this:
[random_image]. - Customize as Needed: Some shortcodes allow parameters. For instance, you could specify a category or limit the number of images displayed. An example would be:
[random_image category="nature" count="5"]. - Embed in Posts/Pages: Simply paste the shortcode wherever you want random images to appear in your content. They will automatically generate when the page is loaded.
- Use in Widgets: Many themes allow shortcodes in widgets. Consider adding random images to your sidebar or footer for additional engagement!
Using shortcodes not only saves you time but offers an efficient way to keep your content fresh and engaging. Plus, it’s a fantastic method to allow for experimentation with how images appear across your site!
7. Random Image Display with Custom Code
Are you looking to spice up your WordPress website with random images? Utilizing custom code can be an effective way to achieve this! By embedding a snippet into your theme’s files or using a plugin that allows custom JavaScript, you can dynamically display random images each time a page loads.
To get started, you’ll want to have a collection of images stored in your WordPress media library or on an external server. Here’s a simple way to implement this with PHP:
<!--?php $images = array('image1.jpg', 'image2.jpg', 'image3.jpg'); // Add your image URLs here$random_image = $images[array_rand($images)];echo ' ';?>
';?>This snippet creates an array of your image names and randomly selects one each time the code runs. It’s easy to customize—just add or remove images from the array as needed.
However, if you’re not comfortable dabbling in code, you can also consider using a plugin such as “Random Image Widget” or similar. These plugins often provide a user-friendly interface that allows you to select images without touching any code. Just choose your images, set parameters, and you’re all set!
Incorporating random images not only adds visual interest but also can lead to increased user engagement by presenting different content upon each visit. Now that’s a win-win!
8. Best Practices for Using Random Images
Displaying random images can be a fun way to keep things fresh, but there are some best practices to keep in mind to ensure your images are effective and enhance user experience.
- Optimize Images for Web: Before uploading images, ensure they are optimized. This means compressing images to reduce file sizes, which helps improve loading times and enhances SEO.
- Use Relevant Images: Random images should be related to your content or theme. Choose visually appealing images that resonate with your audience and maintain context.
- Limit the Number of Images: While variety is key, too many choices can overwhelm users. Aim for a balanced selection of 5-10 images.
- Consider Attribution: If you’re using images from external sources, always check if attribution is required. Giving credit is not only courteous but often legally necessary.
- Test Responsiveness: Ensure that the images display correctly on different devices. Use CSS to make sure they adapt well on mobile, tablet, and desktop screens.
- Use Alt Tags: Remember to include alt tags for your images. This boosts accessibility for users with visual impairments and helps with SEO.
By following these best practices, you can make sure your random images not only enhance the aesthetic appeal of your website but also contribute positively to the overall user experience. Happy image displaying!
9. Optimizing Performance with Cached Images
When it comes to displaying random images on your WordPress website, you might notice that loading times can sometimes lag, especially if the images are large or if there are many of them. This is where caching comes into play. Caching stores copies of your images so that the server doesn’t have to retrieve them from the original source each time someone visits your page. This not only speeds up your website but also enhances the user experience.
Here’s how you can optimize performance by caching images:
- Utilize a Caching Plugin: There are several popular caching plugins available for WordPress, such as W3 Total Cache or WP Super Cache. These plugins can help you easily set up caching for your images.
- Leverage Browser Caching: By enabling browser caching, you allow returning visitors to load your images from their local cache, reducing loading time. This can be configured through your caching plugin.
- Optimize Image Sizes: Ensure that the images uploaded to your website are not larger than they need to be. Use image optimization tools like Smush or Imagify to compress images without sacrificing quality.
- CDN Integration: Consider using a Content Delivery Network (CDN) which caches your images across multiple global servers. This means users will retrieve images from a server closer to them, leading to faster load times.
By following these recommendations, you can significantly enhance the performance of your WordPress site while displaying random images. Fast-loading pages not only keep visitors happy but are also favored by search engines, making it a win-win situation!
10. Conclusion
Displaying random images on your WordPress website can be a fantastic way to engage visitors and keep your content fresh and dynamic. However, a beautiful presentation must also consider performance and user experience. Throughout this post, we’ve explored vital aspects like selecting the right plugin, optimizing the images, and effectively implementing caching.
To recap:
- Choose the Right Plugin: Look for plugins that fit your needs and offer customization options.
- Optimize Images: Compress and resize images to improve load speed without losing quality.
- Implement Caching: Make use of caching plugins to streamline image loading times.
By paying attention to these details, your website will not only look stunning with vibrant random images, but it will also function smoothly, enticing visitors to explore more. Always remember that a user-friendly site with fast loading speeds can make a significant difference in attracting and retaining your audience. So why wait? Start optimizing your WordPress site today!


