Are you looking to enhance your WordPress site hosted on HostGator? Adding plugins is one of the best ways to achieve that! In this post, we’ll walk you through the ins and outs of integrating plugins into your WordPress setup. Whether you’re aiming to boost your site’s SEO, improve its functionality, or add exciting new features, plugins can help you do it all with just a few clicks. Let’s dive in!
Understanding WordPress Plugins

So, what exactly are WordPress plugins? Think of them as miniature software applications that you can add to your WordPress website to extend its functionality. They’re like apps for your smartphone, offering a wide array of features tailored to improve your site’s performance and user experience.
Here’s a breakdown of why you should consider using plugins:
- Versatility: Plugins serve multiple purposes, from SEO optimization and social media integration to security enhancements and performance tweaks.
- User-Friendly: Most plugins come with easy-to-follow instructions, making them accessible even for beginners.
- Community Support: With thousands of plugins available, you’re likely to find one that meets your specific needs, often with a helpful community backing.
Here are some popular categories of WordPress plugins:
| Category | Common Plugins |
|---|---|
| SEO | Yoast SEO, All in One SEO Pack |
| Security | Wordfence, Sucuri Security |
| Performance | W3 Total Cache, WP Super Cache |
| Contact Forms | Contact Form 7, WPForms |
In conclusion, understanding what plugins are and how they function is crucial before diving into the process of adding them to your WordPress website. Now, you’re ready to explore the vast plugin landscape that awaits you!
Why Choose HostGator for WordPress Hosting?
Choosing the right hosting provider is crucial for the success of your WordPress site, and HostGator stands out as a top contender. Here’s why you should consider it:
- Reliable Performance: HostGator offers a 99.9% uptime guarantee, which means your website will be online and accessible almost all the time. This reliability is essential for maintaining visitor engagement and enhancing your site’s credibility.
- Easy WordPress Installation: With just a click of a button, you can install WordPress on your HostGator account. This makes it the perfect choice for beginners who want to get started quickly.
- 24/7 Customer Support: HostGator provides around-the-clock support via live chat, phone, and ticketing system. Whether you’re facing a technical issue or have a query about your account, help is always just a click away.
- Scalability: As your website grows, your hosting needs will change. HostGator makes it easy to upgrade your plan as you scale, ensuring your site can handle increasing traffic and resource demands.
- Affordable Plans: HostGator offers a range of hosting plans at competitive prices, making it accessible for all budgets. Plus, they frequently run promotions and discounts, so keep an eye out for those great deals!
In short, if you’re looking for a user-friendly and reliable platform to host your WordPress site, HostGator is definitely worth considering. With its great features and stellar support, it’s tailored to meet the needs of both beginners and seasoned webmasters.
Step 1: Log into Your HostGator Account
To start adding a plugin to your WordPress site, you first need to log into your HostGator account. Here’s how to do it step-by-step:
- Go to HostGator’s Website: Open your preferred web browser and head over to HostGator.com.
- Click on the Login Button: Locate the “Login” button on the top right corner of the homepage. Click it to proceed.
- Enter Your Credentials: You’ll be prompted to enter your email and password that you used to register your account. Make sure you input the correct information.
- Access the Control Panel: Once logged in, you’ll likely land on your dashboard. Here, you can access various functionalities related to your account.
- Go to cPanel: Look for the option to access your cPanel, often referred to as “Launch cPanel” or just “cPanel.” Click it to enter the area where you can manage everything related to your web hosting.
Now that you’re logged into your HostGator account, you’re all set to dive into the fun part: managing your WordPress site and adding plugins to enhance its functionality. Stay tuned for what’s next!
Step 2: Access Your WordPress Dashboard
Before you can start adding plugins to your WordPress site on HostGator, you need to access your WordPress dashboard. This is the central hub where all the magic happens—where you can manage your posts, pages, settings, and of course, plugins. Here’s how to get there:
- Open Your Web Browser:
Launch your preferred web browser, whether it’s Chrome, Firefox, or Safari. It all works!
- Enter Your Website URL:
In the address bar, type in your website URL followed by
/wp-admin. For example, if your website is myawesomewebsite.com, you’d type myawesomewebsite.com/wp-admin. PressEnter. - Log In:
You’ll see the WordPress login screen asking for your username and password. Enter your credentials to gain access. If you’ve forgotten your password, don’t worry; there’s an option to reset it!
- Welcome to the Dashboard:
Once logged in, you’ll be greeted with the WordPress dashboard. Here you’ll see various options on the left sidebar. Don’t be overwhelmed; you’ll get used to it in no time!
Accessing the WordPress dashboard is pretty straightforward! Just follow these steps, and you’ll be ready to navigate your site like a pro.
Step 3: Navigate to the Plugins Section
Now that you’re comfortably settled in the WordPress dashboard, it’s time to find the plugins section. This is where you can manage all the marvelous features and functionalities that plugins can bring to your site. Here’s how to find it:
- Look for the Left Sidebar:
On the left side of your dashboard, you’ll see a vertical menu. This includes various sections such as Posts, Media, Pages, and more.
- Find the “Plugins” Option:
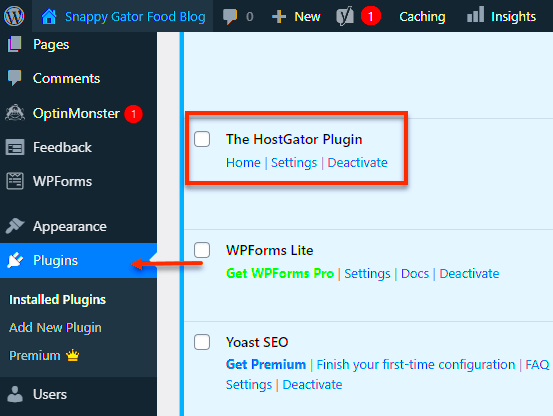
Scroll down the menu until you locate Plugins. It’s typically towards the bottom of the list.
- Click on “Plugins”:
Clicking this will take you to the plugins management area. Here, you’ll see a list of all the plugins currently installed on your WordPress site.
- Explore The Plugins Tab:
Your plugins section is divided into two main areas:
- Installed Plugins: View the plugins already activated on your site.
- Add New: This is where you can search for and install new plugins!
And there you have it! Navigating to the plugins section is a breeze, and now you’re just a few clicks away from adding amazing functionality to your WordPress site on HostGator.
Step 4: Installing a New Plugin
Alright, let’s dive into installing a new plugin on your WordPress site hosted by HostGator. It’s quite straightforward, and you’ll be amazed at how quickly you can enhance your site’s functionality!
First things first, after logging into your WordPress dashboard, navigate to the left-hand side menu and click on “Plugins.” Once you’re there, you’ll see an option that says “Add New.” Click on that!
Now you have a couple of options to get a plugin installed:
- Using the Search Bar: If you have a specific plugin in mind, just type its name into the search bar at the top right corner. The results will show you related plugins. Take your time to read their descriptions and check the ratings!
- Uploading a Plugin: If you’ve downloaded a plugin from another source (like a third-party site), click on “Upload Plugin,” which is right next to the “Add Plugins” title. You can then choose your .zip file from your computer and hit “Install Now.”
Once you’ve found your desired plugin, just click the “Install Now” button. The magic begins, and within a few seconds, you’ll see a success message indicating that the plugin has been installed.
It’s that simple! You’re now one step closer to supercharging your website. Just hold onto your excitement; there’s still one key step left before you can start using your shiny new plugin!
Step 5: Activating the Installed Plugin
Now that you’ve installed your new plugin, it’s time to activate it. This is super important because an installed plugin remains dormant until it’s activated—think of it as a light switch needing to be flipped on!
To activate your plugin, stay in the same “Plugins” section of your WordPress dashboard. You’ll see a list of all the plugins you’ve installed. Find the plugin you just added; it should be at the top of the list.
Next to the plugin name, you’ll see an “Activate” link. Simply click that, and like magic, your plugin is now live!
After activation, you might need to configure your plugin settings. Some plugins will have an “Settings” option appear underneath their name, or you might find a new menu item added to your dashboard. Here are a few tips for this step:
- Explore Settings: Take a moment to explore the settings. Every plugin is different, and configurations can really tailor it to your needs.
- Documentation: Check out the plugin’s documentation if you’re unsure about how to set things up. Most reputable plugins provide comprehensive guides.
- Support: If you ever run into issues, don’t hesitate to seek help in the support community or via the plugin’s support forum.
And there you have it! You’ve successfully installed and activated a new plugin on your WordPress site hosted by HostGator. Now, go ahead and enjoy all the new features and functionalities that come your way!
Step 6: Configuring Plugin Settings
After successfully installing your chosen plugin on WordPress hosted by HostGator, the next vital step is configuring its settings. This process ensures that the plugin functions exactly as you need it to, tailored to your specific requirements.
Let’s go through this process step-by-step:
- Locate the Plugin: Head over to the left sidebar in your WordPress dashboard. Look for the menu that either has the name of the plugin or might be categorized under “Settings.” Click on it.
- Explore Available Options: You’ll typically find various settings and configurations you can tweak. This may include sections like General Settings, Advanced Settings, or Customization.
- Adjust the Settings: Depending on the plugin’s purpose, you might want to enable certain features, modify display options, or set permissions. Take your time to review each option.
- Save Your Changes: Once you’re satisfied with your adjustments, don’t forget to click the Save or Update button. This step is crucial; otherwise, your changes won’t take effect!
- Test the Plugin: Double-check whether the plugin is working as intended. Visit the front end of your website and see it in action. If something doesn’t seem right, revisit the settings and adjust them accordingly.
Most plugins come with documentation or support forums, so if you’re ever in doubt about what a setting does, don’t hesitate to look that up. Happy configuring!
Troubleshooting Common Issues
Even the most seasoned WordPress users encounter hiccups while using plugins on their HostGator hosted site. Don’t worry; most issues are simple to resolve! Here are some common problems and ways to troubleshoot them:
| Issue | Solution |
|---|---|
| Plugin Not Active | Check the Plugins page to ensure the plugin is activated. Click “Activate” if it’s deactivated. |
| Conflicts with Other Plugins | Temporarily deactivate other plugins to identify the conflicting one, then reactivate them one by one. |
| Website Crashes | If your site goes down after a plugin installation, access your FTP or cPanel and rename the plugin’s folder to disable it. |
| Missing Features | Verify that you have configured the settings properly. Revisit the plugin’s documentation for guidance. |
| Slow Website Performance | Check if the plugin is resource-heavy. Consider alternatives or adjust settings to optimize performance. |
It’s always a good idea to keep your plugins updated and to use reliable ones from trustworthy sources. If an issue persists beyond these common troubles, don’t hesitate to seek help from the plugin developer or consult WordPress forums. Remember, you’re not alone in your WordPress journey!
Conclusion
In summary, adding a plugin to WordPress on HostGator is a straightforward process that can greatly enhance the functionality of your website. By following the steps detailed in this guide, you can easily select, install, and activate plugins that meet your needs. Whether you’re aiming to improve SEO, enhance security, or add features like contact forms or social media sharing, there are thousands of plugins available at your fingertips.
Here are the key steps to remember:
- Log in to WordPress Admin: Access your WordPress admin dashboard by going to yoursite.com/wp-admin.
- Navigate to Plugins Section: On the left sidebar, click on the “Plugins” option to expand the menu.
- Add New Plugin: Click on “Add New” to browse available plugins from the WordPress Plugin Directory.
- Search and Choose: Use the search bar to find the specific plugin you want, or browse through featured and popular plugins.
- Install the Plugin: Click the “Install Now” button next to the plugin you wish to add.
- Activate the Plugin: After installation, click the “Activate” button to start using the plugin on your site.
It’s worth noting that while plugins can offer many benefits, installing too many can lead to slower site performance or conflicts. Therefore, it’s advisable to choose plugins wisely and ensure they are regularly updated. By following these steps and considerations, you can significantly enhance your WordPress site on HostGator.


