Adding a login button to your WordPress menu can enhance the user experience tremendously. Whether you’re running a membership website, an online store, or a blog with limited access, having a straightforward way for users to log in is vital. In this guide, we’ll walk you through the steps, making it simple for both beginners and seasoned developers to implement this feature seamlessly in their WordPress menus. So, let’s dive into the essentials of
Understanding WordPress Menus

WordPress menus are a foundational element of your website’s navigation system. They allow you to structure how visitors interact with your content, making it essential to understand how they work. Here are some key concepts to keep in mind:
- Locations: WordPress themes typically come with predefined menu locations (like header or footer). You can assign your created menus to these locations in your theme.
- Custom Menus: Instead of using the automatic menu structure created by WordPress, you can create custom menus that include pages, categories, and other links, including a login button.
- Menu Items: Each menu can include a variety of items such as pages, posts, custom links, and categories. This flexibility allows you to tailor your navigation perfectly to your audience’s needs.
- Drag-and-Drop Feature: WordPress makes rearranging menu items easy with its convenient drag-and-drop interface. You can change the order of the items or even create submenus!
Understanding these elements will help you better utilize your WordPress menus and make effective improvements to enhance user engagement on your site.
Why Add a Login Button to Your Menu?

Ever wondered why you’d want a login button right in your WordPress menu? Well, having a login option is not just about aesthetics; it’s a functional necessity for many websites. Let’s break this down.
- Improved User Experience: A login button provides quick access for registered users, allowing them to navigate your site effortlessly. Imagine someone wanting to sign in quickly — they won’t have to hunt around your site for the login page!
- Encourages Membership Engagement: If your site offers memberships or has a community aspect, a visible login option encourages users to log in and participate. The easier you make it for them, the more active they are likely to be!
- Enhanced Security: Displaying a clear login button can discourage unauthorized access. When users are encouraged to log in correctly, you help maintain the integrity of your content and user data.
- Increases Conversion Rates: For sites where logged-in users receive exclusive content or services, a straightforward login button can increase conversions. Users are more likely to sign up when they see a convenient option to log in.
In short, adding a login button to your WordPress menu not only simplifies navigation but also boosts user engagement and security. It’s a win-win situation for both you and your users!
Method 1: Using a Custom Link
So, you’ve decided that a login button is essential for your site. Great choice! The simplest way to integrate this feature into your WordPress menu is by using a custom link. Here’s how you can do it step-by-step:
- Log in to Your WordPress Dashboard: Start by accessing your WordPress admin panel. If you can’t find the dashboard, simply go to
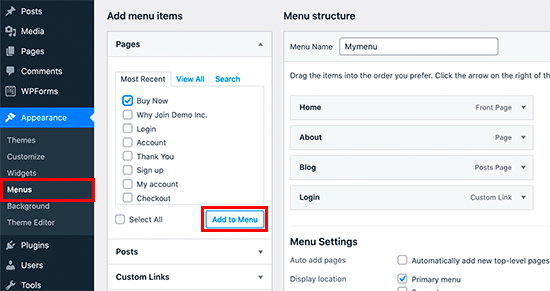
yoursite.com/wp-adminand enter your credentials. - Go to Appearance > Menus: Once you’re in the dashboard, hover over “Appearance” on the left sidebar and click on “Menus.” This is where all the menu magic happens!
- Select Your Menu: If you have multiple menus, pick the one where you want to add the login button. Just select it from the dropdown menu at the top and click “Select.”
- Add a Custom Link: On the left side, look for the “Custom Links” section. Here, you’ll enter the URL for the login page (typically
yoursite.com/wp-login.php) and type “Login” or any other label you prefer in the Link Text box. - Click ‘Add to Menu’: After filling in the details, hit the “Add to Menu” button. You’ll see your new link appear on the right side under the menu structure.
- Arrange Your Menu Items: You can drag and drop the login link to position it where you want it in the menu. Maybe you want it at the end, or maybe closer to the home page link — it’s completely up to you!
- Save Your Menu: Don’t forget to click the “Save Menu” button to ensure your changes are applied. Otherwise, all that effort will go to waste!
And that’s it! By following these steps, you’ve successfully added a login button to your WordPress menu using a custom link. The process is quick and easy, and it’ll make a big difference in user access and navigation.
Method 2: Using a Plugin
If you’re looking for a quick and efficient way to add a login button to your WordPress menu, using a plugin is a fantastic option! This method is not only easy to implement but also provides you with plenty of customization options. There are several plugins out there designed specifically for this purpose. Here’s how you can go about it:
- Choose a Plugin: The first step is to pick a reputable plugin. Some popular choices include Theme My Login, WP Login Form, and LoginPress.
- Install the Plugin: Navigate to your WordPress dashboard, go to Plugins, and click on Add New. Search for your chosen plugin, then click Install Now and activate it.
- Add the Login Button: Most plugins come with a dedicated settings page. Look for the options related to adding a login link to your menu. Some plugins may even allow you to add it to existing menus through the Appearance > Menus section.
- Configure Settings: Don’t forget to check the plugin settings. You can customize where users are redirected after login or logout, set up custom messages, and even decide whether to show/hide certain items based on user roles.
- Test Your Button: Finally, after setting up everything, don’t forget to test the newly added login button to ensure it works smoothly!
By using a plugin, you can enhance the functionality of your login button without needing to deal with any complex code. This method saves you time and gives you the flexibility to make changes as needed!
Customizing the Login Button Appearance
Now that you’ve successfully added a login button to your WordPress menu, you might be wondering how you can make it stand out. After all, a unique and visually appealing login button can enhance user experience and encourage more logins. Here are some methods to customize the appearance of your login button:
- Utilize CSS: If you have a bit of basic knowledge of CSS, you can easily style the button. Go to your WordPress dashboard and head to Appearance > Customize > Additional CSS. Here, you can add custom styles. For example:
- Choose Button Shape: Decide whether you want your button to be rectangular, round, or perhaps even a pill shape. The CSS above can help you manage that through border-radius property.
- Icon Integration: Adding an icon next to your text can make your button more attractive. Some plugins allow you to easily add icons, or you can use Font Awesome for a more extensive selection. Just ensure the icon matches your site’s theme!
- Custom Fonts: If you’re feeling adventurous, consider changing the font style of the button text. Using Google Fonts or another font library can truly make your button pop.
- Mobile Responsiveness: Lastly, ensure your login button is mobile-friendly. Test its appearance on various screen sizes to ensure a consistent user experience.
.menu-item-login a { background-color: #0073aa; color: white; padding: 10px 15px; border-radius: 5px; text-decoration: none; } .menu-item-login a:hover { background-color: #005177; }
By customizing the appearance of your login button, you can create a visually appealing and functional component that enhances the overall experience for your website visitors. After all, first impressions matter!
7. Testing the Login Button
Now that you’ve added the login button to your WordPress menu, it’s crucial to ensure it’s working seamlessly. Testing the login button is a straightforward process, and it’s essential to make sure everything is functioning as intended—after all, you want your users to have a smooth experience.
To test your login button, follow these simple steps:
- Log Out of Your Admin Account: If you’re logged in as an admin, log out first to simulate a regular user experience.
- Navigate to Your Website: Open your site in a new browser tab or window. This ensures you’re viewing it as a visitor would.
- Find the Login Button: Look for the login button you added to the menu. It should be clearly visible and easy to find.
- Click the Login Button: Click on it to make sure it redirects you to the login page correctly.
- Test the Login Process: Enter your credentials to test if you can successfully log in. Make sure to check if you’re redirected to the appropriate dashboard after logging in.
- Check on Different Devices: It’s also a good idea to test the button on different devices like smartphones and tablets to ensure it’s responsive.
By following these steps, you can be confident that your login button will provide an effective gateway for your users. If it behaves as expected, you’re all set!
8. Troubleshooting Common Issues
Even with the best intentions, problems can arise with your WordPress login button. But don’t fret; most issues are easily resolved! Here’s a handy guide to help you troubleshoot common issues.
Here are some typical problems you may encounter along with their solutions:
| Issue | Solution |
|---|---|
| Login Button Not Visible | Check if you added the button correctly in the menu settings. Ensure that the menu is assigned to the correct location in your theme. |
| Redirection Issues | Ensure that you provided the correct URL for the login page. The default login page in WordPress is usually yourdomain.com/wp-login.php. |
| Login Fails After Clicking the Button | Double-check your login credentials. If the issue persists, look for security plugins that may be blocking access or causing conflicts. |
| Button Not Responsive | Inspect your theme’s CSS settings. Add custom CSS if necessary to ensure the button is easy to click on mobile devices. |
Remember that troubleshooting is usually about patience and persistence. If you continue to face issues after trying these solutions, consider reaching out to your theme’s support forum or WordPress community for additional help. Happy blogging!
Conclusion
Adding a login button to your WordPress menus is an effective way to enhance user accessibility and engagement. By following the steps outlined above, you can seamlessly integrate this feature into your website without much hassle. Whether you’re using a plugin or customizing your theme, having a login button readily available simplifies the process for users to access their accounts, ultimately improving their experience on your site. Remember to test the functionality after implementation to ensure it’s working correctly and consider collecting feedback from your users to further improve the navigation on your WordPress site.


