When setting up a WordPress website, understanding DNS zones can be crucial, especially when you need to manage how your domain interacts with various services. DNS (Domain Name System) is essentially the “phonebook” of the internet, translating domain names like “creativesalahu.com” into IP addresses that browsers use to connect to websites. DNS zones are specific portions of this system that hold important records for managing domain names and their associated services.
In this guide, we will explore the basics of DNS zones, their importance, and how you can manually edit them to ensure your WordPress website runs smoothly. Whether you’re troubleshooting issues or setting up custom configurations, understanding DNS zones is key to managing your WordPress site effectively.
Understanding the Role of DNS in WordPress Websites

DNS is a critical part of how your WordPress website functions. Without DNS, users wouldn’t be able to reach your site just by typing your domain name into their browser. Instead, they would need to remember the actual IP address of your server, which is impractical.
Here’s how DNS works in simple terms:
- User types your website’s domain name: When someone wants to visit your site, they enter the domain name into their browser.
- DNS server translates the domain: The DNS server looks up your domain name and finds the corresponding IP address.
- Connection is made to your hosting server: The browser connects to your server using the IP address provided by DNS, and your website is displayed.
For WordPress websites, the DNS system helps route traffic to your hosting provider. It also manages subdomains, email services, and other integrations like SSL certificates. Properly configured DNS zones ensure that all these services are working as expected, without any interruptions.
Why You Might Need to Edit DNS Zones in WordPress
There are several reasons you might need to manually edit DNS zones in WordPress. Here are a few common scenarios:
- Switching Hosting Providers: If you’re moving your WordPress site to a new hosting provider, you will need to update your DNS records to point to the new server’s IP address.
- Setting Up Subdomains: If you’re creating a subdomain for a new part of your site (like blog.creativesalahu.com), you’ll need to add a DNS record for that subdomain.
- Integrating Third-Party Services: Services like email providers or CDNs (Content Delivery Networks) often require specific DNS records to be set up for proper functioning.
- Improving Security: DNS records are also involved in securing your website with tools like SPF, DKIM, and DMARC to prevent email spoofing and phishing attacks.
Editing DNS zones allows you to take control of how your domain interacts with various services. However, it’s essential to make these changes carefully, as improper configurations can disrupt access to your website or email services.
How to Access DNS Zone Settings for Your Domain
Before you can start editing DNS zones for your WordPress website, you first need to access the DNS settings. The process may vary slightly depending on where you’ve registered your domain or where your DNS is managed. In most cases, your domain registrar or hosting provider will give you access to these settings. Here’s a general guide on how to access them:
- Log in to your domain registrar account: Start by logging into your account where you purchased your domain name (e.g., GoDaddy, Namecheap, Google Domains).
- Navigate to the DNS management section: Once you’re logged in, locate the section that manages your domain settings. This is often labeled as “DNS Settings,” “DNS Management,” or “Name Servers.”
- Select the domain you want to modify: If you have multiple domains, choose the one for your WordPress site.
- Access DNS Zone Editor: Most registrars will have an option called “Manage DNS” or “Edit DNS Zone” where you can modify DNS records.
If your DNS is managed by your hosting provider (such as with a WordPress-specific host like Bluehost or SiteGround), you may find these settings in the hosting control panel (cPanel) instead. Always ensure you’re editing the correct DNS settings to avoid potential issues with your website’s accessibility.
Step-by-Step Guide to Manually Edit DNS Zones
Editing DNS zones manually may seem intimidating at first, but it’s quite simple once you understand the basic process. Here’s a step-by-step guide on how to edit DNS records:
- Login to your DNS management panel: Whether you’re using your domain registrar or hosting provider’s panel, start by logging in.
- Select the domain: If you have more than one domain, choose the one that you want to edit.
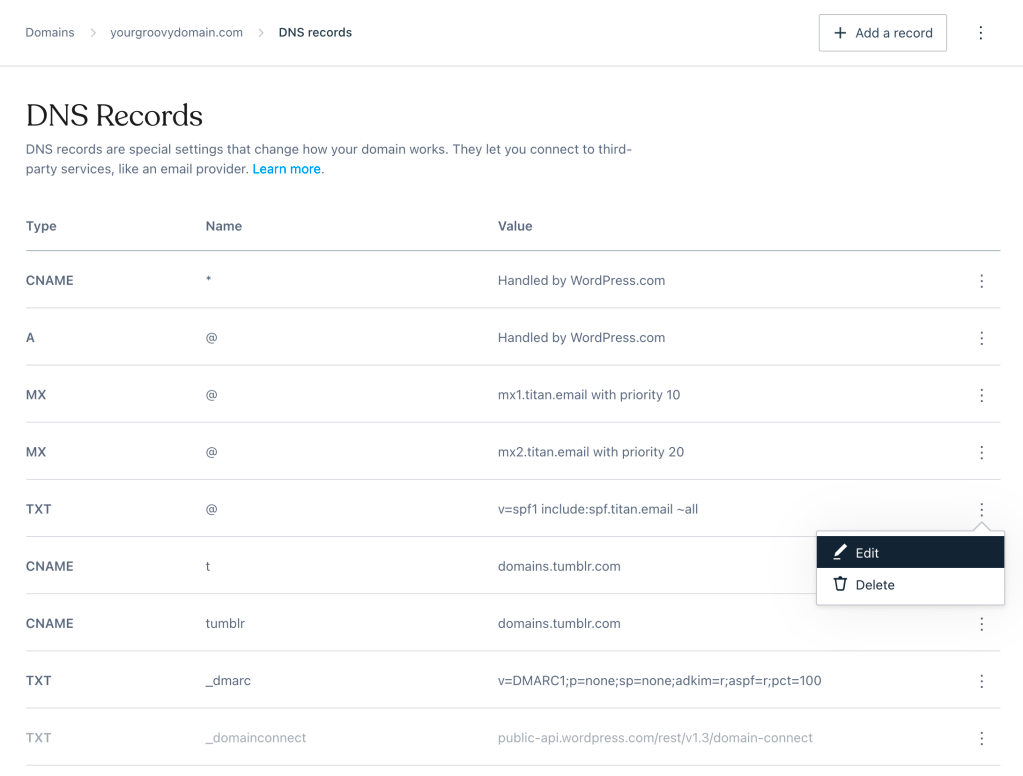
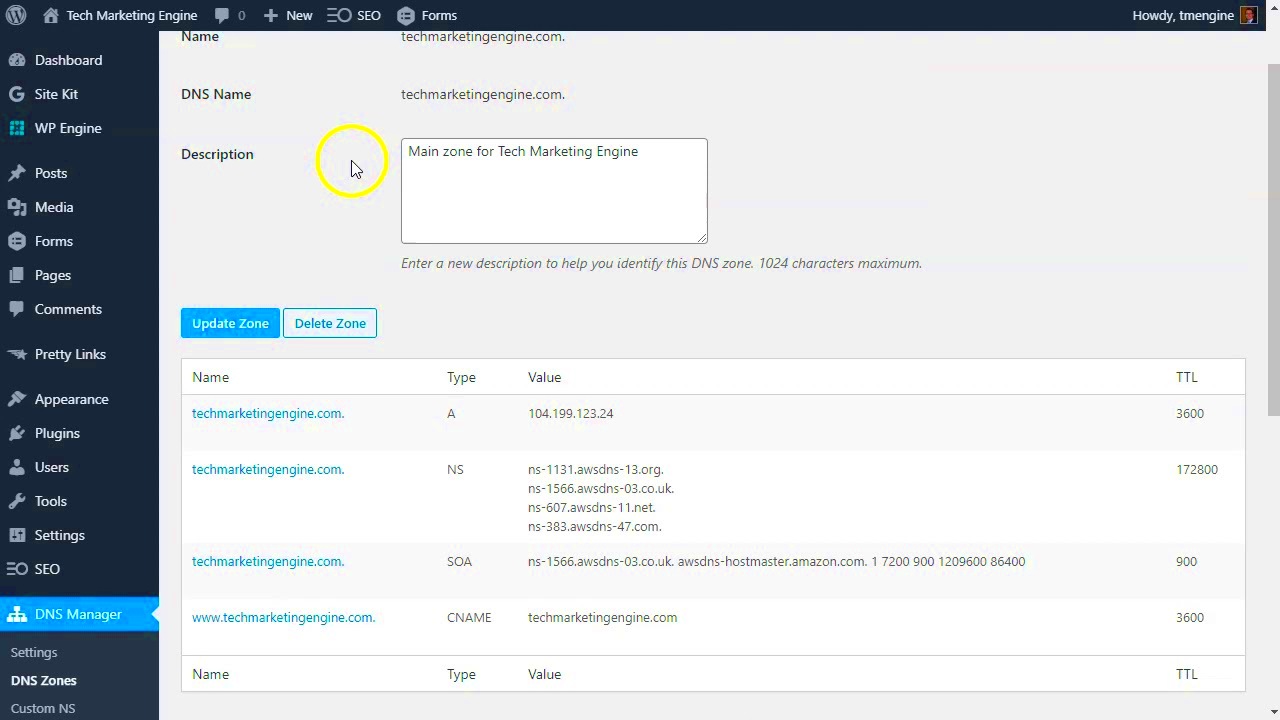
- Find the DNS records: Look for the section that lists the DNS records, such as A records, CNAME records, MX records, etc.
- Edit the necessary record: Click on the DNS record you want to modify (for example, updating the A record to point to a new server). Make sure you only change the required fields.
- Save the changes: After editing the record, save the changes. It can take up to 24-48 hours for DNS changes to propagate across the internet.
Here are some common types of DNS records you might edit:
| Record Type | Purpose |
|---|---|
| A Record | Points your domain to an IP address (e.g., for a hosting server). |
| CNAME Record | Used to alias one domain to another (e.g., pointing www to the root domain). |
| MX Record | Directs email to the appropriate mail server. |
| TXT Record | Used for verification or adding SPF records for email security. |
Make sure to double-check your entries before saving. Incorrect DNS records can lead to your website or email being inaccessible.
Common Issues When Editing DNS Zones and How to Solve Them
While editing DNS zones, you might encounter a few issues. Fortunately, most of these are easy to resolve with a little attention to detail. Here are some common issues and how to address them:
- Changes Not Taking Effect Immediately: DNS changes can take time to propagate, often up to 48 hours. If your changes aren’t visible right away, be patient and check back later.
- Incorrect DNS Records: If you enter the wrong IP address or domain in a DNS record, your site may become unreachable. Always verify the information before saving.
- Conflicting Records: You might accidentally create conflicting DNS records (e.g., multiple A records pointing to different IPs). Ensure that only one record of each type exists unless absolutely necessary.
- DNS Propagation Delays: Sometimes, DNS propagation can be delayed or inconsistent across different regions. You can use online tools like DNSChecker to check if the changes have propagated globally.
- Misconfigured Subdomains: If you’re setting up subdomains, ensure you add the correct A or CNAME record. Double-check that the subdomain points to the correct IP or server.
To avoid these issues, it’s always a good idea to keep a backup of your previous DNS settings. If you’re unsure about making changes, consider reaching out to your hosting provider or domain registrar’s support team for help.
Best Practices for Managing DNS Zones in WordPress
When managing DNS zones for your WordPress website, following best practices can help you avoid common pitfalls and ensure everything runs smoothly. Proper DNS management is crucial for maintaining uptime, email functionality, and security for your site. Here are some best practices to keep in mind:
- Double-Check Your DNS Records: Before making any changes, always double-check the DNS records you’re editing. A small mistake, like entering the wrong IP address, can make your website unreachable.
- Keep a Backup of Your DNS Settings: It’s a good idea to take a screenshot or save your current DNS configuration before making any changes. This backup will be handy if something goes wrong and you need to revert to the previous settings.
- Use TTL (Time to Live) Wisely: TTL determines how long DNS records are cached by servers and ISPs. For changes that need to propagate quickly, set a lower TTL value (e.g., 300 seconds). After making changes, you can increase the TTL again.
- Use CNAME for Subdomains: Instead of creating separate A records for each subdomain, use CNAME records. They point to the main domain and are easier to manage.
- Update DNS Records After Hosting Changes: If you change hosting providers or move your site to a new server, don’t forget to update the A record with the new IP address of your server.
- Monitor DNS Performance: Use online tools like DNS checker or Pingdom to ensure your DNS records are working as expected. Monitoring your DNS performance can help identify issues before they affect your site.
By following these best practices, you’ll make DNS management for your WordPress site more efficient, secure, and reliable.
Frequently Asked Questions About DNS Zones and WordPress
Managing DNS zones can be a bit tricky, especially if you’re new to WordPress or DNS configurations. Below are some common questions and answers that can help you better understand the process:
- What is a DNS zone?
A DNS zone is a portion of the DNS system that holds specific information about a domain, including records like A, MX, CNAME, and TXT records. It is typically managed by your domain registrar or hosting provider. - What are A records and how do they affect my WordPress site?
A records point your domain to a specific IP address. In WordPress, you’ll need to set an A record to link your domain to the server where your WordPress website is hosted. - How long does it take for DNS changes to take effect?
DNS changes can take anywhere from a few minutes to 48 hours to propagate fully. This delay occurs because DNS servers worldwide need to update their records. - Do I need to edit DNS zones for email setup?
Yes, if you’re using custom email services (like Google Workspace or Office 365), you’ll need to update your DNS records to configure email-related records such as MX records. - Can I use DNS records to set up SSL certificates?
Yes, DNS records like TXT records are often used to verify domain ownership during SSL certificate setup. Some providers may also use DNS to configure domain validation for HTTPS. - What is the difference between a CNAME record and an A record?
An A record points directly to an IP address, whereas a CNAME record is an alias that points to another domain name. CNAME records are typically used for subdomains.
Conclusion: Safely Edit DNS Zones for Your WordPress Site
Editing DNS zones is a necessary task for WordPress website management, but it must be done with caution. By understanding how DNS works and following best practices, you can avoid errors that could make your site inaccessible or disrupt its functionality. Always ensure you have a backup of your DNS settings before making any changes, and be patient as it can take time for updates to propagate.
Remember, DNS configurations are a powerful tool to control how your domain interacts with the internet. With careful management, you can make sure your WordPress site runs smoothly, your email works correctly, and your site is secure. If you’re unsure about making changes, it’s always best to consult your hosting provider or a professional who can guide you through the process safely.
By staying informed and taking the right steps, you’ll keep your WordPress website in top shape and avoid unnecessary downtime or disruptions.


