Hey there! If you’re into creating eye-catching visuals, Shutterstock Editor is probably your new best friend. It’s a user-friendly online tool that makes designing logos, social media posts, flyers, and more super easy—even if you’re not a design pro. With Shutterstock Editor, you get access to a vast library of royalty-free images, customizable templates, and a variety of editing tools. One of the coolest features? The ability to add, edit, and remove text effortlessly. Whether you’re tweaking a slogan or cleaning up a design, knowing how to delete unwanted text is key to making your project look polished and professional.
Understanding the Importance of Removing Unwanted Text
Imagine you’re working on a design, and there’s that pesky piece of text that just doesn’t fit anymore—maybe it’s outdated, incorrect, or simply distracting. Leaving unwanted text can make your design look cluttered, unprofessional, and confusing for viewers. Clean visuals help your message stand out and look more credible, which is especially important if you’re branding a business or promoting a product. Removing unnecessary text also gives you more space to emphasize what truly matters, creating a balanced and appealing layout. Plus, when you clean up your design, it saves you from potential legal issues down the line—like accidentally leaving copyrighted or unintended text in your final version. So, mastering how to delete text in Shutterstock Editor isn’t just about aesthetics; it’s about making your designs clearer, more impactful, and truly your own.
Step-by-Step Instructions for Deleting Text in Shutterstock Editor
So, you’re working on a design in Shutterstock Editor and realize you need to remove some text to make it just right. No worries—it’s straightforward! Here’s a simple step-by-step guide to help you delete text quickly and effortlessly:
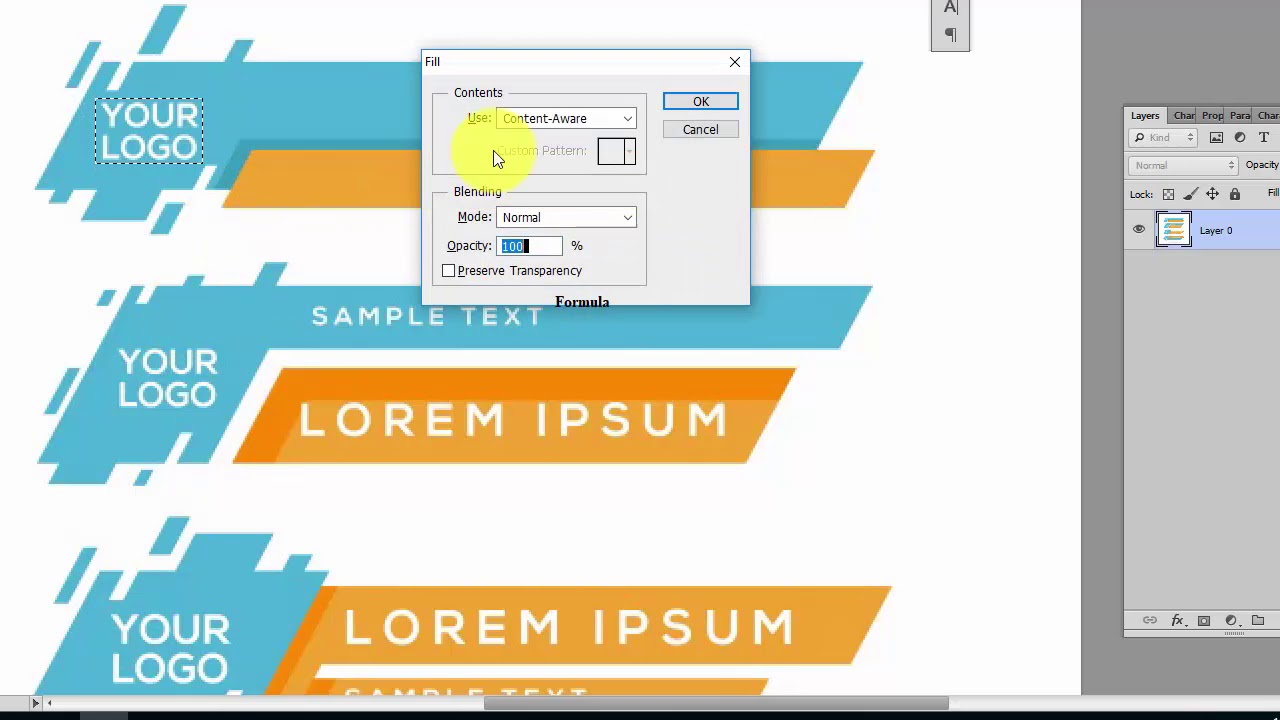
- Open Your Project: Log into your Shutterstock Editor account and open the project containing the text you want to delete.
- Select the Text Element: Click on the text box or layer you wish to remove. You’ll see a bounding box or outline around the text, indicating it’s selected.
- Access the Toolbar: Once selected, a toolbar will appear either above or beside your workspace. Look for the delete icon, usually represented by a trash can.
- Delete the Text: Click on the trash can icon. The selected text will instantly be removed from your design. If you change your mind, you can always undo this action by clicking the undo button or pressing Ctrl + Z (Cmd + Z on Mac).
Pro Tip: If you’re deleting multiple text elements, hold down Shift and click each one to select multiple layers at once before deleting. This saves time and keeps your workflow smooth.
And that’s it! Deleting text in Shutterstock Editor is really that simple. Just be sure to double-check your design after deletion to make sure everything looks balanced and professional.
Tips for Achieving a Clean and Polished Design
Creating a sleek, professional look with your Shutterstock designs doesn’t happen by chance—it’s all about the little details and thoughtful choices. Here are some handy tips to help you achieve a clean, polished finish:
- Limit Your Font Choices: Stick to one or two fonts to keep your design cohesive. Mixing too many fonts can make your design look cluttered and unprofessional.
- Use Consistent Spacing and Alignment: Pay attention to the spacing between elements. Use guidelines and grid features in Shutterstock Editor to align text and images perfectly.
- Keep Text Readable: Choose font sizes and colors that stand out from the background. Avoid overly decorative fonts for body text—simplicity is key.
- Utilize White Space: Don’t overcrowd your design. Leaving empty space around elements helps your message breathe and makes the overall look more sophisticated.
- Simplify Your Color Palette: Use a limited set of colors that complement each other. This creates a unified and professional appearance.
- Remove Unnecessary Text: As you’ve learned, deleting unwanted or redundant text can make your design cleaner. Less is often more.
- Preview Your Design: Before finalizing, zoom out and view your design as a whole. This helps you catch inconsistencies or clutter you might miss up close.
Remember, the goal is to communicate your message clearly without distractions. Taking these steps will help your designs look polished and professional, whether you’re creating social media graphics, presentations, or marketing materials. Practice makes perfect, so don’t hesitate to experiment and see what works best for your style!
Common Issues and Troubleshooting Tips
While Shutterstock Editor is a fantastic tool for creating clean and professional designs, you might run into some hiccups along the way. Don’t worry—most issues are easy to resolve once you know what to look for. Here are some common problems users encounter when deleting text and how to troubleshoot them:
Problem 1: Text Won’t Delete
This can happen if the text layer is locked or selected incorrectly. To fix this:
- Ensure the text layer is selected in the layers panel.
- Look for a lock icon next to the layer; if it’s locked, click to unlock it.
- Try clicking directly on the text box and pressing the Delete key again.
If it still doesn’t work, refresh the editor or restart your browser—sometimes, a quick refresh solves temporary glitches.
Problem 2: Text is Deleted but Reappears After Saving
This usually happens if you accidentally duplicated the text layer or if there’s an auto-save feature restoring previous versions. To prevent this:
- Check the layers panel to ensure you’ve only deleted the intended text layer.
- After deleting, double-check your design before saving or exporting.
- If the text reappears, try clearing your cache or working in incognito mode to avoid conflicting autosave states.
Problem 3: Changes Not Visible
Sometimes, after deleting text, the changes don’t seem to update immediately. This can be due to browser rendering issues or slow internet connection. To troubleshoot:
- Refresh the page and wait a few seconds.
- Clear your browser cache and cookies.
- Ensure your browser is up to date and consider switching to a different browser if problems persist.
General Tips:
- Save frequently to avoid losing your work.
- Use the undo button (Ctrl + Z / Cmd + Z) if you accidentally delete too much.
- Familiarize yourself with the layers panel—knowing which layer contains your text helps prevent accidental deletions.
Most issues are straightforward to fix with these tips. If problems persist, don’t hesitate to reach out to Shutterstock’s support—they’re usually quick to help you get back on track!
Additional Editing Features to Enhance Your Design
Deleting text is just one piece of the puzzle. To really elevate your Shutterstock designs, explore the other editing features available. These tools can help you customize and refine your project, making it stand out with a polished look.
1. Adding and Adjusting Images
Besides text, Shutterstock Editor offers a vast library of images, icons, and illustrations. You can easily add new visuals to your design and adjust their size, position, or transparency. Use the drag-and-drop feature for quick placement, and utilize the editing options to tweak brightness, contrast, or apply filters.
2. Using Layers for Better Control
Layers are your best friends when it comes to complex designs. You can group elements, lock layers to prevent accidental edits, or rearrange their order for visual hierarchy. This makes editing much smoother, especially when working with multiple objects.
3. Applying Filters and Effects
Want to add some flair? Shutterstock Editor includes a variety of filters and effects, such as shadows, glows, and blurs. Applying these can make your text or images pop and give your design a professional touch.
4. Customizing Fonts and Colors
Typography plays a crucial role in design. You can choose from a wide range of fonts, adjust size, letter spacing, and line height. Pair this with a carefully selected color palette to match your brand or style. Use the color picker to pick custom shades or input HEX codes for precision.
5. Cropping and Resizing
Need your design to fit specific dimensions? Use the crop and resize tools to perfect your layout. This is especially helpful if you’re preparing graphics for social media, print, or web use.
6. Saving Templates for Future Use
If you often create similar designs, save your work as a template. This allows you to start from a pre-designed layout, saving time and ensuring consistency across projects.
With these additional features, you can transform a simple design into a professional masterpiece. Experiment with different tools, and don’t be afraid to explore new creative avenues. The more you play around with Shutterstock Editor’s features, the better your designs will become!
Conclusion and Final Tips for Effective Text Management
Mastering text deletion in Shutterstock Editor is essential for creating clean and professional designs. Remember, the key to effective text management lies in precision and clarity. By utilizing the selection tools to accurately target unwanted text, you can ensure your design remains polished and cohesive. Always preview your edits to confirm that only the intended elements are removed. Additionally, leveraging features like layers and undo options can save time and prevent mistakes.
Here are some final tips to enhance your text management skills:
- Use Shortcuts: Familiarize yourself with keyboard shortcuts for quick deletions (e.g., Delete or Backspace).
- Organize Layers: Keep your text and graphic layers well-organized to streamline editing.
- Zoom In: Zoom in for more precise selection and deletion of text elements.
- Group Elements: Group related components to manage them collectively and avoid accidental deletions.
- Save Versions: Save different versions of your design at various stages to easily revert if needed.
| Tip | Benefit |
|---|---|
| Using Shortcuts | Speeds up your editing process |
| Organizing Layers | Reduces errors and simplifies modifications |
| Zooming In | Improves accuracy in editing small or detailed text |
By applying these strategies and tips, you can efficiently manage text in Shutterstock Editor, achieving crisp, professional results in your designs.