Thinking about turning your photography into a steady income stream? Shutterstock is one of the most popular platforms for photographers and artists to showcase their work and earn money through sales. But before you start earning, you need to understand how the upload process works. It’s pretty straightforward, but a few tips can make it smoother and help your images sell faster. In this guide, we’ll walk you through the steps of uploading your images and what you should do to prepare them for success. Ready to get your images in front of millions of potential buyers? Let’s dive in!
Preparing Your Images for Upload and Sale
Before you hit that upload button, it’s essential to make sure your images are in top shape. High-quality, well-prepared photos not only stand out but also increase your chances of making sales. Here are some key points to focus on:
- Resolution and Size: Shutterstock recommends images to be at least 4 megapixels, but higher resolutions are better. Aim for a minimum of 8 megapixels (e.g., 3840×2160 pixels). Larger images look more professional and give buyers more flexibility.
- File Format: Upload in JPEG format with the sRGB color profile. JPEGs are the standard for Shutterstock, and sRGB ensures your colors look consistent across devices.
- Image Quality: Make sure your images are sharp, well-exposed, and free of noise or artifacts. Use editing software to enhance contrast, color balance, and clarity if needed.
- Metadata and Keywords: Add descriptive titles, captions, and relevant keywords. Think about what buyers might search for—be specific and accurate. Proper metadata helps your images get discovered faster.
- Copyright and Releases: Ensure you own the rights to the images or have the necessary model and property releases. Shutterstock is strict about licensing, so missing releases can lead to rejection.
Additionally, consider the following tips:
| Tip | Description |
|---|---|
| Consistent Style | Maintain a consistent theme or style across your portfolio to attract niche buyers. |
| Originality | Create unique images that aren’t widely available elsewhere to stand out in search results. |
| Legal Compliance | Make sure your images comply with Shutterstock’s content guidelines to avoid rejection. |
By taking these steps to prepare your images, you’re setting yourself up for a smoother upload process and a higher chance of making fast, successful sales on Shutterstock. Remember, quality and relevance are key—so invest time in perfecting your images before submitting them. Happy shooting and uploading!
Step-by-Step Instructions for Uploading Images on Shutterstock
Getting your images onto Shutterstock might feel a bit overwhelming at first, but once you get the hang of the process, it’s pretty straightforward. Let’s walk through the steps together so you can start uploading your stunning photos in no time!
Step 1: Create a Contributor Account
If you haven’t already, head over to Shutterstock’s contributor portal and sign up. You’ll need to provide some basic info like your name, email, and a password. Once you verify your email, you’re ready to go!
Step 2: Review the Contributor Guidelines
Before uploading, spend a few minutes reading Shutterstock’s content guidelines. This helps ensure your images meet the quality and subject requirements, reducing the chance of rejection.
Step 3: Prepare Your Images
- Make sure your images are high resolution (at least 4 MP recommended).
- Save your files in JPEG format with sRGB color profile.
- Avoid watermarks or logos.
- Check for proper exposure, sharpness, and minimal noise.
Step 4: Log In and Start Uploading
Once logged into your contributor dashboard, click the “Upload” button. You can drag and drop your images or browse your folders to select files.
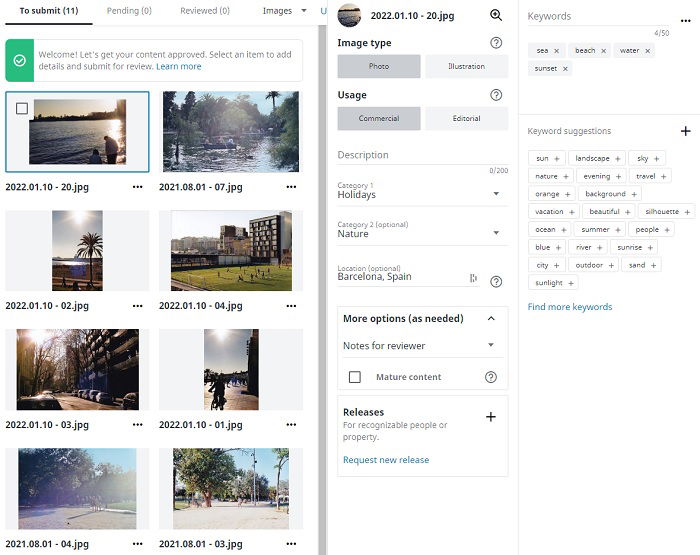
Step 5: Add Titles, Descriptions, and Keywords
Fill out the metadata fields carefully:
- Title: Clear and descriptive, summarizing the image.
- Description: Provide context and details about the photo.
- Keywords: Use relevant tags to help buyers find your image. Think about what words someone might search for.
Step 6: Select the Appropriate Category
Choose the category that best fits your image to improve discoverability. Shutterstock offers a list of categories to help you categorize efficiently.
Step 7: Submit for Review
Once all details are filled in, review your uploads, then click “Submit for Review”. Shutterstock’s review team will evaluate your images — this can take anywhere from a few hours to several days.
And that’s it! After approval, your images go live, and you’re ready to start earning. Remember, the key is consistency—upload regularly and keep refining your portfolio.
Tips for Optimizing Your Images for Better Visibility and Sales
Great images are just the start. To really boost your sales on Shutterstock, you need to make sure your images are optimized for search and appeal. Here are some friendly tips to help you get noticed and sell more:
1. Use Effective Keywords
Keywords are your biggest tool for visibility. Think about what buyers might search for and include a mix of:
- Specific terms — e.g., “mountain sunrise”
- General descriptors — e.g., “nature,” “outdoor,” “scenery”
- Related concepts — e.g., “adventure,” “travel,” “exploration”
Don’t overstuff with irrelevant keywords. Keep them relevant, accurate, and varied.
2. Craft Clear and Descriptive Titles and Descriptions
Your title and description should complement your keywords. Write naturally and informatively—imagine explaining your image to someone who’s never seen it. This helps search algorithms understand your content better.
3. Focus on High-Quality, Unique Images
Stock buyers want fresh, high-quality visuals. Avoid overly generic or overused images. Instead, focus on unique angles, compelling compositions, and high resolution to stand out.
4. Categorize Correctly
Select the most relevant category for each image. Proper categorization improves search accuracy, helping potential buyers find your photos more easily.
5. Keep Updating Your Portfolio
Regular uploads keep your profile active and increase your chances of being featured or appearing in search results. Plus, it’s a good way to learn what sells best!
6. Pay Attention to Trends
Stay current with popular themes—think environmental topics, technology, or modern lifestyles. Incorporate trending subjects into your images to boost their appeal.
7. Monitor Your Performance
Use Shutterstock’s analytics tools to see which images perform well. Focus on creating similar content and optimizing those successful images further.
In the end, success on Shutterstock isn’t just about uploading pretty pictures. It’s about smartly presenting your work so it’s easy for buyers to find and love. Keep honing your skills, stay consistent, and don’t be afraid to experiment with different styles and subjects. Happy uploading!
Common Mistakes to Avoid When Uploading Images
Uploading images to Shutterstock can be a great way to earn passive income, but it’s important to get it right the first time. Many new contributors stumble because they overlook some common pitfalls. Let’s go over a few mistakes you definitely want to avoid so your images have the best chance of being accepted and selling quickly.
Not Reading Shutterstock’s Guidelines Carefully
Every platform has its own rules, and Shutterstock is no exception. Skipping the guidelines can lead to rejected images or even account suspension. Take the time to review their content standards, technical requirements, and model/release policies. Following these rules from the start saves you frustration and helps your images get approved faster.
Uploading Low-Quality or Unfocused Images
Shutterstock is a professional marketplace, so quality matters. Avoid submitting images that are blurry, pixelated, or poorly lit. Always check that your photos are in focus and properly exposed. Remember, high-resolution images with clean compositions tend to perform better and are more likely to be purchased.
Ignoring Metadata and Descriptions
Metadata is key for discoverability. Don’t leave your titles, descriptions, and keywords blank or generic. Use accurate, descriptive, and relevant keywords that reflect the content of your image. This helps buyers find your work when they search for specific topics or themes.
Uploading Duplicate or Similar Images
While having a portfolio of related images is good, avoid uploading multiple nearly identical photos. Instead, aim for a variety of angles, compositions, and concepts. This not only keeps your portfolio diverse but also prevents potential rejection for duplicate content.
Overloading Your Uploads with Irrelevant Content
Focus on quality and relevance. Upload images that are marketable and in demand. Avoid cluttering your portfolio with images that don’t fit Shutterstock’s themes or aren’t suitable for commercial use. This keeps your portfolio professional and appealing to buyers.
Understanding Shutterstock’s Review and Approval Process
Once you upload your images, they don’t automatically go live. Shutterstock has a review process to ensure each image meets their standards. Understanding how this process works can help you manage expectations and improve your submission quality.
Initial Review
After upload, your images enter a review queue. Shutterstock reviewers check for technical quality, compliance with guidelines, and originality. This process typically takes a few days, but it can be longer during busy periods.
What Are Reviewers Looking For?
- Technical Quality: Sharp focus, proper exposure, color accuracy, and high resolution.
- Content Compliance: No prohibited content, trademarks, or identifiable minors without release.
- Marketability: Images should be relevant and appealing to buyers.
- Metadata Accuracy: Correct titles, descriptions, and keywords.
Possible Outcomes
After review, your image can be:
- Approved: Ready to be downloaded and earn royalties.
- Rejected: Due to quality issues, guideline violations, or other reasons. Shutterstock usually provides feedback on why it was rejected, so review their comments carefully and resubmit if appropriate.
- Flagged for Additional Review: Sometimes, images with sensitive or controversial content may be reviewed more thoroughly.
Tips to Speed Up the Review Process
- Upload high-quality images that meet all technical specs.
- Ensure your metadata is accurate and keyword-rich.
- Review Shutterstock’s guidelines before uploading.
- Limit the number of similar images in one batch to avoid delays.
Understanding this process helps you stay patient and prepared. Remember, even if your images are rejected, it’s a learning opportunity. Use the feedback to improve your future uploads and increase your chances of success on Shutterstock!
Maximizing Your Earnings with Effective Image Upload Strategies
Now that you’ve got your images uploaded to Shutterstock, the next step is making sure they earn you as much as possible. It’s not just about uploading a bunch of pictures and hoping for the best—there are smart strategies you can use to boost your sales and maximize your earnings.
Consistency is Key: Regularly uploading new images keeps your portfolio fresh and appealing. Shutterstock favors active contributors, so aim to upload consistently—whether that’s weekly or bi-weekly. This keeps your profile lively and shows Shutterstock that you’re serious about contributing quality content.
Focus on Trends and Demand: Keep an eye on current trends in stock photography. For example, if minimalist designs or remote work themes are popular, create images that fit these niches. Use Shutterstock’s trending searches and categories to guide your uploads. The more relevant your images are to what buyers are actively searching for, the higher your chances of making sales.
Optimize Your Image Metadata: Fill out your image titles, descriptions, and keywords thoughtfully. Use relevant, specific keywords that accurately describe your images. Think about what buyers might search for—be detailed but natural. Proper metadata helps your images surface in search results, increasing visibility and sales.
| Tip | Why It Matters |
|---|---|
| Upload at high resolution | Ensures your images look professional and are suitable for various uses, increasing their appeal. |
| Use diverse subjects and styles | Appeals to a broader audience and captures more search queries. |
| Submit images in batches | Efficient workflow and consistent content flow keep your portfolio active. |
| Monitor your sales and analytics | Identify which images perform best and tailor future uploads accordingly. |
Leverage Collections and Curations: Group your images into themed collections or mood boards. This not only helps organize your portfolio but also makes it easier for buyers to find multiple related images. Well-curated collections can boost your overall visibility and sales potential.
Remember, patience is essential. Building a successful Shutterstock portfolio takes time, but with strategic uploads and active engagement, you’ll see your earnings grow. Keep learning from your sales data, stay updated on market trends, and continue refining your approach for maximum results.
Conclusion and Resources for Shutterstock Contributors
Congratulations! You now have a solid understanding of how to upload images effectively on Shutterstock and how to implement strategies to maximize your earnings. Remember, the key is consistency, quality, and staying attuned to market demands. As you gain experience, you’ll discover what types of images resonate most with buyers and how to optimize your submissions for better visibility and sales.
Becoming a successful Shutterstock contributor is a journey, but with dedication and smart strategies, it can become a rewarding source of income. Keep experimenting, learning from your analytics, and refining your portfolio.
Here are some helpful resources to support your journey:
- Shutterstock Contributor Portal – Your main hub for uploading, managing, and tracking your images.
- Shutterstock Blog – Tips, trends, and updates directly from Shutterstock.
- Shutterstock Contributor Academy – Free courses and tutorials to improve your photography and submission skills.
- Trending Searches and Topics – Stay updated on what buyers are looking for.
- Communities and forums – Connect with fellow contributors to share tips and experiences.
Thanks for reading, and happy uploading! With persistence and creativity, you’ll be well on your way to boosting your Shutterstock earnings and building a thriving portfolio.