When you’re managing a website, the footer plays a crucial role in your overall design and functionality. It’s the section where visitors often look for important information like contact details, social media links, and copyright notices. Fortunately, editing the footer in your WordPress theme doesn’t have to be a daunting task. In this guide, we’ll take you step-by-step through the process, ensuring you have all the tools necessary to make your footer work harder for you. Let’s dive in!
Understanding Your WordPress Theme Structure
Before you can effectively edit your footer, it’s essential to grasp the structure of your WordPress theme. Here’s a breakdown of the key components:
- Header: This is the top section of your site, usually containing the site’s title and navigation menu.
- Body: The main content area where your posts, pages, or portfolio items are displayed.
- Footer: Located at the bottom, this area generally includes relevant links, copyright information, and additional site functionalities.
Most WordPress themes utilize a few core files responsible for these sections. Here’s a quick overview:
| File Name | Purpose |
|---|---|
| footer.php | This file contains the HTML code for your footer and is usually where you’ll make changes. |
| functions.php | You might need to add custom functions or styles that affect your footer. |
| style.css | This file controls the styling of your theme, including the look of your footer. |
Understanding these components will empower you to make precise edits to your footer, tailoring it to fit your specific needs and preferences. Ready to explore how to customize it? Let’s go!
Accessing the Footer Section of Your Theme
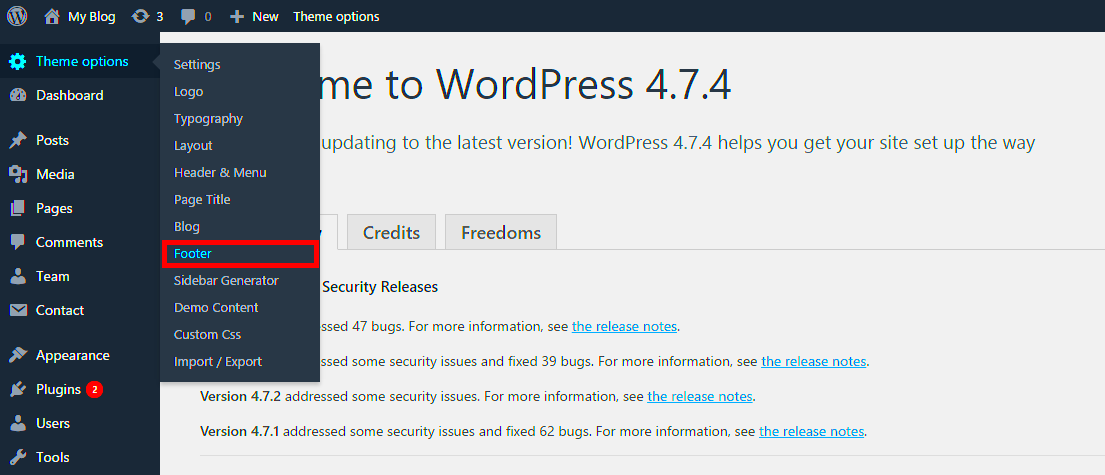
Editing the footer in your WordPress theme is a straightforward process, but it can differ slightly depending on the theme you are using. The footer is typically the area located at the bottom of your web pages, and it often contains important information like copyright details, links to privacy policies, and sometimes even additional navigation items.
To access the footer section, you’ll generally follow these steps:
- Log into your WordPress Dashboard: Start by signing into your WordPress account. This will take you to the backend of your site where all the magic happens.
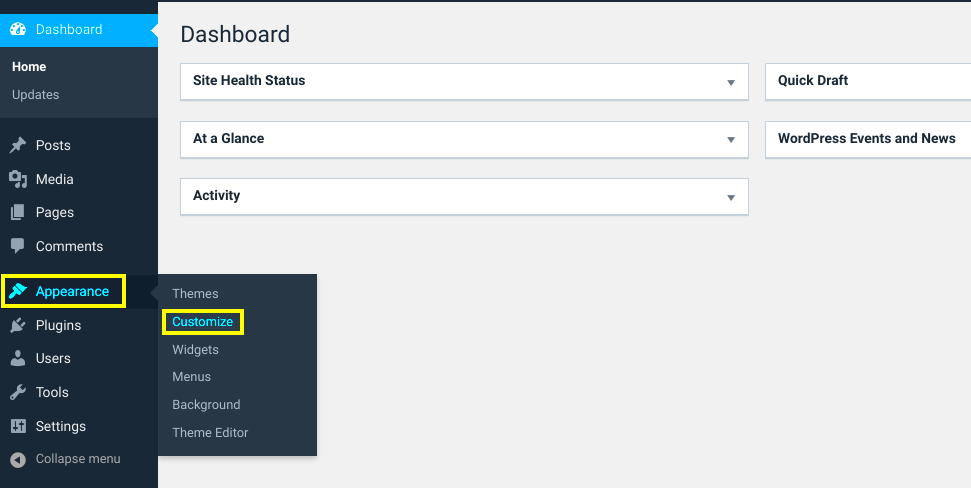
- Navigate to Appearance: On the left sidebar, you’ll see a menu item labeled “Appearance.” Click on it to reveal a dropdown menu.
- Select Widgets or Customize: Depending on your theme, you may have the option to edit the footer through “Widgets” or “Customize.” If your theme supports footer widgets, you’ll be able to drag and drop different elements here. If not, you may need to dive into the Customizer option.
- Locate the Footer Settings: Once you’re in the Widgets or Customizer section, look for a widget area designated for the footer. It’s often labeled as “Footer,” “Footer Area,” or something similar. Click on it to see available options.
And that’s it! The footer section will often provide you with predefined widgets, or you may even have the option to add custom HTML or text. Just remember to save any changes you make to ensure they appear on your live site.
Using the WordPress Customizer
The WordPress Customizer is a powerful tool that allows you to modify various aspects of your site in real time, including the footer. It gives you a visual preview of the changes you make, which is incredibly handy for ensuring your footer looks just right.
Here’s a quick guide on how to use the Customizer for editing your footer:
- Open the Customizer: From your WordPress dashboard, go to “Appearance” and then click on “Customize.” This will launch the WordPress Customizer.
- Find Footer Options: Within the Customizer, look for options that say “Footer,” “Footer Widgets,” or similar wording. Depending on your theme, footer settings may be nested in other sections like “Layout” or “Widgets.”
- Edit Content: Once you locate the footer area, you can make changes such as adding text, inserting social media links, or including copyright information. Depending on your theme, you may also have customizable options for color and font.
- Preview and Publish: As you make changes in the Customizer, a live preview will show up on the right side of the screen. Once you’re satisfied with how everything looks, click the “Publish” button to save your changes.
Using the Customizer not only makes the editing process intuitive but also allows you to see your changes live, ensuring that your footer is just the way you want it!
5. Editing Footer Widgets
Editing footer widgets in your WordPress theme can give your website a personalized touch and help present important information to your visitors. Widgets are versatile content blocks that you can place in various areas of your site, including the footer. To get started, follow these simple steps:
- Log In to Your WordPress Dashboard: Begin by logging into your WordPress admin area by entering your credentials.
- Navigate to Appearance: Once you’re in, go to the sidebar menu and click on Appearance, then select Widgets. This will bring you to a page where you can see all the widget areas available.
- Select Footer Widgets: Look for the section labeled “Footer” or “Footer Widgets.” Depending on your theme, you might have multiple footer areas to choose from. Click on the area you’d like to edit.
- Add or Modify Widgets: To add a new widget, simply drag and drop your desired widget from the left side into the footer area. If you want to edit an existing widget, click on it, and make any necessary adjustments.
- Customize Your Widgets: Many widgets offer customization options. For example, if you add a text widget, you can enter HTML or formatted text, images, or links.
- Save Your Changes: Make sure to click the “Save” button after adding or modifying any widgets. This action ensures that your changes are reflected on the live site.
Whether you choose to display social media links, recent posts, or custom HTML, editing footer widgets can enhance the user experience by providing key information right where visitors expect to find it.
6. Modifying Footer Text and Links
Your footer isn’t just a bottom section of your website; it’s an essential area that can communicate your brand’s identity, build trust, and provide crucial information. Modifying the footer text and links can be straightforward. Here’s how you can do it:
- Access the Theme Customizer: Navigate to Appearance in your WordPress dashboard and click on Customize. This takes you to the WordPress Theme Customizer.
- Locate Footer Settings: Within the customizer, look for the section labeled Footer. Not all themes have this, but many modern ones do. Click on it to expand the footer options.
- Edit Footer Text: You should see a field where you can modify the footer text. Feel free to update the text to something that aligns with your brand, such as a slogan or copyright statement.
- Modify Links: If your footer includes links (like to your privacy policy or terms of service), you can often modify these within the same section. Ensure that the links are functional and direct visitors to the right pages.
- Preview Your Changes: WordPress allows you to preview changes live. Take a moment to review how the new footer text and links will look on your site.
- Publish Your Edits: Satisfied with the changes? Click the “Publish” button, and your new footer text and links will go live immediately.
Remember, the footer of your website can say a lot about you! Make it count with clear, concise text and relevant links that direct your visitors where they need to go.
7. Adding Custom Code to the Footer
Customizing your WordPress footer can go beyond simple text adjustments; sometimes, you may want to inject unique code that enhances functionality or aesthetics. Adding custom code allows you to integrate tracking scripts, promotional banners, social media links, and more, all tailored to your website’s needs.
Here’s how you can add custom code to your footer:
- Using Theme Customizer: Some WordPress themes allow you to add custom scripts directly through the Theme Customizer. Navigate to Appearance > Customize, and look for a section that says “Extra Scripts” or “Footer Scripts.” Here, you can paste your code, and it should function as intended on every page of your site.
- Editing the Footer.php File: If you’re comfortable with some coding, you can edit the footer.php file of your theme. Go to Appearance > Theme Editor, and find the footer.php file in the right sidebar. Be cautious here; a small mistake can cause layout issues. Always create a backup before making changes. Insert your custom code before the closing footer tag.
For those who prefer a less hands-on approach, consider using a plugin like “Insert Headers and Footers.” This plugin provides a user-friendly interface to add code snippets without messing with PHP files.
Regardless of the method you choose, adding code to your footer can significantly enhance your site’s capabilities. Just make sure your code is clean, relevant, and doesn’t overload your website with unnecessary scripts.
8. Best Practices for Footer Design
The footer of your website may be at the bottom of the page, but it’s anything but inconsequential. A well-designed footer can improve user experience, enhance navigation, and boost your site’s overall professionalism. Here are several best practices for footer design you should always consider:
- Keep It Simple: Don’t clutter your footer with excessive information. A clean, well-organized layout works best. Use a maximum of three columns to divide content logically.
- Include Essential Links: Make sure to add links to important pages such as About Us, Privacy Policy, and Contact. This adds value for visitors who may scroll down looking for crucial information.
- Social Media Icons: Integrate recognizable social media icons to encourage visitors to follow your accounts. This not only fosters community engagement but also increases brand visibility.
- Branding Elements: Include your logo or a tagline to reinforce brand identity. This creates a cohesive look across your website.
- Responsive Design: Ensure your footer looks great on all devices, from desktops to smartphones. Test how it displays on various screen sizes and make adjustments as needed.
Lastly, don’t forget to review and update your footer regularly. As your website evolves, your footer should also reflect those changes. Following these best practices will not only enhance the look of your site but also create a better experience for your users.
9. Common Issues and Troubleshooting
Editing the footer in WordPress can be a straightforward task, but sometimes, issues may arise that can make it a bit tricky. Here are a few common problems you might encounter along with troubleshooting tips to help you navigate through them:
- Footer Changes Not Reflecting: If you’ve made changes but don’t see them on your site, you may need to clear your cache. Both browser and website caches can sometimes prevent immediate updates from being visible.
- Theme Incompatibility: Not all themes allow for easy footer customization. If you’re using a theme that doesn’t offer footer options in the Customizer or widgets, you might be limited in what you can do. Consider switching to a more flexible theme or using a plugin for footer management.
- Loss of Formatting: After editing your footer, you might notice that the styling isn’t what you expected. This can be due to CSS conflicts. Using a simple CSS plugin, you can override default styles. Inspect your footer with the browser’s developer tools to narrow down the issue.
- Widgets Not Displaying: If you’ve added widgets to your footer but they’re not appearing, ensure that you’ve placed them in the right footer widget area. Additionally, verify your theme supports widgets in that specific location.
By being aware of these potential issues and having solutions at your fingertips, you’ll find editing your WordPress footer to be a much smoother experience. Keep these tips handy as you tweak those footer designs!
10. Conclusion: Enhancing Your WordPress Footer
In conclusion, the footer of your WordPress site is much more than just the ending of a webpage; it’s an invaluable part of your site’s real estate! Enhancing your footer can significantly impact user experience and branding. Here’s why it’s worth the effort:
- Improved Navigation: Including essential links in your footer can enhance site navigation, making it easier for visitors to find what they need.
- SEO Benefits: A well-structured footer can positively impact search engine optimization by linking to key pages and boosting their visibility.
- Increased Engagement: Footers can serve to engage users through social media icons, newsletter sign-up forms, and relevant call-to-action buttons, guiding them to take the desired actions.
- Brand Reinforcement: By adding key branding elements, such as logos and slogans, your footer can strengthen your brand identity and leave a lasting impression.
In a nutshell, don’t overlook the potential of your WordPress footer! With a bit of creativity and strategic thinking, you can transform it from a mundane space into a dynamic part of your website that enhances user experience and elevates your brand. Happy editing!

